Volvo S60: Introduction
 Volvo S60: Introduction
All bulb specifications are listed on page 311. The following bulbs should only be replaced by a trained and qualified Volvo service technician:
- Dome lighting
- Reading lights
- Glove compartment lighting
- Footwell lighting
- Turn signals in the door mirrors
- Approach lighting in the door mirrors
- Active Bending Lights and LED bulbs
See page 311 for a list of bulb specifications.
![]() NOTE
NOTE
For information regarding any other bulbs not mentioned in this section, please contact your Volvo retailer or a trained and authorized Volvo service technician.
![]() WARNING
WARNING
- The engine should not be running when changing bulbs.
- If the engine has been running just prior to replacing bulbs in the headlight housing, please keep in mind that components in the engine compartment will be hot.
![]() WARNING
WARNING
- Active Bending Lights* – due to the high voltage used by these headlights, these bulbs should only be replaced by a trained and qualified Volvo service technician.
- Turn off the lights and remove the remote key from the ignition before changing any bulbs.
- Headlight housing
- Removing the cover to access the bulbs
- Low beam, Halogen
- High beam, Halogen
- Extra high beam
- Turn signals
- Taillight housing
- Location of taillight bulbs
- License plate lighting
- Trunk lighting
- Vanity mirror lighting
- Bulb specifications
Headlight housing
The entire headlight housing must be lifted out when replacing all front bulbs.
CAUTION
Never touch the glass of bulbs with your fingers. Grease and oils from your fingers vaporize in the heat and will leave a deposit on the reflector, which will damage it.
![]() NOTE
NOTE
- Always switch off the ignition before starting to replace a bulb.
- The optional Active Bending Light bulbs contain trace amounts of mercury. These bulbs should always be disposed of by a trained and qualified Volvo service technician.
Removing the headlight housing
1. Switch off the ignition by briefly pressing the START/STOP ENGINE button.
2. Remove the remote key from the ignition slot.
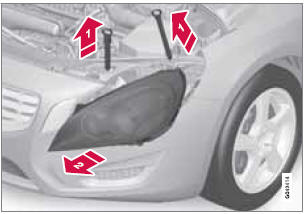
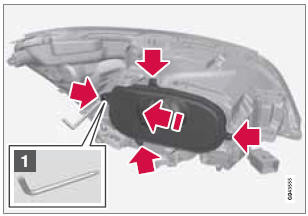
3. (Upper illustration under "Headlight housing")
1 - Withdraw the headlight housing's locking pins.
2 - Remove the headlight housing by alternatively pulling the front and rear edges until it can be lifted out.
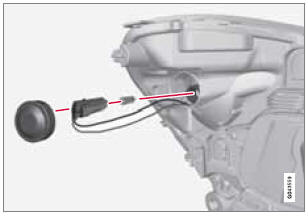
CAUTION
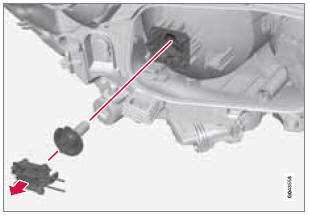
When disconnecting the connector, pull on the connector itself and not on the wiring.
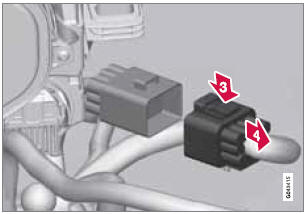
4. (Lower illustration under "Headlight housing")
3 - Unplug the wiring connector by holding down the clip with your thumb.
4 - Pull out the connector with the other hand.
5. Lift out the housing and place it on a soft surface to avoid scratching the lens.
6. Replace the defective bulb(s).
Reinserting the headlight housing
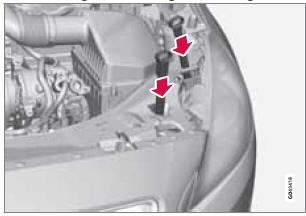
1. Plug in the connector until it clicks into place.
2. Reinstall the headlight housing and locking pins. The short locking pin should be closest to the grille. Check that they are correctly inserted. The headlight housing must be properly inserted and secured in place before the lighting is switched on or the remote key is inserted into the ignition slot.
3. Check that the lights function properly.
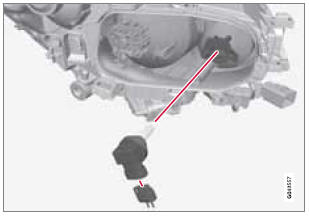
Removing the cover to access the bulbs
![]() NOTE
NOTE
Before starting to replace a bulb, see page 306.
1. Loosen the cover's four retaining screws with the tool (1) provided in the vehicle's tool kit (see page 290). The screws should not be removed completely.
CAUTION
Use the tool from the vehicle's tool kit to loosen the screws. A screwdriver or other sharp object could scratch the headlight.
2. Push the cover to the side.
Reinstall the cover in the reverse order.
Low beam, Halogen
1. Remove the headlight housing from the vehicle (see page 306).
2. Remove the cover over the bulbs (see page 308).
3. Unplug the connector from the bulb.
4. Remove the bulb by pulling it straight out.
5. The guide lug on the new bulb should be straight up when the bulb is inserted into the holder and the bulb should snap into place.
6. Put the cover back into position and reinstall the headlight housing.
High beam, Halogen
1. Remove the headlight housing from the vehicle (see page 306).
2. Remove the cover over the bulbs (see page 308).
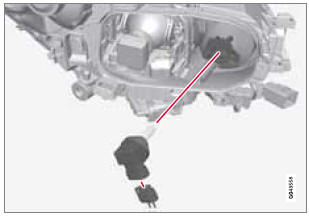
3. Remove the bulb by turning it counterclockwise and pulling it straight out.
4. Remove the connector from the bulb.
5. Press the new bulb into the socket and turn it clockwise to put it in place. It can only be secured in one position.
6. Reinsert the bulb holder into the headlight housing.
7. Put the cover back into position and reinstall the headlight housing.
Extra high beam
1. Remove the headlight housing from the vehicle (see page 306).
2. Remove the cover over the bulbs (see page 308).
3. Remove the bulb by turning it counterclockwise and pulling it straight out.
4. Remove the connector from the bulb.
5. Press the new bulb into the socket and turn it clockwise to put it in place. It can only be secured in one position.
6. Put the cover back into position and reinstall the headlight housing.
Turn signals
1. Remove the headlight housing from the vehicle (see page 306).
2. Remove the cover by pulling it straight out.
3. Pull the holder to access the bulb.
4. Press in the bulb and turn it to remove it from the holder.
5. Press and turn the new bulb into place.
6. Reinsert the bulb holder into the headlight housing.
7. Put the cover back into position and reinstall the headlight housing.
Taillight housing
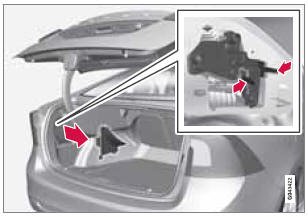
The bulbs in the taillight cluster are replaced from inside the trunk (not the LED functions).
![]() NOTE
NOTE
Before starting to replace a bulb, see page 306.
1. Remove the covers in the left/right panel to access the bulb holder.
2. Press the catches together and pull out the bulb holder.
3. Remove the defective bulb by pressing it in slightly and it turning counterclockwise before pulling it out.
4. Insert a new bulb, press it in slightly and turn it clockwise.
5. Press the bulb holder until it clicks into place and reinstall the cover.
Location of taillight bulbs
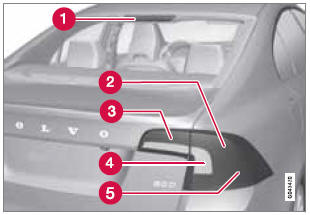
- Brake lights (LEDs)
- Brake light
- Backup light
- Turn signals
- Rear fog light (driver’s side only)
![]() NOTE
NOTE
If an error message remains in the display after a faulty bulb has been replaced, contact an authorized Volvo workshop.
Backup lights
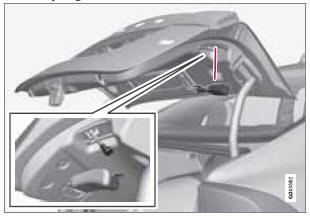
1. Open the panel on the inside of the trunk lid.
2. Remove the bulb holder by turning it counterclockwise.
3. Remove the defective bulb by pressing it in slightly and turning it counterclockwise before pulling it out.
4. Insert a new bulb, press it in slightly and turn it clockwise.
5. Put the bulb holder in place and turn it clockwise.
License plate lighting
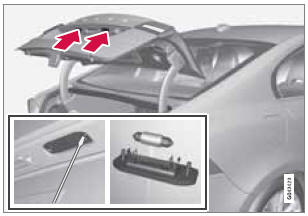
1. Remove the screws with a screwdriver.
2. Carefully detach the entire bulb housing and pull it out.
3. Replace the bulb.
4. Reinsert the entire bulb housing and tighten the screws.
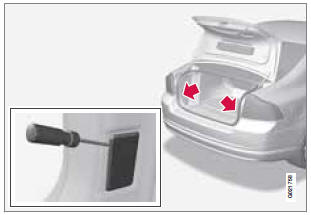
Trunk lighting
![]() NOTE
NOTE
Before starting to replace a bulb, see page 306.
The trunk lighting is located on opposite sides of the trunk.
1. Insert a screwdriver and gently turn so that the bulb housing comes loose.
2. Replace the bulb.
3. Check that the bulb illuminates and press it back into the bulb housing.
Vanity mirror lighting
Removing the mirror glass
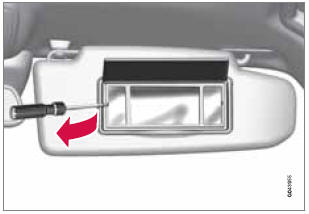
1. Insert a screwdriver underneath the lower edge, in the center, turn and carefully pry up the lug on the edge.
2. Carefully detach and lift out the entire mirror glass.
3. Replace the bulb.
Reinstalling the mirror glass
1. Press the three lugs at top edge of the mirror glass back into position.
2. Press the three lower lugs back into position.
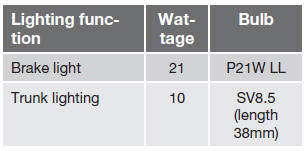
Bulb specifications

![]() NOTE
NOTE
Please consult a Volvo retailer’s Parts department for the most up-to-date specifications.


