Buick LaCrosse: Information Displays
 Buick LaCrosse: Information Displays
Driver Information Center (DIC)
The Driver Information Center (DIC) displays information about the vehicle. It also displays warning messages if a system problem is detected. See Vehicle Messages for more information. All messages appear in the DIC display located in the center of the instrument panel cluster.
On some models, the DIC may show warning lights or indicators in the top portion of the display. See Warning Lights, Gauges, and Indicators for more information.
The vehicle may also have features that can be customized through the controls on the radio. See Vehicle Personalization for more information.
DIC Operation and Displays
The DIC has different displays which can be accessed by using the DIC buttons on the turn signal lever to the left of the steering wheel. The DIC displays trip, fuel, vehicle system information, and warning messages if a system problem is detected.
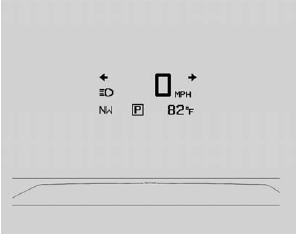
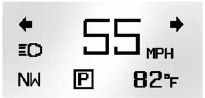
The bottom of the DIC display shows what position the shift lever is in, the odometer, and the direction the vehicle is driving.
In cold weather the DIC display may change slowly. This is normal and will move more quickly as the vehicle's interior temperature rises.
DIC Buttons
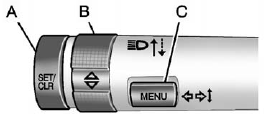
A. SET/CLR: Press to set or clear the menu item when it is displayed.
B.  (Thumbwheel): Use to
scroll through the items in each
menu. A small marker will move
across the bottom of the page
as you scroll through the items.
(Thumbwheel): Use to
scroll through the items in each
menu. A small marker will move
across the bottom of the page
as you scroll through the items.
This shows where each page is in the menu.
C. MENU: Press to get to the Trip/Fuel Menu and the Vehicle Information Menu.
Trip/Fuel Menu Items
Press MENU on the turn signal
lever until Trip/Fuel Information
Menu is displayed. Use to
scroll through the following menu
items:
• Digital Speedometer
• Trip 1
• Trip 2
• Power Flow Gauge (eAssist Only)
• Fuel Range
• Average Fuel Economy/Instantaneous Fuel Economy
• Average Vehicle Speed
• Timer
• Navigation
Digital Speedometer
The speedometer shows how fast the vehicle is moving in either kilometers per hour (km/h) or miles per hour (mph). The speedometer cannot be reset.
Trip 1 and Trip 2
This display shows the current distance traveled, in either kilometers (km) or miles (mi), since the last reset for the trip odometer.
The trip odometer can be reset to zero by pressing SET/CLR while the trip odometer display is showing.
Power Flow Gauge (eAssist Only)
This display shows the operating mode of the eAssist system and the high voltage battery charge level.
The animation indicates the direction of energy flow.
Fuel Range
This display shows the approximate distance the vehicle can be driven without refueling. The fuel range estimate is based on an average of the vehicle's fuel economy over recent driving history and the amount of fuel remaining in the fuel tank. Fuel range cannot be reset.
Average Fuel Economy/Instantaneous Fuel Economy
On some models, this display shows Average Fuel Economy. On other models, this display shows both Average Fuel Economy and Instantaneous Fuel Economy.
The Average Fuel Economy display shows the approximate average liters per 100 kilometers (L/100 km) or miles per gallon (mpg). This number is calculated based on the number of L/100 km (mpg) recorded since the last time this menu item was reset. The fuel economy can be reset by pressing SET/CLR while the Average Fuel Economy display is showing.
The Instantaneous Fuel Economy display shows the current fuel economy in liters per 100 kilometers (L/100 km) or miles per gallon (mpg). This number reflects only the fuel economy that the vehicle has right now and changes frequently as driving conditions change. Unlike average economy, this display cannot be reset.
Average Vehicle Speed
This display shows the average speed of the vehicle in miles per hour (mph) or kilometers per hour (km/h). This average is calculated based on the various vehicle speeds recorded since the last reset of this value. The average speed can be reset by pressing SET/CLR while the Average Vehicle Speed display is showing.
Timer
This display can be used as a timer.
To start the timer, press SET/CLR while Timer is displayed. The display will show the amount of time that has passed since the timer was last reset, not including time the ignition is off. Time will continue to be counted as long as the ignition is on, even if another display is being shown on the DIC. The timer will record up to 99 hours, 59 minutes, and 59 seconds (99:59:59) after which the display will return to zero.
To stop the timer, press SET/CLR briefly while Timer is displayed. To reset the timer to zero, press and hold SET/CLR.
Navigation
This display is used for the OnStar or Navigation System Turn-by-Turn guidance. See OnStar Overview or the navigation manual, if the vehicle has navigation, for more information.
Vehicle Information Menu Items
Press MENU on the turn signal
lever until Vehicle Information Menu
is displayed. Use  to scroll
through the following menu items:
to scroll
through the following menu items:
• Unit
• Tire Pressure
• Jump Start (eAssist Only)
• Remaining Oil Life
• Battery Voltage
Unit
Move to switch between
metric or US when the Unit display
is active. Press SET/CLR to confirm
the setting. This will change the
displays on the cluster and DIC to
either metric or English (US)
measurements.
Tire Pressure
The display will show a vehicle with the approximate pressures of all four tires. Tire pressure is displayed in either kilopascal (kPa) or pounds per square inch (psi). See Tire Pressure Monitor System and Tire Pressure Monitor Operation for more information.
Jump Start (eAssist Only)
This display allows for on-board jump starting of the vehicle. See “Jump Starting (On-board with eAssist Only)” for more information.
Remaining Oil Life
This display shows an estimate of the oil's remaining useful life.
If REMAINING OIL LIFE 99% is displayed, that means 99% of the current oil life remains.
When the remaining oil life is low, the CHANGE ENGINE OIL SOON message will appear on the display.
See Engine Oil Messages. The oil should be changed as soon as possible. See Engine Oil. In addition to the engine oil life system monitoring the oil life, additional maintenance is recommended in the Maintenance Schedule in this manual. See Maintenance Schedule for more information.
Remember, the Oil Life display must be reset after each oil change. It will not reset itself. Also, be careful not to reset the Oil Life display accidentally at any time other than when the oil has just been changed.
It cannot be reset accurately until the next oil change. To reset the engine oil life system, press SET/CLR while the Oil Life display is active. See Engine Oil Life System.
Battery Voltage
This display, available on some vehicles, shows the current battery voltage. If the voltage is in the normal range, the value will display.
For example, the display may read Battery Voltage 15.0 Volts. The vehicle's charging system regulates voltage based on the state of the battery. The battery voltage can fluctuate while viewing this information on the DIC. This is normal. See Charging System Light for more information.
If there is a problem with the battery charging system, the DIC will display a message.
Compass
The vehicle may have a compass display in the Driver Information Center (DIC). See Compass for more information.
Head-Up Display (HUD)
WARNING!
If the HUD image is too bright or
too high in your field of view, it
may take you more time to see
things you need to see when it is
dark outside. Be sure to keep the
HUD image dim and placed low in
your field of view.
For vehicles with the Head-Up Display (HUD), some information concerning the operation of the vehicle is projected onto the windshield. This includes the speedometer reading, rpm reading, transmission position, outside air temperature, compass heading, and a brief display of the current radio station, including XM information or CD track. It will also display turn-by-turn navigation information if the vehicle has a navigation radio.
The images are projected through the HUD lens located on the driver side of the instrument panel.
Notice:
If you try to use the HUD
image as a parking aid, you may
misjudge the distance and
damage your vehicle. Do not use
the HUD image as a parking aid.
The HUD information can be displayed in one of three languages, English, French, or Spanish. The speedometer reading and other numerical values can be displayed in either English or metric units.
The language selection is changed through the radio and the units of measurement is changed through the trip computer in the Driver Information Center (DIC). See AM-FM Radio (Radio with CD/DVD/MEM) or AM-FM Radio (Radio with CD and Touchscreen) and Driver Information Center (DIC).
HUD Display on the Vehicle Windshield
The HUD information appears as an image focused out toward the front of the vehicle.
When the ignition is placed in the ON/RUN or ON/RUN/START position, HUD will display an introductory message for a short time, until the HUD is ready.
The following indicator lights come
on in the instrument panel when
activated and also appear on
the HUD:
• Turn Signal Indicators
• High-Beam Indicator Symbol
The HUD temporarily displays some vehicle warnings, such as CHECK TIRE PRESSURE and FUEL LEVEL LOW when these messages are on the DIC trip computer.
The HUD also displays the following
messages on vehicles with these
systems, when they are active:
• TRACTION CONTROL ACTIVE
• STABILITRAK ACTIVE
When the HUD is on, the speedometer reading is continually displayed. The current radio station or CD track number will display for a short period of time after the radio or CD track status changes. This happens whenever radio information is changed. The speedometer size is reduced when radio, CD information, warnings, or turn-by-turn navigation information are displayed on the HUD.
To adjust the HUD image so that items are properly displayed, do the following:
1. Adjust the driver seat to a comfortable position.
2. Start the engine.
3. Adjust the HUD controls.
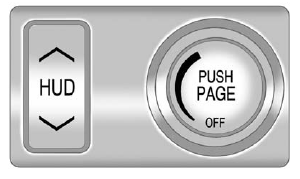
Use the following settings to adjust the HUD.
OFF: To turn HUD off, turn the HUD dimming knob fully counterclockwise until the HUD display turns off.
Brightness: Turn the dimming knob clockwise or counterclockwise to brighten or dim the display.
 (Up) or
 (Down): Press the
up or down arrows to center the
HUD image in your view. The HUD
image can only be adjusted up and
down, not side to side.
(Down): Press the
up or down arrows to center the
HUD image in your view. The HUD
image can only be adjusted up and
down, not side to side.
PAGE: Press to select the display formats. Release the PAGE button when the format number with the desired display is shown on the HUD. If vehicle messages are displayed, pressing PAGE may clear the message.
The three formats are as follows:
English Shown, Metric Similar
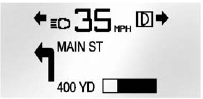
Format One: This display gives the speedometer reading (in English or metric units), turn signal indication, high-beam indication, transmission positions, outside air temperature, and compass heading.
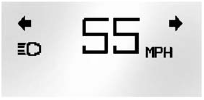
English Shown, Metric Similar
Format Two: This display includes the information in Format One without the transmission information, the outside air temperature, and compass heading.
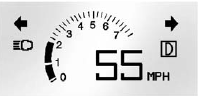
English Shown, Metric Similar
Format Three: This display includes much of the information in Format One along with a circular tachometer, but without outside air temperature and compass heading.
All formats will show the turn-by-turn navigation information and provide details about the next driving maneuver to be made. When you near your next maneuver, the HUD will display a distance bar that will empty the closer you get to your maneuver. All navigation information is provided to the HUD by the navigation radio or OnStar service, for vehicles that have these features.
English Shown, Metric Similar
The HUD image displayed on the windshield will automatically dim and brighten to compensate for outside lighting. However, the HUD brightness control can still be adjusted as needed.
The HUD image can temporarily light up depending on the angle and position of the sunlight on the HUD display. This is normal and will change when the angle of the sunlight on the HUD display changes.
Polarized sunglasses could make the HUD image harder to see.
Care of the HUD
Clean the inside of the windshield as needed to remove any dirt or film that could reduce the sharpness or clarity of the HUD image.
To clean the HUD lens, use a soft, clean cloth that has household glass cleaner sprayed on it. Wipe the HUD lens gently, then dry it. Do not spray cleaner directly on the lens because the cleaner could leak into the unit.
If You Cannot See the HUD Image When the Ignition Is On
• Is anything covering the HUD lens?
• Is the HUD dimmer setting bright enough?
• Is the HUD image adjusted to the proper height?
• Are you wearing polarized sunglasses?
• Still no HUD image? Check the fuse in the instrument panel fuse block. See Instrument Panel Fuse Block.
If the HUD Image Is Not Clear
• Is the HUD image too bright?
• Are the windshield and HUD lens clean?
If the HUD image is not correct, contact your dealer.
Keep in mind that the windshield is part of the HUD system.


