Subaru Legacy: CD player operation
 Subaru Legacy: CD player operation
NOTE
● Make sure to always insert a disc with the label side up. If a disc is inserted
with the label side down, the player displays “CHECK DISC”. Refer to “When the following
messages are displayed” F5-27.
● If a disc is inserted during a radio broadcast, the disc will interrupt the broadcast.
● After the last track finishes, the disc will automatically return to track 1 (the
first track on the disc) and will automatically play back.
● The player is designed to be able to play music CD-Rs and music CD-RWs, but it
may not be able to play certain ones.
● CDs (i.e., 8 cm/3 inch CDs) are not supported, and if inserted, they will be immediately
ejected.
● Copyright protected WMA/AAC files will not be played by the system. The player
will automatically skip to the next file (track).
● Audio data recorded in the MP3/ WMA/AAC formats may not be played depending on
the data recording condition.
- How to insert a CD (type A)
- How to insert a CD(s) (type B)
- How to play back a CD
- To select a track from its beginning
- Fast-forwarding and fast-reversing
- Repeating
- Random playback
- Scan
- Display selection
- Folder selection
- How to eject a CD from the player (type A)
- How to eject CDs from the player (type B)
- When the following messages are displayed
How to insert a CD (type A)
While the ignition switch is in the “Acc” or “ON” position, hold a disc with a finger in the center hole while gripping the edge of the disc, then insert it in to the slot (with the label side up) and the player will automatically pull the disc into position.
NOTE
DO NOT INSERT TWO DISCS INTO THE DISC INSERTION SLOT AT A TIME.
How to insert a CD(s) (type B)

1. Briefly press the “LOAD” button. If the magazine in the player has an idle position where you can insert a disc, the disc number indicator associated with the idle position will blink.
If no indicator blinks, it means that there is no idle position in the magazine.
2. When the “LOAD” indicator illuminates, insert the disc. Once you have inserted the disc, the “LOAD” indicator will turn off and the “LOADING” indicator will illuminate. The disc will then be automatically drawn in, the player will begin to play back the first track of the disc, the “LOADING” indicator will turn off and the “READING” indicator will illuminate.
● To insert more discs in succession, repeat steps 1 and 2. The magazine will be loaded with discs in the ascending order of position number.
● If you do not insert any disc in 15 seconds after you have pressed the “LOAD” button, the player will return to the original mode that was selected before the “LOAD” button was pressed.
● The disc indicator steadily lights up if a disc is already inserted in the corresponding position of the magazine.
● While the player is in the loading mode, if you press “FM”, “AM” or “SAT” button, the player will enter the standby mode. Press the “CD/AUX” button to start playback.
Inserting a disc in a desired position
1. Briefly press the “LOAD” button. If the magazine in the player has an idle position where you can insert a disc, the disc number indicator associated with the idle position will blink.
The positions in the magazine the indicator of which steadily lights up are already loaded with discs.

Disc select buttons
2. Press the disc select button at the position where you want to insert a disc.
3. When the “LOAD” indicator illuminates, insert the disc. Once you have inserted the disc, the “LOAD” indicator will turn off. The disc will then be automatically drawn in, and the player will begin to play the first track on the disc.
● If you wish to insert another disc, repeat the procedure beginning with step 1.
● If you do not insert any disc in 15 seconds after you have pressed the “LOAD” button, the player will return to the original mode that was selected before the “LOAD” button was pressed.
● While the player is in the loading mode, if you press “FM”, “AM” or “SAT” button, the player will enter standby mode. Press the “CD/AUX” button to start playback.
Loading all the magazine (full disc loading mode)

1. If you continue to press the “LOAD” button for more than 1.5 seconds, the player will produce beep sound and will enter the full disc loading mode.
2. When the disc number indicator flashes and “ALL LOAD” indicator illuminates, insert a disc within 15 seconds. If a disc is successfully loaded during this period, the disc number indicator will stop blinking and will steadily light.
3. When the loading of a disc is complete, the next idle disc number indicator will blink. Then repeat step 2.
4. When the magazine is filled with discs by repeating steps 2 and 3, the player will start playback of the discs, beginning with the one inserted first.
If you fail to insert any disc during each 15 seconds interval, the full disc loading mode will be canceled, and the player will start playback of the disc inserted first.
How to play back a CD
NOTE
For type A audio, if a disc that the player cannot read has been loaded, the player will display the message “CHECK DISC”.
When there is no CD inserted
Insert a CD by referring to “How to insert a CD (type A)” F5-19 / “How to insert a CD (s) (type B)” F5-19.
When a CD is loaded, the player will start playback of the CD, beginning with the first track.
When CD is in the player (type A)/ When playing back all CDs in the player (type B)
When the “CD/AUX” button is pressed, the player will start playback.
When selecting a CD to play (type B)
Disc select buttons
Press a desired one of the disc select buttons the disc number indicator of which steadily lights up. The player will then start playback of the selected CD, beginning with the first track.
To select a track from its beginning
Forward direction
Turn the “TUNE/TRACK/CH” dial clockwise to skip to the beginning of the next track/file (track). Each time the dial is turned, the indicated track/file (track) number will increase.
NOTE
In an MP3, WMA or AAC folder, skipping past the last track/file (track) will take you back to the first track/file (track) in the folder.
Backward direction
Turn the “TUNE/TRACK/CH” dial counterclockwise to skip to the beginning of the current track/file (track). Each time the dial is turned, the indicated track/file (track) number will decrease.
NOTE
In an MP3, WMA or AAC folder, skipping past the first track/file (track) will take you to the last track/file (track) in the folder.
Fast-forwarding and fast-reversing
Fast-forwarding
Press the “ ” side of the “SEEK” button
continuously to fast-forward the track/file. Release the button to stop fast-forwarding.
” side of the “SEEK” button
continuously to fast-forward the track/file. Release the button to stop fast-forwarding.
NOTE
If you fast-forward to the end of the last track/file (track), fast-forwarding will stop and the player will start playback beginning with the first track/file (track).
Fast-reversing
Press the “ ” side of the “SEEK” button
continuously to fast-reverse the track/file. Release the button to stop fast-reversing.
” side of the “SEEK” button
continuously to fast-reverse the track/file. Release the button to stop fast-reversing.
NOTE
If you fast-reverse to the beginning of the first track/file (track), fast-reversing will stop and the player will start playback.
Repeating
Type A audio
Type B audio
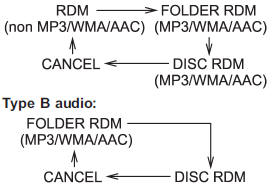
To repeat a track/file (track), briefly press the “RPT/RDM” button (type A audio) or “RPT” button (type B audio) while the track/file (track) is playing.
Each time you briefly press the button, the mode changes in the following sequences.
Type A audio:
Type B audio:
NOTE
● The “TRACK RPT” indication refers to the repeat playback of a single track.
It repeats the track that is playing.
● The “FOLDER RPT” indication refers to the repeat playback of a folder. It repeats
the all of the tracks in the folder. It is possible to select the function when
the MP3/WMA/AAC format track is playing.
● The “DISC RPT” indication refers to the repeat playback of a disc. It repeats
the tracks on the CD. It is only possible to select this function for type B audio.
To cancel the track/file (track) repeat-play mode, briefly press the “RPT” button
and select CANCEL. The “RPT” indication will turn off, and the normal playback mode
will be resumed.
NOTE
The repeat-play mode will be cancelled if you perform any of the following steps:
● Press the “RPT/RDM” button and select CANCEL (type A audio)
● Press the “RPT” button and select CANCEL (type B audio)
● Press the “ ” button
● Press the disc select button
● Press the “SCAN” button
● Press the “LOAD” button when there is free space in the CD magazine
Random playback
Type A audio

Type B audio
To play back a track/file(s) at random, press the “RPT/RDM” button for 0.5 second or longer (type A audio) or press the “RDM” button (type B audio).
● For type A audio, press the “RPT/RDM” button for 0.5 second or longer.
● For type B audio, press the “RDM” button.
Each time you press the button, the mode changes in the following sequences.
Type A audio:
NOTE
● The “RDM” indication refers to the random playback of the tracks. It randomly
repeats the tracks on the CD. It is possible to select the function when formats
other than the MP3/WMA/ AAC format CD is playing.
● The “FOLDER RDM” indication refers to the random playback in the folder. It randomly
repeats the tracks in the folder. It is possible to select the function when an
MP3/WMA/AAC format track is playing.
● The “DISC RDM” indication refers to the random playback of a disc. It randomly
repeats the tracks in the CD. It is possible to select the function when an MP3/WMA/AAC
format track is playing.
To cancel the random playback mode, press the “RPT/RDM” button for 0.5 second or longer again (type A audio) or press the “RPT” button again (type B audio) and select CANCEL.
The “RDM” indication will turn off, and the normal playback mode will be resumed.
NOTE
Random playback will be cancelled if you perform any of the following steps:
● Press the “RPT/RDM” button for 0.5 second or longer and select CANCEL (type
A audio)
● Press the “RPT” button and select CANCEL (type B audio)
● Press the “ ” button
● Press the disc select button
● Press the “SCAN” button
● Press the “LOAD” button when there is free space in the CD magazine
● Press the “ ” or “
 ”
side of the “FOLDER” button
”
side of the “FOLDER” button
Scan

The scan mode lets you listen to the first 10 seconds of each track/file in succession. Press the “SCAN” button to start scanning upward beginning with the track/ file(s) following the currently selected one. After all track/file(s) in the disk/folder have been scanned, normal playback will be resumed. To cancel the scan mode, press the “SCAN” button again.
NOTE
The scan mode will be cancelled if you perform any of the following steps.
● Press the “RPT” button
● Press the “RDM” button
● Press the “RPT/RDM” button
● Turn the “TUNE/TRACK/CH” dial
● Press the “ ” or “
 ”
side of the “FOLDER” button
”
side of the “FOLDER” button
● Press the “ ” button
● Press the “ ” or “
 ”
side of the “SEEK” button
”
side of the “SEEK” button
● Press the disc select button
● Select the radio or AUX mode
● Press the “LOAD” button when there is free space in the CD magazine
● Turn off the power of the audio
equipment
● Turn the ignition switch to the “LOCK” position
Display selection
If you press the “TEXT” button during playback, the indication will change to the next one in the following sequence.
For CD-DA:
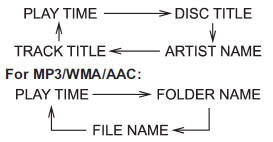
Page (track/folder title) scroll

If you press the “TEXT” button again for at least 0.5 second, the title will be scrolled so you can see all of it.
NOTE
The display is designed to show titles for up to 30 characters.
Folder selection
Press the “ ” side of the “FOLDER”
button briefly to select the next folder.
” side of the “FOLDER”
button briefly to select the next folder.
Press the “ ” side of the button briefly
to go back to the previous folder.
” side of the button briefly
to go back to the previous folder.
NOTE
● Selecting folders in this way is possible only within a single disc.
● Only MP3/WMA/AAC folders are recognized when an attempt to select the next or
previous folder is made. If no appropriate folder exists on the disc, pressing the
“ ” or “
 ”
side of the “FOLDER” button starts playback beginning with the first track/file
(track).
”
side of the “FOLDER” button starts playback beginning with the first track/file
(track).
How to eject a CD from the player (type A)

When a disc is being played back or when a disc is in the player, press the eject
button “ ”. The disc will be ejected.
NOTE
● Avoid driving the vehicle with a CD sticking out, because vibration might make it fall out.
● If you do not remove the ejected disc within approximately 15 seconds, a disc protection function will operate, automatically reloading the disc. In this case, the disc is not played.
How to eject CDs from the player (type B)
NOTE
● Avoid driving the vehicle with a CD sticking out, because vibration might make it fall out.
● If you do not remove the ejected disc within approximately 15 seconds, a disc protection function will operate, automatically reloading the disc. In this case, the disc is not played.
Ejecting a CD from the player

Disc select buttons
1. Use the disc select button to select the disc to be ejected.
2. Briefly press the “ ” button. The
selected disc will be ejected. The disc number indicator will flash at this time.
When you remove the ejected disc, the disc number indicator will turn off. To remove
more discs in succession, repeat steps 1 and 2.
” button. The
selected disc will be ejected. The disc number indicator will flash at this time.
When you remove the ejected disc, the disc number indicator will turn off. To remove
more discs in succession, repeat steps 1 and 2.
Ejecting all discs from the player (all disc ejection mode)
1. If you press the “ ” button for
1.5 seconds or longer, the player will produce beep sound and will enter the all
disc ejection mode. At this time, the disc number indicator and “ALL EJECT” indicator
will flash.
” button for
1.5 seconds or longer, the player will produce beep sound and will enter the all
disc ejection mode. At this time, the disc number indicator and “ALL EJECT” indicator
will flash.
2. Remove the disc that has been ejected. The other discs loaded will then be ejected one after another.
NOTE
● If you press the “ ” button while
the player is in all disc ejection mode, the mode will be cancelled following ejection
of the disc that is currently being ejected.
” button while
the player is in all disc ejection mode, the mode will be cancelled following ejection
of the disc that is currently being ejected.
● If you press the “CD/AUX” button or “LOAD” button while the player is in all disc ejection mode, the player will draw in the discs that have been ejected and play them.
NOTE
● If you press the “” button while
the player is in all disc ejection mode, the mode will be cancelled following ejection
of the disc that is currently being ejected.
● If you press the “CD/AUX” button or “LOAD” button while the player is in all disc ejection mode, the player will draw in the discs that have been ejected and play them.
When the following messages are displayed
If one of the following messages is displayed while operating the CD player, determine the cause based on the following information. If you cannot clear those messages, please contact your SUBARU dealer.
When “PUSH EJECT” is displayed
Press the eject button to unload the disc. Check the disc for damage or deformation, and also check that the correct disc is inserted. Do not try to unload the disc forcibly. Single CDs (i.e., 8 cm/3 inch CDs) are not supported, and if inserted, they will be immediately ejected. If the disc cannot be unloaded or this message remains displayed, please contact your SUBARU dealer.
When “CHECK DISC” is displayed
Press the eject button to unload the discs. Check that the disc is not damaged or scratched, and also check that the disc is inserted correctly. This message may appear when using some CD-RW discs.
Check that the disc type (i.e., 8 cm/3 inch CDs are not supported) and data format are correct. This player can only play CDDA, MP3, WMA and AAC data formats. If the disc cannot be unloaded or this message remains displayed, please contact your SUBARU dealer.


