Buick LaCrosse: Audio Players
 Buick LaCrosse: Audio Players
CD Player
For vehicles equipped with the MyLink or IntelliLink infotainment system, see the separate MyLink/IntelliLink Features and Functions Guide for more information.
The player can be used for CD and MP3s.
With the ignition on, insert a CD into the slot, label side up. The player pulls it in and begins playing.
The vehicle must be in P (Park) for video to display.
The system is capable of playing:
• Most audio CDs
• CD-R
• CD-RW
• MP3 or unprotected WMA formats
When playing any compatible recordable disc, the sound quality can be reduced due to disc quality, the method of recording, the quality of the music or video that has been recorded, or the way the disc has been handled.
To avoid damage to the CD player:
• Do not use scratched or
damaged discs
• Do not apply labels to discs. The
labels could get caught in the
player.
• Insert only one disc at a time.
• Keep the loading slot free of
foreign materials, liquids and
debris.
If a description label is needed, try labeling the top of the disc using a marking pen.
Loading and Ejecting Discs
To load a disc:
1. Turn the ignition on.
2. Insert a disc into the slot. The player pulls it in the rest of the way. If the disc is damaged or improperly loaded, there is an error and the disc ejects.
The disc automatically plays once loaded.
Press  to eject a disc from the
CD player.
to eject a disc from the
CD player.
Playing a CD
A disc must be loaded to select the source.
When a disc is loaded, the disc icon displays.
There are two ways to play a CD:
• Insert the disc and playback starts automatically.
• Press CD/AUX, MEM/DVD/AUX, or SOURCE repeatedly to select the disc source.
Playing an Audio CD
1. Press the CD screen button on the Home Page or select CD from the source pop-up to display the CD main page.
2. From the CD screen, press the Menu screen button to display the menu options.
3. Press to select the desired option.
On the CD main page a track number displays at the beginning of each track. Song, Artist, and Album information displays when available.
Use the following controls to play the disc:
 (Play/Pause): Use to start,
pause, or resume play.
(Play/Pause): Use to start,
pause, or resume play.
 (Seek Down):
• Press to seek to the beginning of the current or previous track.
If the track has been playing for less than five seconds, it seeks to the previous track. If longer than five seconds, the current track starts from the beginning.
• Press and hold to fast reverse through a track. Release the button to return to playing speed. Elapsed time displays.
 (Seek Up):
• Press to seek to the next track.
• Press and hold to fast forward through a track. Release the button to return to playing speed. Elapsed time displays.
SELECT: Turn to the right or left to select the next or previous track.
Press this knob to select the menu.
If a track is selected from the list, the system plays the track and returns to the CD screen.
Error Messages
If Disc Read Error displays and/or the disc comes out, it could be for one of the following reasons:
• The disc has an invalid or unknown format.
• The disc is not from a correct region.
• The disc is very hot. Try the disc again when the temperature returns to normal.
• The road is very rough. Try the disc again when the road is smoother.
• The disc is dirty, scratched, wet, or upside down.
• The air is very humid. Try the disc again later.
• There was a problem while burning the disc.
• The label is caught in the CD player.
If the CD is not playing correctly, for any other reason, try a known good CD.
If any error continues, contact your dealer.
CD/DVD Player
The CD/DVD player can play CDs, DVD-As, MP3/WMA CDs, MP3/WMA DVDs, and DVD-Vs.
The CD/DVD player will not play 8 cm (3 in) discs.
Care of CDs and DVDs
Sound quality can be reduced due to disc quality, recording method, quality of the music recorded, and how the disc has been handled.
Handle discs carefully and store them in their original cases or other protective cases away from direct sunlight and dust. If the bottom surface of a disc is damaged, the disc may not play properly or at all.
Do not touch the bottom surface of a disc while handling it; this could damage the surface. Pick up discs by grasping the outer edges or the edge of the hole and the outer edge.
If the bottom surface of a disc is dirty, take a soft, lint-free cloth, or dampen a clean, soft cloth in a mild neutral detergent solution mixed with water, and clean it. Wipe the disc from the center to the outer edge.
Care of the CD/DVD Player
Do not add a label to a disc, as it could get caught in the CD/DVD player. If a label is needed, label the top of the recorded disc with a marking pen.
Do not use disc lens cleaners because they could contaminate the lens of the disc optics and damage the CD/DVD player.
Notice:
If a label is added to a
CD, more than one CD is inserted
into the slot at a time, or an
attempt is made to play scratched
or damaged CDs, the CD player
could be damaged. While using
the CD player, use only CDs in
good condition without any label,
load one CD at a time, and keep
the CD player and the loading slot
free of foreign materials, liquids,
and debris.
Control Buttons
The buttons used to control the CD/DVD player are:
MEM/DVD/AUX: Press to choose between the MEM, CD/DVD, and AUX.
 : Press to select tracks or
to fast forward or rewind within a
track.
: Press to select tracks or
to fast forward or rewind within a
track.
INFO: Press to display additional information about the disc that may be available.
TUNE: Turn to select tracks.
Menu Knob: Turn to enter the menu.
SELECT: Press to select an item.
 (Eject): Press to eject the disc.
 : Press to pause a CD, DVD-A,
or DVD-V; press again to resume
playback. Press and hold to stop a
DVD-V disc.
: Press to pause a CD, DVD-A,
or DVD-V; press again to resume
playback. Press and hold to stop a
DVD-V disc.
Inserting a CD or DVD
With the printed side facing up, insert a disc into the slot until it is drawn in.
Removing a CD or DVD
Press .
The disc is pushed out of the CD/DVD slot.
If the disc is not removed after it is ejected, it is pulled back in after a few seconds.
Playing a CD or DVD-A Disc
Press the MEM/DVD/AUX button if there is a disc in the player.
It begins playing.
Information about the disc and current track is shown on the display depending on the data stored.
Selecting CD or DVD-A Tracks
Using the control buttons:
• Press  or
or
 to select the
previous or next track.
to select the
previous or next track.
• Turn the TUNE knob.
Using the menu:
1. Turn the Menu knob.
2. Select Tracks List.
3. Select the track.
Pausing a CD or DVD-A Track
Press  to pause a CD or DVD-A
track. Press
to pause a CD or DVD-A
track. Press  again to continue
playing the track.
again to continue
playing the track.
Playing CD or DVD-A Tracks in Random Order
Turn the Menu knob and set Shuffle Songs to On.
Fast Forward and Rewind
Press and hold or
to fast
forward or rewind within the current
track.
Playing an MP3 CD or DVD
Files that are not stored in folders are displayed in the root directory (disc).
The search rate increases if the Menu knob is continuously turned while searching in a list.
Selecting an MP3 Track
Using the control buttons:
• Press or
to select the
previous or next track.
• Turn the TUNE knob.
Using the CD or DVD Menu:
1. Turn the Menu knob.
2. Select Folder List.
3. Select the folder.
4. Select the track.
Searching for MP3s on a CD or DVD
It is normal for the search feature to take some time to display the information after reading the disc due to the amount of information stored on the disc. The infotainment system automatically switches to FM while the disc is being read.
Files that do not have any meta data stored in the ID3 tag display as Unknown.
Tracks can be searched for by:
• Playlists
• Artists
• Albums
• Song Titles
• Genres
The number of objects in each category is shown in parentheses after the category.
To search for tracks:
1. Turn the Menu knob.
2. Select Search.
3. Select: Playlists, Artists, Albums, Song Titles, or Genres.
4. Select the track. The search rate increases if the Menu knob is continuously turned while searching in a list.
Playing MP3 Tracks in Random Order
Turn the Menu knob and then set Shuffle Songs to On.
Recording an Audio or MP3 CD to MEM
See Mass Storage Media (MEM) for more information.
Playing a DVD-V
See Rear Seat Entertainment (RSE) System for information about how to control a Video DVD using the wireless remote control.
Selecting a Chapter
Using the control buttons:
• Press or
to select the
previous or next chapter.
• Turn the TUNE knob.
Using the DVD menu:
1. Turn the Menu knob.
2. Select Chapter List.
3. Select the chapter.
Selecting a Title
1. Turn the Menu knob.
2. Select Title List.
3. Select the title.
Changing the Audio Stream
1. Turn the Menu knob.
2. Select Audio Stream.
3. Select Change Audio Stream.
4. Press SELECT to change the selection.
Select Cancel to exit the menu.
Pausing a DVD
1. Turn the Menu knob.
2. Select Pause to pause the disc.
Select Unpause to start playback.
Navigating the DVD-V Disc Menu
Use the following actions to
navigate the title menu on a DVD-V
Disc.
• Select/Enter
• Cursor UP
• Cursor DOWN
• Cursor RIGHT
• Cursor LEFT
• Up Menu
Use the following actions to
navigate the menu on a DVD-V Disc
while playing chapters.
• Pause (Play)
• Chapter List
• Title List
• DVD/DVD
• DVD/AUX
• AUX/DVD
• AUX/AUX
To navigate the menu:
1. Turn the Menu knob.
2. Select the action.
MP3
Playing an MP3, CD, and DVD
For vehicles equipped with the MyLink or IntelliLink infotainment system, see the separate MyLink/IntelliLink Features and Functions Guide for more information.
MP3 Format
There are guidelines that must be met, when creating an MP3 disc or the CD might not play.
The guidelines are:
• Sampling rate: 8 kHz, 16 kHz, 22.05 kHz, 24 kHz, 32 kHz, 44.1 kHz, and 48 kHz.
• Bit rates supported: 8, 16, 24, 32, 40, 48, 56, 64, 80, 96, 112, 128, 144, 160, 192, 224, 256, and 320 kbps.
• Maximum number of folders is 255 with a maximum hierarchy of eight folders.
• Maximum of 1024 files on a disc.
• Recorded on a CD-R or CD-RW with a maximum capacity of 700 MB.
• The Artist/Album/Song Titles/Genre information requires a CD to be fully scanned before the music navigator works with these menus. Disc scanning does not occur when the disc is being played.
When an MP3 is loaded in the player, MP3 displays.
If a disc is already loaded, but you are currently on a map screen or listening to a different audio source, press SOURCE to switch to the disc source. A track number appears on the display when each track starts to play.
To play a disc:
TUNE/ (Play/Pause): Use to
start, pause, or resume play of a
loaded disc.
(Play/Pause): Use to
start, pause, or resume play of a
loaded disc.
 (Next/Forward): Press to seek
to the next track. Press again to
continue moving forward through
the disc.
(Next/Forward): Press to seek
to the next track. Press again to
continue moving forward through
the disc.
Press and hold to advance quickly through playback. Release the button to return to playing speed.
Elapsed time displays.
 (Previous/Reverse): Press to
seek to the beginning of the current
or previous track. If the track has
played for less than five seconds, it
goes to the previous track. If longer
than five seconds, the current track
restarts. Press again to continue
moving back through the disc.
(Previous/Reverse): Press to
seek to the beginning of the current
or previous track. If the track has
played for less than five seconds, it
goes to the previous track. If longer
than five seconds, the current track
restarts. Press again to continue
moving back through the disc.
Press and hold this button to reverse quickly through playback.
Release the button to return to playing speed. Elapsed time displays.
Menu Knob:
Turn to:
• Enter the menu system.
• Highlight a menu option.
• Select a value.
SELECT:
Press to:
• Select or activate the highlighted menu option.
• Confirm a set value.
• Turn a system setting on or off.
Disc Music Menu
Press the SELECT knob to access the Disc music menu.
Turn the SELECT knob to scroll, then press it to select any of the following category buttons on the MP3 music menu to display the corresponding category screen:
• Folders/Playlists
Select to view the folders stored on the disc. Select a folder to view the list of all the songs in that folder. There might be a delay before the list displays.
Select the song from the list and it begins to play.
• Track List (All Songs)
Select to view a list of all songs on the disc. There might be a delay before the list displays.
Select a song from the list and it begins to play. Songs are displayed based on the CD burning application folder and file structure used.
• Artists
Select to view the list of artists that have been stored on the disc. Select an artist name to view a list of all songs by the artist. There might be a delay before the list displays. Select the desired song from the list and it begins to play.
• Albums
Select to view the albums on the disc. Select the album to view a list of all songs on the album.
There might be a delay before the list displays. Select a song from the list and it begins to play.
• Genres
Select to view the genres on the disc. Select a genre to view a list of all songs of that genre. There might be a delay before the list displays. Select a song from the list and it begins to play.
• Song Titles
Select to display a list of all songs on the disc. There might be a delay before the list displays. Select a song from the list and it begins to play. Songs are displayed in alphabetical order based on the Song Title ID3 tag, if available.
Root Directory
The root directory is treated as a folder. All files contained directly under the root directory are accessed prior to any root directory folders.
Empty Directory or Folder
If a root directory or folder is empty or contains only folders, the player advances to the next folder in the file structure that contains a compressed audio file. The empty folder(s) are not displayed or numbered.
No Folder
When the CD only contains compressed audio files without any folders or playlists, all files are located under the root folder.
File System and Naming
The displayed song title is taken from the file's ID3 tag. If a song title is not present in the ID3 tag, the radio displays the file name as the track name.
Mass Storage Media (MEM)
Infotainment systems with MEM storage are able to record up to 1.1 GB (gigabyte) of music from audio CDs, MP3/WMA/AAC discs, and USB storage devices. The MEM player can also time shift audio from AM, FM, and XM radio.
Music or content stored in MEM that you did not create, or have the right to distribute, must be deleted before the sale or end of lease of the vehicle.
Control Buttons
The buttons used to control the MEM player are:
MEM/DVD/AUX: Press to select the MEM player.
 or
or
 : Press to select tracks or
to rewind or fast forward within a
track.
: Press to select tracks or
to rewind or fast forward within a
track.
INFO: Press to display additional information about the MEM track that may be available.
TUNE/  : Press to pause the
track currently playing; press again
to resume playback. Turn to select
tracks.
: Press to pause the
track currently playing; press again
to resume playback. Turn to select
tracks.
REC  : Press to record music
from a CD or USB drive.
: Press to record music
from a CD or USB drive.
DEL: Press to delete the current track from MEM.
FAV (Favorites): Press to display MEM favorites.
1 to 6: Press to select a track or playlist stored in that numeric position.
Recording from Audio CDs
The infotainment system can record the current song playing or all songs from an audio CD to MEM. A status bar appears on the top of the display when the recording process starts and disappears when the process has ended. Copy protected CDs cannot be recorded to MEM.
Recording to MEM
Press REC , then select Record
Current Song or Record All Songs
on Disc. If the track has started
playing, the system will restart the
track and begin recording from the
beginning of the track. When the
song recording is completed, the
message Song Recorded to MEM
displays, and there may be a slight
pause.
Songs recorded to MEM are stored as the current date, disc, and track number.
Re-recording a Previously Recorded Disc
If the disc or track has already been recorded to MEM, the message The Song(s) is Already Recorded displays.
Stopping the Recording
Press REC while recording from
an audio CD to display the stop
recording option. Select Stop
Recording Song to MEM.
Renaming Recorded Discs
Discs that have been recorded to MEM can be renamed.
1. Turn the Menu knob.
2. Select Rename Recorded Discs.
3. Select the disc.
4. Select Album or Artist to rename either one.
5. Use the Menu knob to enter the character sequence. See Operation for more information.
Recording from MP3/WMA Discs or USB Storage Devices
USB Host Support
The USB connector uses the USB standards, 1.1 and 2.0.
USB Supported Devices
• USB Flash Drives
• Portable USB Hard Drives
Recording to MEM
Press REC , then select Record
Current Song or Record Current
Folder.
The information stored by MEM is titled according to the ID3 tag associated with it.
Re-recording a Previously Recorded Disc
If the disc or track has already been recorded to MEM, the message The Song(s) is Already Recorded displays.
Stopping the Recording
Press REC while recording from
an MP3/WMA CD or USB storage
device to display the stop recording
option. Select Stop Recording Song
to MEM.
Deleting Tracks from MEM
Individual tracks and all tracks can be deleted from MEM.
To delete individual tracks, press and release the DEL button while the track is playing.
To delete all tracks from MEM, press and hold the DEL button while a track is playing.
Playing from MEM
Playing Back a Previously Recorded CD
Turn the TUNE knob to select a track if MEM is already playing from the previously recorded disc.
1. Select Recorded Disc List.
2. Select the disc.
3. Select the track.
Searching for a Track
Tracks can be searched for by:
• Playlists
• Artists
• Albums
• Song Titles
• Genres
The number of objects in each category is shown in parentheses after the category.
To search for tracks:
1. Turn the Menu knob.
2. Select Search.
3. Select: Playlists, Artists, Albums, Song Titles, or Genres.
4. Select the track. The search rate increases if the Menu knob is continuously turned while searching in a list.
Shuffle Songs
Select the Shuffle Songs option from the MEM menu to randomly play back tracks stored in MEM.
Configuring MEM Favorites
During MEM playback, press the
FAV button to change between
favorite categories. The favorite
categories are:
• Playlists
• Artists
• Albums
• Genres
To remove MEM favorites categories:
1. Press the CONFIG button.
2. Select Radio Settings.
3. Select MEM Favorites.
4. Remove the checkmark from the box to remove that MEM favorites category.
Replace the checkmark to re-add the removed category.
Saving MEM Tracks as Favorites
Favorites can be saved by pressing and holding one of the 1 to 6 buttons. Favorites can be stored according to the following list:
Playlist: Adds the currently playing track to the playlist selected.
Artist: Saves the artist associated with the currently playing track in the indicated favorites position.
Album: Saves the album associated with the currently playing track in the indicated favorites position.
Genre: Saves the genre associated with the currently playing track in the indicated favorites position.
Creating Playlists
To create a playlist using tracks stored in MEM:
1. Select Playlist from the MEM favorites.
2. Select the track to be stored in the playlist.
3. Press and hold one of the 1 to 6 buttons until the track can be heard again to store the track.
4. Repeat Steps 1 through 3 to store additional tracks in the playlist.
Auxiliary Devices (Radio with CD and Touchscreen)
For vehicles equipped with the MyLink or IntelliLink infotainment system, see the separate MyLink/IntelliLink Features and Functions Guide for more information.
The optional AUX input allows portable devices to connect to the vehicle using the 3.5 mm(1/8 in) input jack or the USB port.
Portable devices are controlled by using the menu system described in Overview (Radio with CD) or Overview (Radio with CD/DVD and MEM) or Overview (Radio with CD and Touchscreen) and Operation.
This jack is not an audio output. Do not plug headphones into the auxiliary input jack. Drivers are encouraged to set up any auxiliary device while the vehicle is in P (Park).
Possible auxiliary audio sources
include:
• Laptop computer
• MP3 player
• Tape player
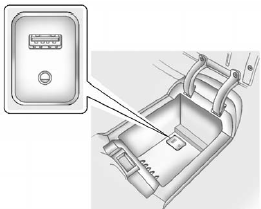
The AUX input is located in the center console.
3.5mm Jack
Connect a 3.5mm (1/8 in) cable to the auxiliary input jack to use a portable audio player.
Playback of an audio device that is connected to the 3.5mm jack can only be controlled using the controls on the device.
If an auxiliary device has already been connected on vehicles with a touchscreen, but a different source is currently active, press the Now Playing screen button on the Home Page, then press Source repeatedly to cycle through all of the available audio source screens, until the AUX source screen is selected.
Adjusting the Volume
Turn the VOL/  knob to adjust the
volume of the infotainment system
after the volume level has been set
on the portable audio device.
knob to adjust the
volume of the infotainment system
after the volume level has been set
on the portable audio device.
USB Port
For vehicles with a USB port, the following devices may be connected and controlled by the infotainment system.
• iPods
• PlaysForSure Devices (PFDs)
• USB Drives
• Zunes™
• USB mass storage device
• Microsoft Transfer Protocal (MTP)
Not all iPods, PFDs, USB Drives, and Zunes are compatible with the infotainment system.
Connecting and Controlling an iPod® (Radio with CD and Radio with CD/DVD/MEM)
Not all iPods can be controlled by the infotainment system.
Connecting an iPod
Connect the iPod to the USB port.
Selecting a Track
Using the control buttons:
• Press  or
or
 to select the
previous or next track.
to select the
previous or next track.
• Turn the TUNE knob to select a track in the current submenu.
The track will start to play.
Searching for a Track
Tracks can be searched for by:
• Playlists
• Artists
• Albums
• Song Titles
• Podcasts
• Genres
• Audiobooks
• Composers
To search for tracks:
1. Turn the Menu knob.
2. Select Search.
3. Select: Playlists, Artists, Albums, Song Titles, Podcasts, Genres, Audiobooks, or Composers.
4. Select the track.
Shuffle (Radio with CD)
Turn the Menu knob and set Shuffle
Songs (Random) to On or Off, then
press the  BACK button to return
the main screen.
BACK button to return
the main screen.
On: Plays tracks in the current folder in random order.
Off: Plays tracks in the current folder in sequential order.
Repeat
Turn the Menu knob and set Repeat to On or Off, then press the /BACK button to return the main screen.
On: Repeats the current track.
Off: Playback starts from the beginning of the current track after the last track finishes.
Shuffle (Radio with CD/DVD/MEM)
Turn the Menu knob and set Shuffle Songs to On or Off.
Shuffle On: Plays current tracks in random order.
Shuffle Off: Plays current tracks in sequential order.
Connecting and Controlling a PlaysForSure Device (PFD) or Zune (Radio with CD)
Connecting a PFD or Zune
Connect the PFD or Zune to the USB port.
Searching for a Track
Tracks can be searched for by:
• Playlists
• Artists
• Albums
• Song Titles
• Podcasts
• Genres
To search for tracks:
1. Turn the Menu knob.
2. Select Search.
3. Select: Playlists, Artists, Albums, Song Titles, Podcasts, or Genres.
4. Select the track.
Shuffle Functionality
Turn the Menu knob and set Shuffle Songs (Random) to On or Off.
On: Plays current tracks in random order.
Off: Plays current tracks in sequential order.
Repeat Functionality
Turn the Menu knob and set Repeat to On or Off.
Repeat On: Repeats the current track.
Repeat Off: Playback starts from the beginning of the current track after the last track finishes.
Connecting and Controlling a USB Drive (Radio with CD and Radio with CD/DVD/MEM)
The infotainment system can only play back .mp3 and .wma files from a USB drive.
Only the first 2,500 songs are recognized on the device.
When a device is not supported, the message “No supported data found.
You can safely disconnect the device” appears.
Connecting a USB Drive
Connect the USB drive to the USB port.
Searching for a Track
It is normal for the search feature to take some time to display the information after reading the device due to the amount of information stored.
Files that do not have any meta data stored in the ID3 tag display as Unknown.
Tracks can be searched for by:
• Playlists*
• Artists
• Albums
• Song Titles
• Genres
• Folder View
*This only displays if a playlist is found on the device.
To search for tracks:
1. Turn the Menu knob.
2. Select Search.
3. Select: Playlists, Artists, Albums, Song Titles, Genres, or Folder View.
4. Select the track.
Shuffle Functionality
Turn the Menu knob and set Shuffle Songs (Random) to On or Off.
On: Plays current tracks in random order.
Off: Plays current tracks in sequential order.
Repeat Functionality
Turn the Menu knob and set Repeat to On or Off.
Repeat On: Repeats the current track.
Repeat Off: Playback starts from the beginning of the current track after the last track finishes.
Recording Tracks to MEM (Radio with CD/DVD/MEM)
See Mass Storage Media (MEM) for more information.
Playing from a USB (Radio with CD and Touchscreen)
A USB mass storage device or Microsoft Transfer Protocal (MTP) device can be connected to the USB port.
The USB port is in the center console.
The USB icon displays when the USB device is connected.
USB MP3 Player and USB Drives
• The USB MP3 players and USB drives connected must comply with the USB Mass Storage Class specification (USB MSC).
• Only USB MP3 players and USB drives with a sector size or 512 bytes and a cluster size smaller or equal to 32 kbytes in the FAT32 file system are supported.
• Hard disk drives are not supported.
• The following restrictions apply for the data stored on a USB MP3 player or USB device:
- Maximum folder structure depth: 11 levels.
- Maximum number of MP3/WMA files that can be displayed: 1,000 . WMA with Digital Rights Management (DRM) from online music shops cannot be played.
WMA files can only be played back safely if they were created with Windows Media Player version 8 or later.
- Applicable playlist extensions are: .m3u, .pls.
- Playlist entries must be in the form of relative paths.
- The system attribute for folders/files that contain audio data must not be set.
To play a USB device, do one of the following:
• Connect the USB and it begins to play.
• Press the Now Playing screen button on the Home Page, then press the SOURCE button on the faceplate repeatedly to cycle through all of the available audio source screens, until the USB source screen is selected.
While the USB source is active, use the following to operate USB function:
TUNE/  (Play/Pause): Press to
start, pause, or resume play of the
current media source.
(Play/Pause): Press to
start, pause, or resume play of the
current media source.
 (Seek Down):
1. Press to seek to the beginning of the current or previous track.
If the track has been playing for less than five seconds, the previous track plays. If playing longer than five seconds, the current track restarts.
2. Press and hold to reverse quickly through playback.
3. Release to return to playing speed. Elapsed time displays.
 (Seek Up):
1. Press to seek to the next track.
2. Press and hold to advance quickly through playback.
Release to return to playing speed. Elapsed time displays.
USB Menu
Press any of the following buttons on the USB Menu:
Shuffle Songs: Press to play the tracks randomly. Press again to stop shuffle.
Playlists: Press to view the playlists stored on the USB. Select a playlist to view the list of all songs in that playlist. There might be a delay before the list displays. Select a song from the list to begin playback.
Artists: Press to view the list of artists stored on the USB. Select an artist name to view a list of all albums by the artist. There might be a delay before the list displays. To select a song, touch All Songs then select a song or touch an album then select a song from the list to begin playback.
Albums: Press to view the albums on the USB. Select the album to view a list of all songs on the album.
There might be a delay before the list displays. Select a song from the list to begin playback.
Song Titles: Press to display a list of all songs on the USB. Songs are displayed as stored on the disc.
There might be a delay before the list displays. To begin playback, select a song from the list.
Genres: Press to view the genres on the USB. Select a genre to view a list of all songs of that genre.
Select a song from the list to begin playback.
Folders: Press to open a folder list to access the files within the folder structure.
File System and Naming
The song titles, artists, albums, and genres are taken from the file's ID3 tag and are only displayed if present in the tag. If a song title is not present in the ID3 tag, the radio displays the file name as the track name.
Playing from an iPod® (Radio with CD and Touchscreen)
This feature supports the following
iPod models:
• iPod nano (1st, 2nd, 3rd, and 4th generation)
• iPod with video (5.0 and 5.5 generation). Video is not shown; only audio is
supported.
• iPod classic (6th generation)
• iPod touch (1st and 2nd generation)
There may be problems with operation and function in the following situations:
• When connecting an iPod on which a more recent version of the firmware is installed than is supported by the infotainment system.
• When connecting an iPod on which firmware from other providers is installed.
To connect and control an iPod, connect one end of the standard iPod USB cable to the iPod's dock connector. Connect the other end to the USB port in the center console.
iPod music information displays on the radio’s display and begins playing through the vehicle’s audio system.
The iPod battery recharges automatically while the vehicle is on.
When the vehicle is off while an iPod is connected using the iPod USB cable, the iPod battery stops charging and the iPod automatically turns off.
If the iPod is an unsupported model, it can still be listened to in the vehicle by connecting to the auxiliary input jack using a standard 3.5mm (1/8 in) stereo cable.
Shuffle Songs: Press to play the tracks randomly. Press again to stop shuffle.
Press any of the following buttons on the iPod Menu:
Playlists:
1. Press to view the playlists stored on the iPod.
2. Select a playlist name to view a list of all songs in the playlist.
3. Select the desired song from the list to begin playback.
Artists:
1. Press to view the artists stored on the iPod.
2. Select an artist name to view a list of all songs by the artist.
3. Select the desired song from the list to begin playback.
Albums:
1. Press to view the albums stored on the iPod.
2. Select an album name to view a list of all songs on the album or select All Songs to view all songs by the artist.
3. Select the desired song from the list to begin playback.
Song Titles:
1. Press to view a list of all songs stored on the iPod.
2. Select the desired song from the list to begin playback.
Genres:
1. Press to view the genres stored on the iPod.
2. Select a genre name to view a list of artists of that genre.
3. Select an artist to view albums or All Songs to view all songs of that genre.
4. Select album to view songs.
5. Select the desired song from the list to begin playback.
Podcasts:
1. Press to view the podcasts stored on the iPod.
2. Select a podcast name to play the desired podcast.
Composers:
1. Press to view the composers stored on the iPod.
2. Select a composer name to view a list of all songs by that composer.
3. Select the desired song from the list to begin playback.
Audio Books:
1. Press to view the audio books stored on the iPod.
2. Select an audio book name to view a list of all audio books.
3. Select the desired audio book from the list to begin playback.
Playing from an iPhone®
This feature supports the following iPhone model:
• iPhone (3G – 3GS)
To use the iPhone, follow the same instructions as stated earlier for using an iPod.


