BMW 5 Series: Destination input
 BMW 5 Series: Destination input
- Manual destination entry
- Address book
- Last destinations
- Special destinations
- Destination entry by map
- Destination entry by voice
- Planning a trip with intermediate destinations
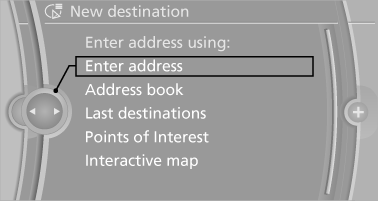
Manual destination entry
General information
The system supports you in entering street names and house numbers by automatically completing the entry and providing entry comparisons.
Stored town/city and street names can be called up quickly.
▷ If the existing entries should not be changed,
the entries for the state/province and town/
city can be skipped.
▷ Destination guidance is started to the town/
city center if no street is entered.
Entering a state/province
1. "Navigation"
2. "Enter address"
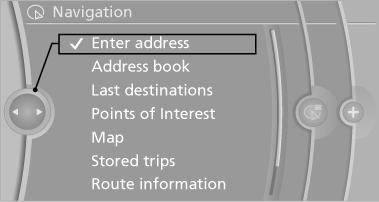
3. Select "State/Province" or the displayed state/province.
Entering a town/city
1. Select "Town/City/Postal Code" or the displayed town/city.
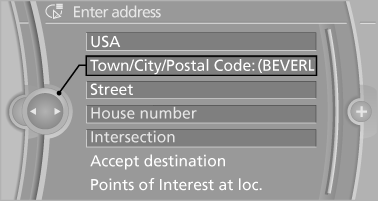
2. Select letters, if necessary.
The list is narrowed down further with each
entry.
3. Move the controller to the right.
4. Select the town/city name from the list.
If there are several towns/cities with the same name:
1. Change to the list of town/city names.
2. Highlight the town/city.
3. Select the town/city.
Entering the postal code
1. Select "Town/City/Postal Code" or the displayed
town/city.
2.  Select the symbol.
3. Select the numbers.
4. Change to the list of postal codes and towns/
cities.
5. Highlight the entry.
6. Selecting an entry.
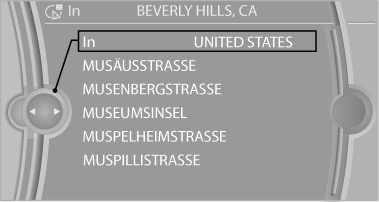
Entering a street and intersection
1. Select "Street" or the displayed street.
2. Enter a street and intersection in the same
way as you would enter a town/city.
If there are several streets with the same name:
1. Change to the list of street names.
2. Highlight the street.
3. Select the street.
Alternative: enter the street address and house number
1. Select "Street" or the displayed street.
2. Enter the street as you would the town/city.
3. "House number"
4. Select the numbers.
5. Change to the list of house numbers.
6. Select a house number or range of house
numbers.
Street does not exist in the destination city/town
The desired street does not exist in the specified city/town because it belongs to another part of the city/town.
1. "Navigation"
2. "Enter address"
3. Select "Street" or the displayed street.
4. Change to the list of street names.
5. Select "In" the displayed country.
All streets of the selected state/province are offered. The associated town/city is displayed after the street name.
6. Select the letters.
7. Change to the list of street names.
8. Highlight the street.
9. Select the street.
Starting destination guidance after entering the destination
1. "Accept destination"
2. "Start guidance" or "Add as another
destination"
Add a destination as a further destination
Address book
Selecting a destination from the address book
1. "Navigation"
2. "Address book"
Contacts with addresses are displayed if these have been checked as destinations.
If the mobile phone does not display the contacts with addresses, they must first be checked as a destination
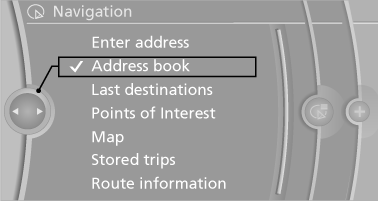
3. Select a contact in the list or, if desired, with
"A-Z search".
4. "Business address" or "Home address"
Storing the destination in the address book
After entering the destination, store the destination in the address book.
1. "Navigation"
2. "Map"
3.  "Guidance"
4. "Options" Open.
5. "Store as new contact" or "Add to existing
contact"
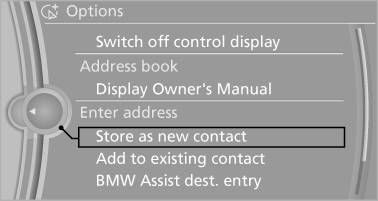
6. Select an existing contact, if available.
7. "Business address" or "Home address"
8. Enter "Last name" and, if necessary, "First
name".
9. "Store in vehicle"
Storing the position
The current position can be stored in the address book.
1. "Navigation"
2. "Options" Open<>.
3. "Store position as contact" or "Add position to contact"
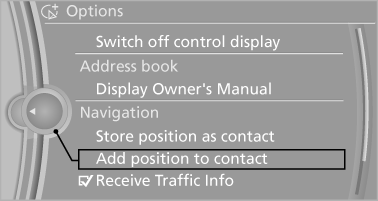
4. Depending on the selection, choose an existing
contact from the list. Select the type
of address and enter the first and last names.
5. "Store in vehicle"
Editing or deleting an address
1. "Navigation"
2. "Address book"
3. Highlight the entry.
4. "Options" Open.
5. "Edit in Contacts" or "Delete entry"
Using the home address as the destination
The home address must be stored. Specify the home address
1. "Navigation"
2. "Address book"
3. "Home"
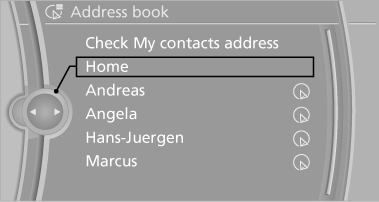
4. "Start guidance"
Last destinations
At a glance
The destinations previously entered are stored automatically.
The destinations can be called up and used as a destination for destination guidance.
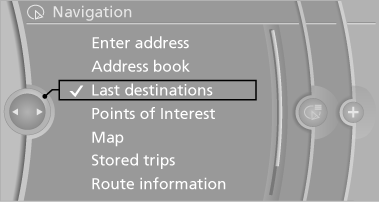
Calling up the last destination
1. "Navigation"
2. "Last destinations"
Starting destination guidance
1. "Navigation"
2. "Last destinations"
3. Select the destination.
4. "Start guidance"
Editing the destination
1. "Navigation"
2. "Last destinations"
3. Highlight the destination.
4. Open "Options".
5. "Edit destination"
Deleting the last destinations
1. "Navigation"
2. "Last destinations"
3. Highlight the destination.
4. Open "Options".
5. "Delete entry" or "Delete all last
destinations"
Special destinations
Opening the search for special destinations
To select special destinations, e.g., hotels or
tourist attractions:
1. "Navigation"
2. "Points of Interest"
3. Select the search function.
Online Search
1. "Google™ Local Search"
2. Select a special destination.
3.  Select the symbol.
4. "Start guidance"
A-Z search
1. "A-Z search"
2. "Town/City"
Select or enter the town/city.
3. "Category"
4. Select the category.
5. "Category details"
For some special destinations, multiple category
details can be selected. Move the
controller to the left to leave the category
details.
6. "Keyword"
7. Enter the keyword.
A list of the special destinations is displayed.
8. Select a special destination.
Details are displayed.
If multiple details are stored, you can leaf
through the pages.
If a phone number is available, a connection
can be established if necessary.
9.  Select the symbol.
"Start guidance" or "Add as another
destination"
Add a destination as a further destination
"Start search": if a search term is not entered,
the search is repeated with the previous search
term.
Category search
1. "Category search"
2. "Town/City"
Select or enter the town/city.
3. "Category"
4. Select the category.
5. "Category details"
For some special destinations, multiple category
details can be selected. Move the
controller to the left to leave the category
details.
6. "Start search"
A list of the special destinations is displayed.
7. Select a special destination.
Details are displayed.
If multiple details are stored, you can leaf
through the pages.
If a phone number is available, a connection
can be established if necessary.
8.  Select
the symbol.
Select
the symbol.
"Start guidance" or "Add as another
destination"
Add a destination as a further destination
Display of special destinations
List of special destinations: special destinations are organized by distance and are displayed with a directional arrow to the special destination.
on the split screen, special destinations of the selected category are displayed in the map view as symbols. The display depends on the scale of the map and the category.
Destination entry via BMW Assist
A connection is established to the Concierge service
1. "Navigation"
2. "Enter address"
3. "Options" Open.
4. "BMW Assist dest. entry"
Displaying special destinations in the map
To display symbols of the special destinations in the map view:
1. "Navigation"
2. "Map"
3. "Options" Open.
4. "Display Points of Interest"
5. Select the setting.
Destination entry by map
Selecting the destination
1. "Navigation"
2. "Map"
The current position of the vehicle is indicated
on the map.
3.  "Interactive map"
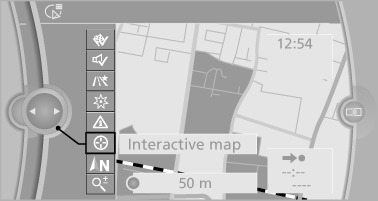
4. Select the destination with crosshairs.
▷ To change the scale: turn the controller.
▷ To shift the map: move the controller in
the required direction.
▷ To shift the map diagonally: move the
controller in the required direction and
turn it.
Specifying the street
If the system does not recognize a street, one of the following is displayed:
▷ The name of a street in the vicinity.
▷ The county.
▷ The coordinates of the destination.
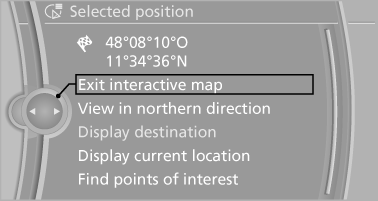
Additional functions
Additional functions are available on the interactive map after the controller is pressed.
▷  Select the symbol.
"Start guidance" or "Add as another
destination"
Add a destination as a further destination
▷ "Exit interactive map": return to the map
view.
▷ "View in northern direction" or "View in
driving direction"
▷ "Display destination": the map section
around the destination is displayed.
▷ "Display current location": the map section
around your current location is displayed.
▷ "Find points of interest": the search for special
destinations is started.
Destination entry by voice
General information ▷ Instructions for voice activation system<>.
▷ When making a destination entry by voice,
you can change between voice operation
and iDrive.
▷ To have the available spoken instructions
read out loud: ›Voice commands‹
Saying the entries
▷ the town/city, street, and house number can
be entered as a single command.
▷ Countries, towns and cities, streets, and intersections
can be said as whole words or
spelled in the language of the system.
Example: to enter a town/city in a US state
as a whole word, the language of the system
must be English.
▷ Spell the entry if the spoken language and
the language of the system differ.
▷ Say the letters smoothly, and avoid exaggerating
the pronunciation and inserting
lengthy pauses between the letters.
▷ The options available for entering data depend
on the navigation data and the country
and language settings.
entering an address using a command
1.  Press the button on the
steering
wheel.
Press the button on the
steering
wheel.
2. ›Enter address‹
3. Wait for a request from the system.
4. Say the address in the suggested order.
5. Continue making the entry as prompted by
the system.
If necessary, individually name the separate
components of the address, e.g., the town/city.
Entering a town/city separately
The name of the town/city can be said as a word or spelled out.
With the destination entry menu displayed:
1.  Press the button on the
steering
wheel.
Press the button on the
steering
wheel.
2. ›City‹ or ›Spell city‹.
3. Wait for the system to prompt you for the
town/city.
4. Say the name of the town/city, or say at least
the first three letters.
Depending on the entry, up to 20 towns/cities
may be suggested.
5. Select the town/city.
▷ To select a recommended town/
city: ›Yes‹
▷ To select a different town/city: ›New
entry‹
▷ Select an entry: ›Entry ...‹ e.g., entry 2
▷ To spell an entry: ›Spell city‹
6. Continue making the entry as prompted by
the system.
If there are several towns/cities with the same name:
Towns/cities of the same name are grouped in a list and displayed as one location followed by an ellipsis.
1. Select an entry: ›Yes‹ or ›Entry ...‹ e.g., Entry
2.
2. Select the desired town/city.
Entering a street or intersection separately
Enter a street and intersection in the same way as you would enter a town/city.
Entering a house number separately
Depending on the data in the navigation system, house numbers up to number 2,000 can be entered.
1. ›House number‹
2. Say the house number.
Say each digit separately.
3. Continue making the entry as prompted by
the system.
Planning a trip with intermediate destinations
New trip
A trip can be planned with several intermediate destinations.
1. "Navigation"
2. "Map"
3. Move the controller to the left if necessary.
4.  "Guidance"
5. "Enter new destination"
6. Select the type of destination entry.
7. Enter the intermediate destination.
8. "Start guidance"
Entering intermediate destinations
A maximum of 30 intermediate destinations can be entered for one trip.
1. "Enter new destination"
2. Select the type of destination entry.
3. Enter the intermediate destination.
4. "Add as another destination"
The intermediate destination is entered in
the destination list and is highlighted.
5. Turn the controller until the intermediate
destination is located in the desired position
in the list.
6. Press the controller.
Starting the trip
1. After all intermediate destinations are entered, highlight the first destination.
If the second destination, for example, is
highlighted when destination guidance is
started, the first destination is skipped.
2. "Start guidance"
 This symbol marks the active leg of
the
trip.
This symbol marks the active leg of
the
trip.
Store the trip
Up to 30 trips can be stored in the trip list. If necessary, delete existing trips to be able to store new trips.
1. "Options" Open.
2. "Store trip"
3. Enter the name.
4. "OK"
Select the stored trip
1. "Navigation"
2. "Stored trips"
3. Select a stored trip.
4. "Start guidance"
Reversing the direction of travel
Intermediate destinations are displayed in reverse order in the list.
1. "Map"
2.  "Guidance"
3. "Options" Open.
4. "Reverse order of trip dest."
Intermediate destination options
1. "Map"
2.  "Guidance"
3. "Display all trip destinations"
4. Select an intermediate destination.
▷ "Edit destination"
▷ "Reposition dest. in the trip": move an
intermediate destination to another position
in the list.
▷ "Delete dest. in the trip"
▷ "Go to next dest. in the trip"
Some options are not available for certain trips.
Delete the stored trip
1. "Stored trips"
2. Highlight the desired trip.
3. "Options" Open.
4. "Delete all trips" or "Delete trip"
Open the last trip
1. "Navigation"
2. "Stored trips"
3. "Last trip"
4. "Start guidance"


