Honda Accord: Installing a Child Seat
 Honda Accord: Installing a Child Seat
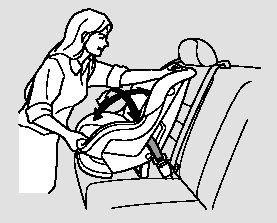
After selecting a proper child seat and a good place to install the seat, there are three main steps in installing the seat:
1. Properly secure the child seat to the vehicle. All child seats must be secured to the vehicle with the lap part of a lap/shoulder belt or with the LATCH (Lower Anchors and Tethers for CHildren) system. A child whose seat is not properly secured to the vehicle can be endangered in a crash.
2. Make sure the child seat is firmly secured. After installing a child seat, push and pull the seat forward and from side-to-side to verify that it is secure.
A child seat secured with a seat belt should be installed as firmly as possible. However, it does not need to be ‘‘rock solid.’’ Some side-to-side movement can be expected and should not reduce the child seat’s effectiveness.
If the child seat is not secure, try installing it in a different seating position, or use a different style of child seat that can be firmly secured.
3. Secure the child in the child seat.
Make sure the child is properly strapped in the child seat according to the child seat maker’s instructions. A child who is not properly secured in a child seat can be seriously injured in a crash.
The following pages provide guidelines on how to properly install a child seat. A forward-facing child seat is used in all examples, but the instructions are the same for a rearfacing child seat.
- Installing a Child Seat with LATCH
- Installing a Child Seat with a Lap/Shoulder Belt
- Installing a Child Seat with a Tether
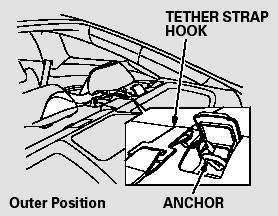
Installing a Child Seat with LATCH
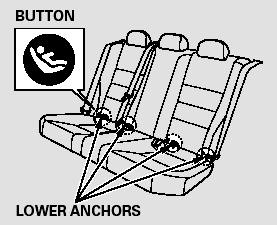
Your vehicle is equipped with LATCH (Lower Anchors and Tethers for CHildren) at the outer rear seats.
The lower anchors are located between the seat-back and seat bottom, and are to be used only with a child seat designed for use with LATCH.
The location of each lower anchor is indicated by a small button above the anchor point.
To install a LATCH-compatible child seat:
1. Move the seat belt buckle or tongue away from the lower anchors.
2. Make sure there are no objects near the anchors that could prevent a secure connection between the child seat and the anchors.
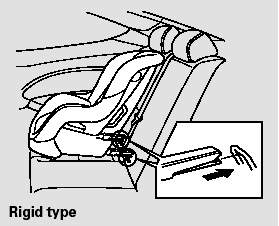
3. Place the child seat on the vehicle seat, then attach the seat to the lower anchors according to the child seat maker’s instructions.
Some LATCH-compatible seats have a rigid-type connector as shown above.
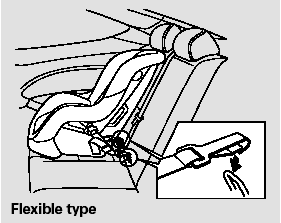
Other LATCH-compatible seats have a flexible-type connector as shown above.
4. Whatever type you have, follow the child seat maker’s instructions for adjusting or tightening the fit.
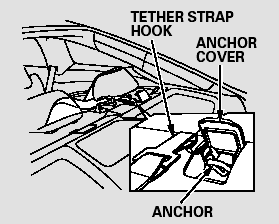
5. Lift the head restraint, then route the tether strap through the legs of the head restraint and over the seat-back, making sure the strap is not twisted.
6. Open the anchor cover.
7. Attach the tether strap hook to the tether anchor, then tighten the strap as instructed by the child seat maker.
8. Push and pull the child seat forward and from side-to-side to verify that it is secure.
Installing a Child Seat with a Lap/Shoulder Belt
When not using the LATCH system, all child seats must be secured to the vehicle with the lap part of a lap/ shoulder belt.
In addition, the lap/shoulder belts in all seating positions except the driver’s have a lockable retractor that must be activated to secure a child seat.
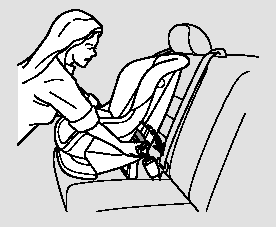
1. With the child seat in the desired seating position, route the belt through the child seat according to the seat maker’s instructions, then insert the latch plate into the buckle and remove any slack from the lap portion of the belt.
2. To activate the lockable retractor, slowly pull the shoulder part of the belt all the way out until it stops, then let the belt feed back into the retractor.
3. After the belt has retracted, tug on it. If the belt is locked, you will not be able to pull it out. If you can pull the belt out, it is not locked, and you will need to repeat these steps.
4. After confirming that the belt is locked, grab the shoulder part of the belt near the buckle, and pull up to remove any slack from the lap part of the belt. Remember, if the lap part of the belt is not tight, the child seat will not be secure.
To remove slack, it may help to put weight on the child seat, or push on the back of the seat while pulling up on the belt.
5. Push and pull the child seat forward and from side-to-side to verify that it is secure enough to stay upright during normal driving maneuvers. If the child seat is not secure, unlatch the belt, allow it to retract fully, then repeat these steps.
To deactivate the lockable retractor and remove a child seat, unlatch the buckle, unroute the seat belt, and let the belt fully retract.
Installing a Child Seat with a Tether

A child seat with a tether can be installed in any seating position in the back seat, using one of the anchorage points shown above.
Since a tether can provide additional security to the lap/shoulder belt installation, we recommend using a tether whenever one is required or available.
Using an Anchor
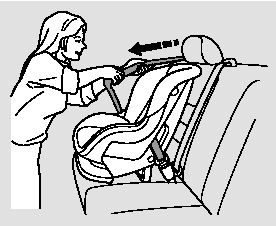
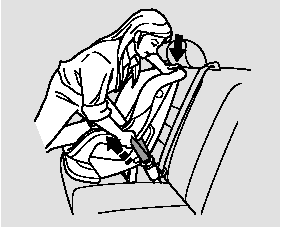
1. After properly securing the child seat, lift the head restraint, then route the tether strap over the seat-back and through the head restraint legs.
2. Lift the cover, then attach the tether strap hook to the anchor, making sure the strap is not twisted.
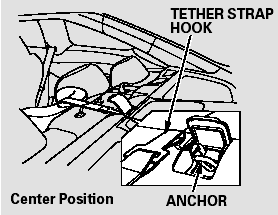
3. Tighten the strap according to the seat maker’s instructions.


