Hyundai Sonata: Lighting
 Hyundai Sonata: Lighting
- Battery saver function
- Headlamp delay (if equipped)
- Headlamp welcome function
- Daytime running light (if equipped)
- Lighting control
- High beam operation
- Turn signals and lane change signals
- Front fog light (if equipped)
Battery saver function
• The purpose of this feature is to prevent the battery from being discharged. The system automatically turns off the parking lights when the driver removes the ignition key (smart key : turns off the engine) and opens the driver-side door.
• With this feature, the parking lights will be turned off automatically if the driver parks on the side of road at night.
If necessary, to keep the lights on when the ignition key is removed (smart key : turns off the engine), perform the following:
1) Open the driver-side door.
2) Turn the parking lights OFF and ON again using the light switch on the steering column.
Headlamp delay (if equipped)
If you turn the ignition switch to the ACC or OFF position with the headlights ON, the headlights (and/or tail lights) remain on for about 20 minutes. However, if the driver’s door is opened and closed, the headlights are turned off after 30 seconds.
The headlights can be turned off by pressing the lock button on the transmitter (or smart key) twice or turning the light switch to the OFF or Auto position.
However, if you turn the light switch to the Auto position when it is dark outside, the headlights will not be turned off.
Headlamp welcome function
When the headlight switch is in the ON or AUTO position and all doors (and trunk) are closed and locked, if you press the door unlock button on the transmitter (or the smart key), the headlights will come on for about 15 seconds. At this time, if you press the door lock button on the transmitter (or smart key) the headlights will turn off immediately.
Daytime running light (if equipped)
Daytime Running Lights (DRL) can make it easier for others to see the front of your vehicle during the day. DRL can be helpful in many different driving conditions, and it is especially helpful after dawn and before sunset.
The DRL system will make the headlights turn OFF when:
1. The headlight is ON.
2. Engine stops.
Lighting control
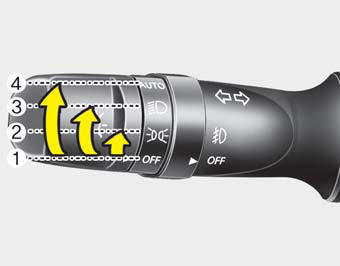
The light switch has a Headlight and a Parking light position.
To operate the lights, turn the knob at the end of the control lever to one of the following positions:
(1) OFF position
(2) Parking light position
(3) Headlight position
(4) Auto light position (if equipped)
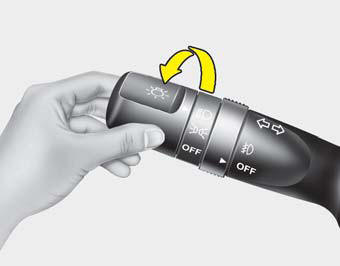
Parking light position ( )
)
When the light switch is in the parking light position, the tail, position and license lights are ON and the tail light indicator is ON (if equipped).
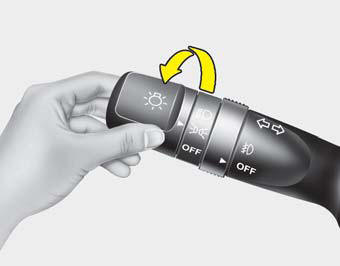
Headlight position ( )
)
When the light switch is in the headlight position the head, tail, license and instrument panel lights are ON.
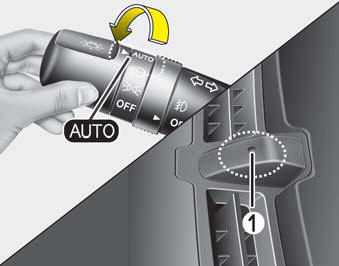
Auto light position (if equipped)
When the light switch is in the AUTO light position, the taillights and headlights will be turned ON or OFF automatically depending on the amount of light outside the vehicle.
CAUTION
• Never place anything over sensor (1) located on the instrument panel. This
will ensure better auto-light system control.
• Don’t clean the sensor using a window cleaner. The cleaner may leave a light film
which could interfere with sensor operation.
• If your vehicle has window tint or other types of metallic coating on the front
windshield, the Auto light system may not work properly.
High beam operation
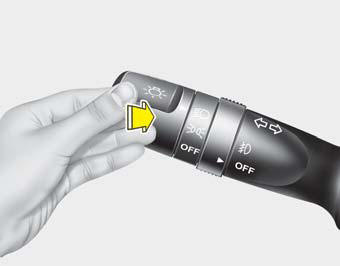
To turn on the high beam headlights, push the lever away from you. Pull it back for low beams.
The high beam indicator will light when the headlight high beams are switched on.
To prevent the battery from being discharged, do not leave the lights on for a prolonged time while the engine is not running.
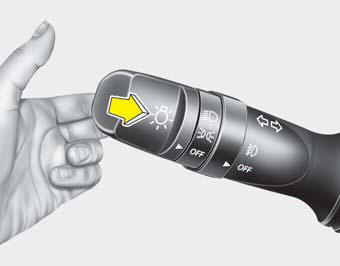
To flash the headlights, pull the lever towards you. It will return to the normal (low beam) position when released. The headlight switch does not need to be on to use this flashing feature.
Turn signals and lane change signals
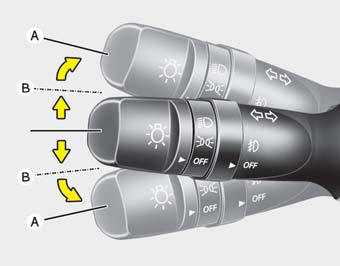
The ignition switch must be on for the turn signals to function. To turn on the turn signals, move the lever up or down (A). Green arrow indicators on the instrument panel indicate which turn signal is operating. They will self-cancel after a turn is completed. If the indicator continues to flash after a turn, manually return the lever to the OFF position.
To signal a lane change, move the turn signal lever slightly and hold it in position (B). The lever will return to the OFF position when released.
If an indicator stays on and does not flash or if it flashes abnormally, one of the turn signal bulbs may be burned out and will require replacement.
One-touch triple turn signal
To activate an one-touch triple turn signal move the turn signal lever up or down slightly and then release it. The lane change signals will blink 3 times.
NOTICE
If an indicator flash is abnormally quick or slow, a bulb may be burned out or have a poor electrical connection in the circuit.
Front fog light (if equipped)
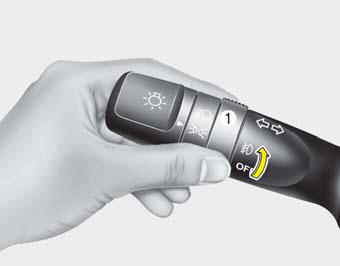
Fog lights are used to provide improved visibility when visibility is poor due to fog, rain or snow etc. The fog lights will turn on when fog light switch (1) is turned to ON after the headlights are turned on. To turn off the fog lights, turn the switch to OFF.
CAUTION
When in operation, the fog lights consume large amounts of vehicle electrical power. Only use the fog lights when visibility is poor or unnecessary battery and generator drain could occur.


