Volvo S60: Radio
 Volvo S60: Radio
- General functions
- HD Radio reception (U.S. models only)
- Sirius satellite radio
- Advanced Sirius settings
General functions
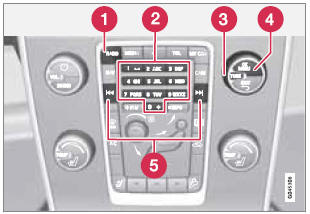
- RADIO button for selecting the AM, FM1, FM2, Sirius1* or Sirius2* wavebands.
- Number key buttons (0-9)
- Navigate among the menu alternatives in the display by turning TUNE.
- Confirm your selection or access the radio menus by pressing OK/MENU.
- Left/right arrow keys: Press and hold to go to the next/previous strong station, press briefly to tune to a preset station.
RADIO menu selections can be made from the center console or the steering wheel keypad. See page 244 for more information about the infotainment menu system.
Selecting a station (in wavebands AM/ FM1/FM2)
Automatic tuning
1. Press RADIO. Continue pressing this button to toggle to the desired waveband (AM, FM1, etc.).
2. Release the button and wait several seconds or press OK/MENU.
3. Press the left or right arrow keys on the center console control panel to search for the next available station.
List of stations (in wavebands FM1/FM2 only)
The radio automatically compiles a list of the strongest FM stations whose signals are currently being received. This enables you to find stations when driving in areas where radio stations and their frequencies are unfamiliar.
To access this list:
1. Select the desired waveband (FM1 or FM2).
2. Turn TUNE one step in either direction. This displays the list of stations in the area. The currently tuned station will be indicated in the list by magnified text.
3. Turn TUNE again in either direction to select a station on the list.
![]() NOTE
NOTE
- This list will only display the frequencies of the stations currently being received, not a complete list of all radio frequencies on the currently selected waveband.
- If the signal from the currently tuned station is weak, this may prevent
the radio from updating the list of stations. If this occurs, press
 while the list of stations is displayed
to switch to manual tuning mode and select a station. If the list of stations
is no longer displayed, turn TUNE in either direction to display the list again
and press .
while the list of stations is displayed
to switch to manual tuning mode and select a station. If the list of stations
is no longer displayed, turn TUNE in either direction to display the list again
and press .
The list will disappear from the display after several seconds.
If the station list is no longer displayed, turn TUNE in either direction and
press on the number key pad on the
center console to switch to manual tuning (or to switch back from manual tuning
to the "list of stations" function).
Manual tuning
By default, the list of stations of the strongest stations in the area will be
displayed when you turn TUNE (see the preceding section, "List of stations"). While
the list of stations is displayed, press
on the number key pad on the center
console to switch to manual tuning, which enables you to select a frequency from
the complete list of all radio frequencies available on the currently selected waveband.
In other words, in manual tuning mode, turning TUNE one step will change from e.g.,
93.3 to 93.5, etc.).
To manually tune a station:
1. Press RADIO. Continue pressing this button to toggle to the desired waveband (AM, FM1, etc.) and wait for several seconds or press OK/MENU to confirm.
2. Turn TUNE to select a frequency
![]() NOTE
NOTE
The radio is initially set to automatically search for stations in the area in which you are driving (see the preceding section, "List of stations").
However, if you have switched to manual tuning (by pressing
on the number key pad on the center
console while the list of stations is displayed), the radio will remain in manual
tuning mode the next time it is switched on. To switch back to "list of stations"
mode, turn TUNE one step (to display the full list of stations) and press
.
Please note that if you press when
the list of stations is not displayed, this will activate the INFO function (see
page 210 for more information about this function).
Storing preset stations
Ten preset stations can be stored for each waveband (AM, FM1, etc.).
Stored preset stations are selected using the number key buttons on the center console. Manually storing preset stations
1. Tune to a station (see "Selecting a station").
2. Hold in one of the number key buttons.
> The sound will be muted for several seconds and when it returns, the station has been stored on the number key button used.
A list of preset stations can be displayed. This function can be activated/deactivated in AM/ FM mode in FM menu Show presets or in AM menu Show presets
Scan
The function automatically searches the current waveband for radio stations. When a station is found, it is played for several seconds before scanning is resumed. While the station is playing it can be stored as a preset in the usual way (see "Manually storing preset stations").
To start scanning in AM/FM mode, go to FM menu Scan or in AM menu Scan.
Stop station scanning by pressing EXIT.
![]() NOTE
NOTE
Storing a station interrupts the SCAN function.
Radio text
Some stations transmit information on program content, artists, etc. This information can be shown on the display.
Activate/deactivate in FM mode under Show radio text.
HD Radio reception (U.S. models only)
Introduction
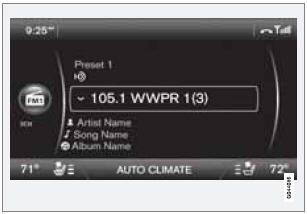
Display when the radio is receiving an HD Radio broadcast
![]() NOTE
NOTE
HD radio volume may fade in and out at times due to coverage limitations.
HD radio is a brand name registered by the Ibiquity digital corporation1. They are the developer of a broadcasting technology called IBOC or In Band On Channel, which refers to the method of transmitting a digital radio broadcast signal centered on the same frequency as the AM or FM station's present frequency.
The IBOC system is referred to as a "hybrid" since it is both analogue and digital.
During hybrid operation, receivers still continue to receive the analogue (non-digital)
signal. HD radio receivers incorporate both modes of reception, where the receiver
will automatically switch to the analogue signal if the digital signal cannot be
decoded or is lost by the receiver. When you have tuned to an HD Radio station,
the  symbol will appear in the audio
system display. The symbol is "grayed-out" when HD Radio is in standby mode and
white when the radio is actively receiving an HD broadcast.
symbol will appear in the audio
system display. The symbol is "grayed-out" when HD Radio is in standby mode and
white when the radio is actively receiving an HD broadcast.
More information about HD radio and IBOC can be found on Ibiquity's website, www.hdradio.com and www.ibiquity.com.
Benefits of digital broadcasting
- Better sound (FM sounds near CD quality and AM as analogue FM).
- Some FM frequencies offer a greater number of listening choices through “multicasting” (consisting of a frequency's main channel and any sub-channels that may also be available on that particular frequency. See also the section "Sub-channels" below).
- When receiving a digital signal there is no multipath disturbance or hisses/pops/ crackling due to outside influences.
How HD broadcasting works
HD Radio works similarly to conventional radio and broadcasts of this type are available in many areas of the United States. However, there are a few key differences:
- Instead of transmitting one analogue signal, stations send out a bundled signal – both analogue and digital.
- An HD radio receiver can receive both digital and analogue broadcasts. Depending on the terrain and location of the vehicle (which will influence the signal strength), the receiver will determine which signal to receive.
Limitations
- Main channel vs. sub-channels (FM only): The main channel is the only channel that can receive in hybrid mode (both digital and analogue). If a frequency has subchannels, they are broadcast in digital mode only. The main FM channel will be displayed as, for example, 93.9 WNYC (Volvo uses the symbol ">" to indicate there are sub-channels available) The sub- FM channels will be displayed as 93.9 – 2 WNYC, 93.9 - 3 WNYC, etc.
- Reception coverage area: Due to current IBOC transmitter power limitations, the reception coverage area in digital mode is somewhat more limited than the station's analogue coverage area. Please be aware that as with any radio broadcast technology, terrain, time of day, foliage level and building location can have positive or negative effects on radio reception.
- Analogue to digital/digital to analogue blending: Analogue to digital blending will occur as the signal strength reaches a preset threshold in the receiver. This will be noticeable in fringe areas (areas with weak reception) and is normal.
![]() NOTE
NOTE
There may be a noticeable difference in sound quality when a change from analogue to digital or digital to analogue occurs, such as:
- Volume increase or decrease
- Equalizer settings, i.e., Bass/ Midrange/ Treble cut or boost
- Time alignment (Digital program material in extreme cases can be as much as 8 seconds behind the analogue). This will noticeable as a "stuttering" effect.
The above items are dependant on the broadcaster's equipment settings and do not indicate a fault in the vehicle's radio receiver or antenna systems.
Switching HD on or off
The factory setting for HD radio is off. However, when driving through areas with weak HD signals (fringe areas), you may experience that the radio repeatedly switches between analogue/ digital and digital/analogue reception. If this happens, it may be desirable to switch HD off. To do so:
1. Be sure the audio system is switched on and in one of the AM or FM modes.
2. Press OK/MENU in the center console control panel.
3. Turn TUNE and move the marker to HD Radio.
4. Press OK/MENU to turn HD off (the X will disappear from the box on the display screen).
This will disable the radio's capability to receive digital broadcasts but it will continue to function as a conventional (analogue) AM/FM receiver. Please note that when HD is switched off, it will not be possible to tune to sub-channels (see the following section for a more detailed explanation of sub-channels).
Repeat steps 2-4 above to reactivate HD (an X will appear in the box on the display screen). Please note that this will only switch HD on or off for the selected waveband (AM, FM1, etc.).
Sub-channels
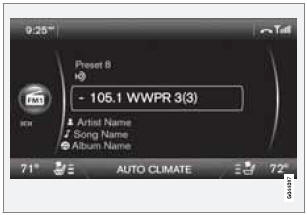
Example of an HD Radio station with sub-channels
In many cases, a main HD Radio station (FM wavebands only) will also have sub-channels offering additional types of programming or music.
In such cases, the “-” symbol will be displayed to the left of the frequency number and a number will be displayed to the right of the frequency number indicating that the currently tuned frequency has at least one sub-channel. The "2" in the illustration indicates that you are currently listening to the first sub-channel on frequency 93.9.
Selecting sub-channels
To listen to a station's sub-channel(s), press and hold the right arrow key on the center console or on the steering wheel keypad for approximately 1 second. To go back to the main channel, press and hold the left arrow key on the center console or on the steering wheel keypad for approximately 1 second. To go to subchannel 2 (if available), press and hold the right arrow key on the center console or on the steering wheel keypad for approximately 1 second.
If you are currently tuned to a frequency's main channel, pressing and holding the left arrow key for approximately 1 second will tune to the next lower radio frequency.
![]() NOTE
NOTE
- When the radio has gone into HD mode, it may take several seconds before the ">" symbol (if the current frequency has any sub-channels) is displayed to the left of the frequency. Pressing and holding the arrow keys for approximately 1 second before the main-/sub-channel icon is displayed will cause the radio to tune to the next available radio station, not to the current station's sub-channels.
- When you are no longer in broadcasting range of the currently tuned sub-channel, No reception will be displayed. The radio will then be muted and it will be necessary to tune to or search for a new radio station.
Sub-channels can also be stored as presets, see page 214 for information on storing stations.
If you press a sub-channel's preset button, it may take up to 6 seconds before the channel becomes audible. If you press this button while you are out of digital range of the transmitter, No HD reception will be displayed.
Sirius satellite radio
Listening to satellite radio
The Sirius satellite system consists of a number of high elevation satellites in geosynchronous orbit.
![]() NOTE
NOTE
- The digital signals from the Sirius satellites are line-of-sight, which means that physical obstructions such as bridges, tunnels, etc, may temporarily interfere with signal reception.
- Avoid any obstructions, such as metallic objects transported on roof racks or in a ski box, or other antennas that may impede signals from the SIRIUS satellites.
Selecting Sirius radio mode
1. With the infotainment system switched on, press RADIO.
2. Continue pressing RADIO (or turn TUNE to scroll) to select SAT 1 or SAT 2 and press OK/MENU (or wait for several seconds).
Activating Sirius radio
1. Tune to a satellite channel that has no audio, which means that the channel is unsubscribed and the text Subscription update needed is displayed (see also "Selecting a channel").
2. Call Sirius at 1-888-539-SIRIUS (7474).
3. If you tune to an unsubscribed channel, the Sirius ID will be displayed. The Sirius ID can also be accessed from the menu (press OK/MENU, turn TUNE to scroll to the Advanced settings menu, press OK/ MENU, scroll to SIRIUS ID and press OK/ MENU to display the number).
4. Updating subscription will be displayed while the subscription is being updated, after which the display will return to the normal view.
SIRIUS ID
The SIRIUS ID (sometimes referred to as the Electronic Serial Number or ESN) is required when contacting the Sirius Call Center. It is used to activate your account and when making any account transactions.
Selecting a channel category
1. Turn TUNE to display a list of channels.
2. Press EXIT.
3. Turn TUNE to scroll through the list of categories and press OK/MENU to make a selection.
> The channels in the selected category are displayed.
![]() NOTE
NOTE
- The category All is default, which enables you to scroll through the entire list of available satellite channels.
- The channel categories are automatically updated several times a year. This takes approximately two minutes and will interrupt normal broadcasting. A message will be displayed while updating is in progress. Information on channel or feature updates is available at www.sirius.com.
Selecting a channel
There are three ways of tuning in a channel:
- Using the left and right arrow keys to go to the next channel. Skipped channels (see page 220) will be excluded.
- By turning the TUNE control and selecting a channel from the list
- Through direct channel entry.
![]() NOTE
NOTE
- The numbers of skipped or locked channels will not be displayed.
- If a channel is locked, the access code must be entered before the channel can be selected. See "Unlocking a channel" on page 220.
Direct channel entry
The Sirius satellite channels are in numerical order throughout all of the categories. To access a channel directly:
1. Turn TUNE to access the channel list.
2. Use the number key buttons to enter the channel's number.
3. Press OK/MENU. The radio will tune to this channel, even if it belongs to a category other than the currently selected one.
Scanning
SCAN automatically searches through the list of satellite channels. The search will only be carried out in the selected category, see page 214 for more detailed information on the scan function.
Storing a channel
A total of 20 satellite channels can be stored; 10 channels each for Sirius 1 and 2, see page 214 for detailed information on storing channels.
- A long press on one of the number keys stores the currently tuned channel on that key.
- A short press on a number key while the radio is in SAT 1 or SAT 2 mode will tune to the preset satellite channel stored on that button, regardless of the currently selected channel category.
Searching for and storing songs
The Song Seek function provides notification when Sirius is broadcasting the songs selected in song memory. Song memory enables you to store the name of the song for future advance notification when that song is being played.
Song seek
When a satellite radio channel plays one of the songs stored in the song memory while the Song seek feature is activated, the listener will be alerted by a text message and an audible signal.
Press OK/MENU to listen to the song or EXIT to cancel.
To activate/deactivate the song seek function:
1. Press OK/MENU.
2. Turn TUNE to scroll to Song memory and press OK/MENU.
3. Turn TUNE to scroll to Song Seek and press OK/MENU to activate or deactivate the function.
![]() NOTE
NOTE
When the song has ended, the radio will remain tuned to the channel on which the song was played.
Song memory
Up to ten songs can be saved in the system's memory.
To add the currently playing song to the list:
1. Press OK/MENU.
2. Scroll to Song memory and press OK/ MENU.
3. Scroll to Add current song to song memory and press OK/MENU. If a new song is selected when the memory is full, you will be prompted to delete a song from the list. To do so:
1. Press OK/MENU.
2. Turn TUNE to scroll through the list of songs. Select a song and press OK/ MENU to delete it from the list.
Radio text
This text provides information about the song that is currently playing. To turn this feature on or off, press OK/MENU and scroll to Show radio text and press OK/MENU to toggle between on or off.
Advanced Sirius settings
This menu function enables you to make settings on certain Sirius satellite radio functions. To access this menu:
1. Press OK/MENU.
2. Scroll to the Advanced settings menu and press OK/MENU.
![]() WARNING
WARNING
Settings should be made when the vehicle is at a standstill.
The following settings can be made in the Sirius menu:
- Channel skip settings can be made
- Channel lock settings can be made
- The channel access code can be displayed or changed (see also "Locking a channel" on page 220)
- Your Sirius ID can be displayed
- Reset Sirius settings
Skip options
This function is used to remove a channel from the list of available channels.
Skipping a channel
1. Press OK/MENU.
2. Scroll to the Advanced settings menu.
3. Press OK/MENU to enter the Skip options menu.
4. Press OK/MENU to enter Channel skip list.
5. Press OK/MENU to select All categories or turn TUNE to scroll to a category and press OK/MENU to select it.
6. Press OK/MENU to select Skip all channels in the category or turn TUNE to scroll to a channel and press OK/ MENU to select or deselect it. Multiple channels can be selected.
Unskip all channels
This removes all channels from the skip list and makes them available for selection.
Temporary unskip all channels
This function will temporarily unskip all channels and make them available for selection. The channels remain on the skip list and will again be skipped the next time the ignition is switched on.
Channel lock
Access to specific channels can be restricted (locked). A locked channel will not provide audio, song titles, or artist information.
![]() NOTE
NOTE
All channels are initially unlocked.
Locking a channel
1. Press OK/MENU.
2. Scroll to the Advanced settings menu.
3. Press OK/MENU and turn TUNE to scroll to the Lock options menu and press OK/ MENU.
4. Use the number keys in the central control panel to enter the channel access code2 and press OK/MENU.
5. Press OK/MENU to enter the Channel lock list.
6. Press OK/MENU to select All categories or turn TUNE to scroll to a category and press OK/MENU to select it.
7. Press OK/MENU to select Lock all channels in the category or turn TUNE to scroll to a channel and press OK/ MENU to select it. Multiple channels can be selected.
The selected channel is now locked and a checked box will be displayed to indicate this. It will be necessary to enter the channel access code2 in order to listen to a locked channel.
Unlocking a channel
A channel's access code2 is required to unlock a channel.
Unlock all channels
This permanently removes all channels from the locked list and makes them available for selection.
Temporarily unlock all channels
This function will temporarily unlock all channels and make them available for selection. The channels remain on the locked list and will again be locked the next time the ignition is switched on.
CHANGE CODE
This function makes it possible to change the channel access code. The default code is 0000.
To change the code:
1. Select Change code in theLock options menu and press OK/MENU.
2. Enter the new code and press OK/MENU.
3. Confirm the new code and press OK/ MENU.
If an incorrect code is entered, the text Incorrect code is displayed.
If you have forgotten the access code:
1. Select SIRIUS ID in the Advanced settings menu and press OK/MENU.
2. Press and hold the OK/MENU button for several seconds.
3. The current code will be displayed.
Your Volvo retailer can also provide you with assistance.
SIRIUS ID
This function displays the 12-digit Sirius activation ID.


