Volvo S60: Remote key and key blade
 Volvo S60: Remote key and key blade
- Introduction
- Common functions: Remote key/ Personal Car Communicator (PCC)*
- Unique functions—PCC*
- Detachable key blade
- Replacing batteries in the remote key/ PCC
- Valet locking
- Blocking access to the trunk
Introduction
Two remote keys or optional Personal Car Communicators (PCC) are provided with your vehicle. They enable you to unlock the doors and trunk, and also function as ignition keys to start the vehicle or operate electrical components. The remote keys contain detachable metal key blades for manually locking or unlocking the driver's door and the glove compartment. Up to six remotes can be programmed for use on the same vehicle.
The PCCs have enhanced functionality compared with the standard remote key.
![]() NOTE
NOTE
In the remainder of this chapter, all references to the remote key also pertain to the PCC unless otherwise stated.
![]() WARNING
WARNING
Never leave the remote key in the ignition if children are to remain in the vehicle.
Detachable key blade
Each remote key or PCC contains a detachable metal key blade for mechanically locking or unlocking the driver's door and the glove compartment, and to enable the valet locking function. See page 59 for more information on the key blade and see page 62 for information on the valet locking function. The key blades have a unique code, which is used if new ones need to be produced. This code is available at an authorized Volvo retailer.
Loss of a remote key
If either of the remote keys is lost, the other should be taken with the car to a Volvo retailer. As an anti-theft measure, the code of the lost remote key must be erased from the system.
![]() NOTE
NOTE
Additional or duplicate remote control keys can be obtained from any Authorized Volvo Retailer.
You can also obtain additional or duplicate remote control keys from certain independent repair facilities and locksmiths that are qualified to make remote control keys. Each key must be programmed to work with your vehicle.
California Only:
A list of independent repair facilities and/or locksmiths known to Volvo that can cut and code replacement keys can be found:
- on the Volvo website at http://www.volvocars.com/us/keys
- by calling Volvo Customer Care at 1-800-458-1552
The number of registered keys for the vehicle can be found by pressing MY CAR and going into Information Number of keys. See page 133 for a description of the menu system.
USA-5WK49264
FCC ID:KR55WK49264 + Siemens VDO 5WK49236
FCC ID:KR55WK49236, 5WK49266
FCC ID:KR55WK49266 + Siemens VDO 5WK49233
FCC ID:KR55WK49233
This device complies with part 15 of the FCC rules and RSS-210. Operation is subject to the following conditions: (1) This device may not cause harmful interference, and (2) this device must accept any interference received, including interference that may cause undesired operation.
Canada-5WK49264
IC:267T-5WK49264 + Siemens VDO 5WK49236
IC:267T-5WK49236, 5WK49266
IC:267T-5WK49266 + Siemens VDO 5WK49233
IC:267T-5WK49233
Operation is subject to the following conditions: (1) this device may not cause interference, and (2) this device must accept any interference, including interference that may cause undesired operation of the device.
Key memory: door mirrors and driver's seat
The position of the side door mirrors and power driver's seat are stored in the remote keys when the vehicle is locked. The next time the driver's door is unlocked with the same remote key and the door is opened within 2 minutes, the power driver's seat and side door mirrors will automatically move to the position that they were in when the doors were most recently locked with the same remote key. See page 89 for more information.
This feature can be activated or deactivated in the vehicle's menu by pressing MY CAR and going into Settings - Car settings - Car key memory. See page 133 for a description of the menu system.
See also page 63 for information regarding vehicles with the optional keyless drive.
Confirmation when locking/unlocking the vehicle
Settings can be made in the menu system for audible and visual confirmation when the vehicle has been locked or unlocked. With these functions activated, the following will occur when the vehicle is locked/unlocked:
Locking confirmation
- The turn signals flash once, an audible signal sounds and the door mirrors will fold* in.
Confirmation will only be given when all doors and the trunk are properly closed and locked.
![]() NOTE
NOTE
If you do not receive confirmation when locking the vehicle, check whether a door or the trunk is ajar, or if this feature has been turned off in the menu.
Unlocking confirmation
- The turn signals will flash twice and the door mirrors will fold* out.
Making a setting
Different alternatives for locking/unlocking confirmation can be selected in the menus by pressing MY CAR on the center console control panel.
- To activate visual confirmation: go to Settings - Car settings - Light settings and select Door lock confirmation light and/or Unlock confirmation light by pressing OK/ MENU.
- To activate audible confirmation: go to Settings Car settings Lock settings and select Audible confirmation by pressing OK/MENU.
See page 133 for a description of the menu system.
Lock indicator
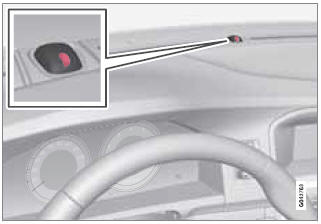
Lock/alarm indicator light
A flashing indicator light at the base of the windshield verifies that the vehicle is locked.
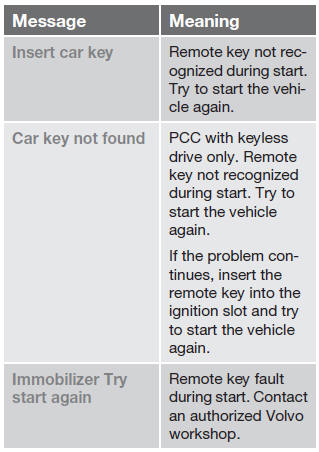
Immobilizer (start inhibitor)
Each of the keys supplied with your vehicle contains a coded transponder. The code in the key is transmitted to an antenna in the ignition slot where it is compared to the code stored in the start inhibitor module. The vehicle will start only with a properly coded key. If you misplace a key, take the other keys to a trained and qualified Volvo service technician for reprogramming as an anti-theft measure. The following messages (which may appear in the instrument panel display) are related to the immobilizer:
CAUTION
Never use force when inserting the remote key in the ignition slot. The vehicle cannot be started if the transponder is damaged.
This device complies with part 15 of the FCC rules. Operation is subject to the following condition: (1) This device may not cause harmful interference, and (2) this device must accept any interference received, including interference that may cause undesired operation.
Canada–IC: 3659A-WFS125VO
Operation is subject to the following conditions: (1) this device may not cause interference, and (2) this device must accept any interference, including interference that may cause undesired operation of the device.
See page 114 for information on starting the vehicle.
Replacing the battery in the remote key
The batteries should be replaced if:
- The information symbol illuminates and Low battery in remote control. Please change batteries. is shown in the display and/or
- if the locks do not react after several attempts to unlock or lock the vehicle.
![]() NOTE
NOTE
The remote key's range is normally approximately 60 ft (20 m) from the vehicle. See page 60 for information on replacing the battery.
Common functions: Remote key/ Personal Car Communicator (PCC)*
Personal Car Communicator (PCC)*
 Lock
Lock
 Unlock
 Approach lighting
 Trunk unlock/open
 Panic alarm
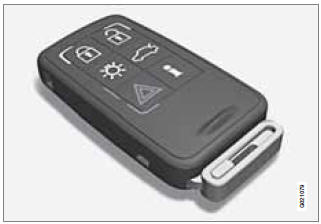
Buttons on the remote
Lock – Press the Lock
button on the remote once to lock all doors and the trunk. The turn signals will
flash once to confirm locking.
Unlock – Press the Unlock button on the remote once to unlock the driver's door.
After a short pause, press the Unlock button a second time within 10 seconds to unlock the other doors and the trunk.
This function can be changed so that all doors unlock at the same time by pressing My Car and going to Settings - Car settings - Lock settings Change doors unlock setting. See page 133 for a description of the menu system.
Approach lighting –
As you approach the vehicle, press the button on the remote key to light the interior
lighting, parking lights, license plate lighting and the lights in the door mirrors*.
These lights will switch off automatically after 30, 60 or 90 seconds. See page 133 for a description of the menu system.
Unlock/open trunk
Press once: This unlocks the trunk (but does not open it) and disarms the alarm and optional movement sensor (the alarm indicator light on the dashboard will go out). If the trunk is not opened within two minutes it will automatically relock and the alarm will be rearmed.
Press twice: This both unlocks the trunk and pops it open slightly.
![]() NOTE
NOTE
Any excess weight (snow, etc.) on the trunk lid may prevent it from opening.
See also page 69 for information on opening the trunk from the passenger compartment.
After closing, the trunk will not automatically relock. Press Lock to relock it and rearm the alarm.
Panic alarm – This button can be used to attract attention during emergency situations.
To activate the panic alarm, press and hold this button for at least 3 seconds or press it twice within 3 seconds. The turn signals and horn will be activated. The panic alarm will stop automatically after 2 minutes and 45 seconds.
To deactivate, wait approximately 5 seconds and press the button again.
The Panic alarm button will not unlock the vehicle.
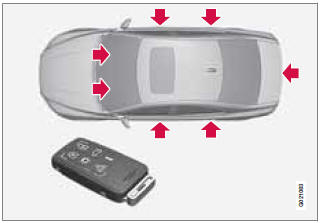
Range
The remote key has a range of approximately 60 ft. (20 m) from the vehicle.
![]() NOTE
NOTE
Buildings or other obstacles may interfere with the function of the remote key. The vehicle can also be locked or unlocked with the key blade, see page 59.
Unique functions—PCC*

1 - Information button
2 - Indicator lights
Pressing the information button provides certain information about the vehicle with the help of the indicator lights.
Using the information button
1. Press the information button 
2. All of the indicator lights will flash sequentially for approximately 7 seconds to indicate that the PCC is receiving information from the vehicle. If any of the buttons are pressed during this 7-second period, transmission of information to the PCC will be interrupted.
![]() NOTE
NOTE
If none of the indicator lights flash when the information button has been pressed several times from different places in relation to the vehicle, contact an authorized Volvo service technician.
The indicator lights provide information according to the illustration:
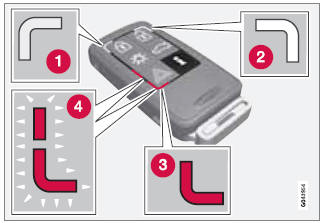
1 - Steady green light: the vehicle is correctly locked.
2 - Steady yellow
light: the vehicle is not locked.
3 - Steady red light: the alarm has been triggered.
4 - Both red lights flash alternatively: the alarm was triggered less than 5 minutes
ago.
Range
The PCC's lock and unlock functions have a range of approximately 60 ft. (20 m) from the vehicle.
![]() NOTE
NOTE
- The approach lighting, panic alarm, and the functions controlled by the information button have a range of approximately 300 ft (100 m) from the vehicle.
- Radio waves, buildings or other obstacles may interfere with the function of the PCC.
If the vehicle does not provide confirmation when a button has been pressed, try moving closer and pressing the button again.
Outside of the PCC´s range
If the PCC is more than approximately 300 ft (100 m) from the vehicle when the information button is pressed, no new information will be received. The PCC most recently used to lock or unlock the vehicle will show the vehicle's most recently received status. The indicator lights will not flash when the information button is pressed while the PCC is out of range. If more than one PCC is used to lock/unlock the vehicle, only the one used most recently will show the correct locking status.
![]() NOTE
NOTE
If none of the indicator lights illuminate when the information button is pressed, this may be because the most recent transmission between the vehicle and the PCC was interrupted or impeded by buildings or other objects.
Keyless drive
Vehicles equipped with the optional Personal Car Communicator have the keyless drive function, see page 63 for detailed information.
Detachable key blade
The key blade can be removed from the remote key. When removed, the key blade can be used to:
- Lock/unlock the driver's door if the remote key is not functioning properly
- Lock/unlock the glove compartment (see page 69)
- Enable/disable the valet locking function (see page 62)
- The front passenger's door and the rear side doors can be locked manually if necessary
- The trunk can be opened manually if necessary (see page 69)
Removing the key blade
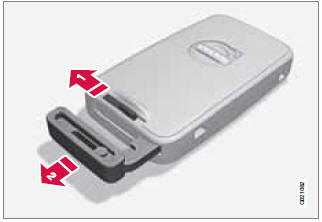
 Slide the spring loaded
catch to the side.
Slide the spring loaded
catch to the side.
 Pull the key blade straight
out of the remote key.
Pull the key blade straight
out of the remote key.
Reinserting the key blade in the remote key
1. Hold the remote key with the slot for the key blade up.
2. Carefully slide the key blade into its groove.
3. Gently press the key blade in the groove until it clicks into place.
Unlocking the doors with the detached key blade
Insert the key blade as far as possible in the driver's door lock. Turn the key blade clockwise approximately one-quarter turn to unlock the driver's door only.
![]() NOTE
NOTE
After unlocking the driver's door with the key blade, opening the door will trigger the alarm.
To disable the alarm:
Insert the remote key in the ignition slot. This also applies to vehicles equipped with the optional keyless drive.
Replacing batteries in the remote key/ PCC
The battery/batteries in the remote key/PCC should be replaced if:
- The information symbol lights up and a text appears in the information display. and/or
- the vehicle's locks repeatedly do not react when a button on the remote key/PCC is pressed within approximately 60 ft (20 m) from the vehicle.
Battery type CR 2430, 3 V (one battery in the remote key, two batteries in the PCC)
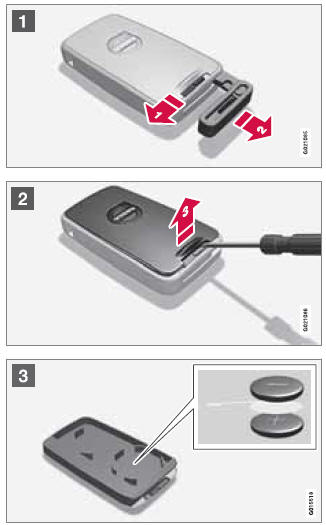
Opening the remote key/PCC
1.  Slide the spring loaded catch
to the side.
Slide the spring loaded catch
to the side.
 Pull the key blade straight out
of the remote key.
Pull the key blade straight out
of the remote key.
2.  Insert a small screwdriver in
the hole behind the spring loaded catch and carefully pry up the cover.
Insert a small screwdriver in
the hole behind the spring loaded catch and carefully pry up the cover.
![]() NOTE
NOTE
Turn the remote key with the buttons upward so that the batteries do not fall out when the cover is removed.
Replacing the batteries
CAUTION
When handling batteries, avoid touching their contact surfaces as this could result in poor battery function in the remote key.
3. Note the position of the battery's (+) or (–) sides.
Remote key (one battery)
1. Use a screwdriver to pry out the old battery.
2. Insert a new one with the
(+) side downward.
PCC (two batteries)
1. Use a screwdriver to pry out the old batteries.
2. Insert the first new
battery with the (+) side upward.
3. Insert the plastic spacer over the battery.
Insert the second new battery on top of the plastic spacer, with the + side downward.
Re-assembling the remote key
1. Press the remote key's cover into place.
2. Hold the remote key with the
slot for the key blade up.
3. Carefully slide the key blade into its groove.
4. Gently press the key blade in the groove until it clicks into place.
Old batteries should be properly recycled.
Valet locking
Blocking access to the trunk
Normal locking/unlocking function
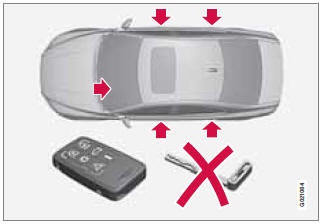
Locking/unlocking points with valet locking activated
By utilizing the remote key with the key blade removed, the valet locking feature enables you to block access to the trunk and glove compartment for e.g., valet parking or when the vehicle is brought to the retailer for service.
With the valet locking function activated:
- The vehicle's doors can be locked or unlocked with the remote
- The engine can be started
- The glove compartment cannot be unlocked
- Access to the trunk is blocked (the trunk lid cannot be unlocked or opened with the remote, and the rear seat backrests cannot be lowered
Activating the valet locking function
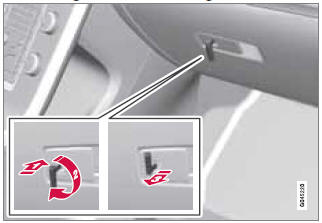
 Insert the key blade
in the glove compartment lock.
Insert the key blade
in the glove compartment lock.
 Turn the key blade180
degrees clockwise.
Turn the key blade180
degrees clockwise.
 Remove the key blade
from the lock. A message will appear in the instrument panel display.
Remove the key blade
from the lock. A message will appear in the instrument panel display.
Deactivating the valet locking function
Turn the key blade 180 degrees counterclockwise in the glove compartment lock to deactivate valet locking.
See page 69 for information on locking the glove compartment normally, without activating the valet locking function.


