Subaru Legacy: Replacing bulbs
 Subaru Legacy: Replacing bulbs
WARNING
Bulbs may become very hot while illuminated. Before replacing bulbs, turn off the lights and wait until the bulbs cool down, Otherwise, there is the risk of sustaining a burn injury.
CAUTION
Replace any bulb only with a new bulb of the specified wattage. Using a bulb of different wattage could result in a fire. For the specified wattage of each bulb, refer to “Bulb chart” F12-14.
- Headlight
- Front turn signal light
- Front position light
- Front fog light (if equipped)
- Rear combination lights
- Tail/Back-up light (Outback)
- License plate light
- Dome light
- Map light
- Vanity mirror light
- Door step light
- Cargo area light (Outback)
- Trunk light (Legacy)
- Other bulbs
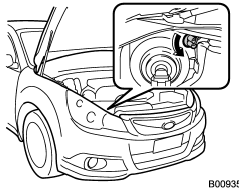
Headlight
CAUTION
Halogen headlight bulbs become very hot while in use. If you touch the bulb surface with bare hands or greasy gloves, fingerprints or grease on the bulb surface will develop into hot spots, causing the bulb to break. If there are fingerprints or grease on the bulb surface, wipe them away with a soft cloth moistened with alcohol.
NOTE
● If headlight aiming is required, consult your SUBARU dealer for proper adjustment of the headlight aim.
● It may be difficult to replace the bulbs. We recommend that you have the bulbs replaced by your SUBARU dealer if necessary.
Low beam light bulbs
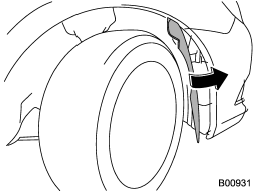
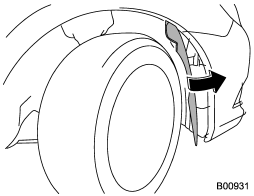
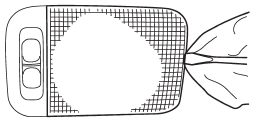
1. Pull off the fender lining. For details, refer to “Pulling off the fender lining” F11- 7.
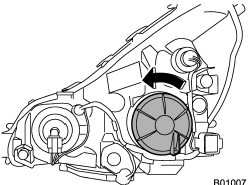
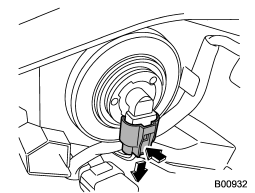
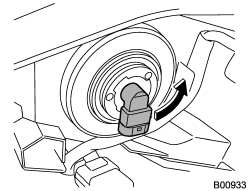
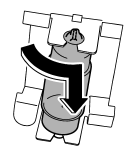
2. Remove the bulb cover, by turning it counterclockwise.
3. Disconnect the electrical connector.
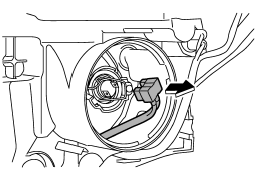
4. Remove the retainer spring.
5. Replace the bulb, then set the retainer spring securely.
6. Reconnect the electrical connector.
7. Install the bulb cover.
8. After replacing the bulb, reattach the fender lining.
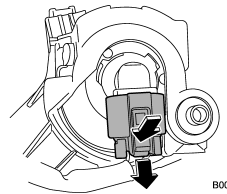
High beam light bulbs
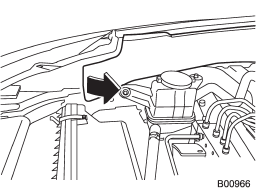
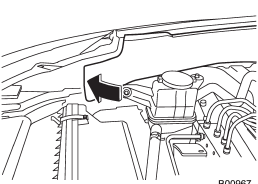
1. Remove the air intake duct (right-hand side). For the method to remove the air intake duct, refer to “Removing air intake duct” F11-7.
Left-hand side
2. Use a screwdriver to remove the secured clip of the washer tank. To make it easy to access the bulb, move the washer tank to the horizontal direction (left-hand side).
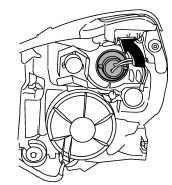
3. Disconnect the electrical connector from the bulb.
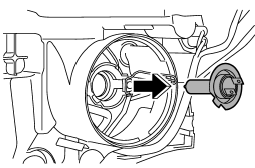
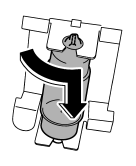
4. Remove the bulb from the headlight assembly by turning it counterclockwise.
5. Replace the bulb with new one. At this time, use care not to touch the bulb surface.
6. Reconnect the electrical connector.
7. To install the bulb to the headlight assembly, turn it clockwise until it clicks.
8. Install the air intake duct with clips (right-hand side).
9. Set the washer tank to the original place and secure it by clip (left-hand side).
Front turn signal light
NOTE
It may be difficult to replace the bulbs. We recommend that you have the bulbs replaced by your SUBARU dealer if necessary.
1. Turn over the protective cover of the engine compartment.
2. Turn the socket counterclockwise and pull it out.
3. Pull out the bulb from the socket and replace the bulb with a new one.
4. After replacing the bulbs, reposition the protective cover of the engine compartment.
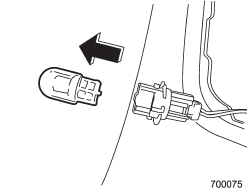
Front position light
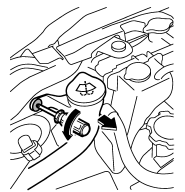
1. Turn the socket counterclockwise and pull it out.
2. Pull out the bulb from the socket and replace the bulb with a new one.
Front fog light (if equipped)
NOTE
It may be difficult to replace the bulbs. We recommend that you have the bulbs replaced by your SUBARU dealer if necessary.
1. Pull off the fender lining. Refer to “Pulling off the fender lining” F11-7.
2. Disconnect the electrical connector.

1) For left-hand side
2) For right-hand side
3. Turn the socket clockwise (right-hand side) or counterclockwise (left-hand side).
4. Pull out the socket.
5. Pull out the bulb from the socket and replace the bulb with a new one.
6. After replacing the bulb, reattach the fender lining.
Rear combination lights
Legacy
NOTE
It may be difficult to replace the bulbs. We recommend that you have the bulbs replaced by your SUBARU dealer if necessary.
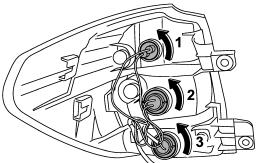
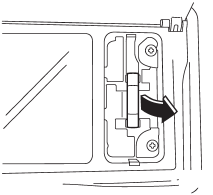
1. Turn the knobs of the cover 90 degrees counterclockwise to remove the cover.
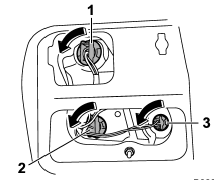
1) Brake/tail and rear side marker light
2) Rear turn signal light
3) Back-up light
2. Remove the bulb holder from the rear combination light assembly by turning it counterclockwise. Use pliers if necessary.
3. Pull the bulb out of the bulb holder and replace it with a new one.
4. Set the bulb holder into the rear combination light assembly and turn it clockwise until it locks.
5. Securely lock the cover against the trunk trim.
Outback
1. Undo the clips. For the method to undo the clips, refer to “Type C clips” F11-6.
2. Remove the cover.
3. Remove the upper and lower screws.
4. Slide the rear combination light assembly straight rearward and remove it from the vehicle.
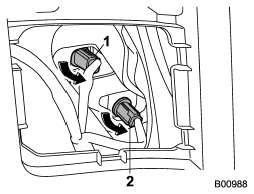
1) Tail and rear side marker light
2) Brake light
3) Rear turn signal light
5. Remove the bulb holder from the rear combination light assembly by turning it counterclockwise.
6. Pull the bulb out of the bulb holder and replace it with a new one.
7. Set the bulb holder into the rear combination light assembly and turn it clockwise until it locks.
8. Reinstall the rear combination light assembly by sliding the two-pronged part of the combination light assembly securely to each holder of the vehicle side.
9. Tighten the upper and lower screws.
10. Reinstall the side cover.
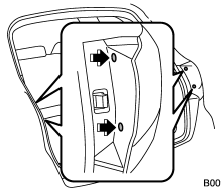
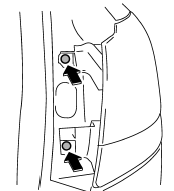
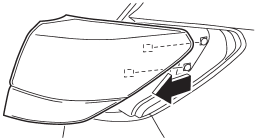
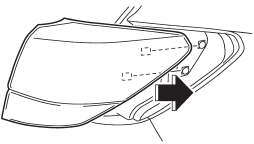
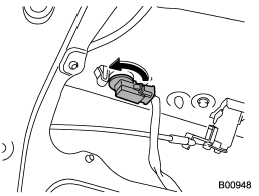
Tail/Back-up light (Outback)

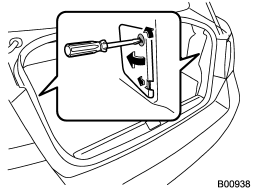
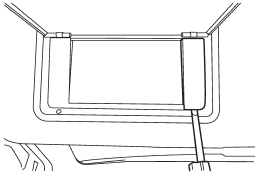
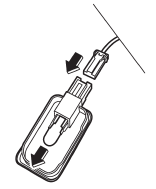
1. Apply a flat-head screwdriver to the light cover as shown in the illustration, and pry the light cover off from the rear gate trim.
1) Back-up light
2) Tail light
2. Turn the bulb socket counterclockwise and remove it.
3. Pull the bulb out of the bulb socket and replace it with a new one.
4. Install the bulb socket by turning it clockwise.
5. Install the light cover on the rear gate.
License plate light
Legacy
NOTE
It may be difficult to replace the bulbs. We recommend that you have the bulbs replaced by your SUBARU dealer if necessary.
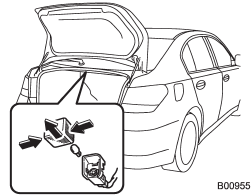
1. Open the trunk.
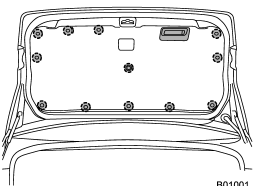
2. Remove the trunk trim lining by removing the 12 clips and the trunk trim handle.
3. Turn the bulb socket counterclockwise and remove it.
4. Pull the bulb out of the bulb socket and replace it with a new one.
5. Install the bulb socket by turning it clockwise.
6. Reinstall the trunk trim lining.
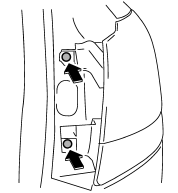
Outback
1. Remove the mounting screws using a Phillips screwdriver.
2. Remove the lens.
3. Pull the bulb out of the socket.
4. Install a new bulb.
5. Reinstall the lens.
6. Tighten the mounting screws.
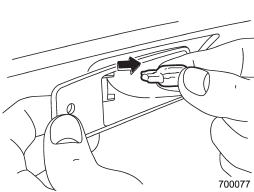
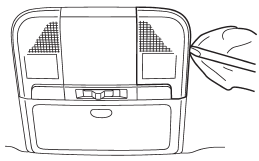
Dome light
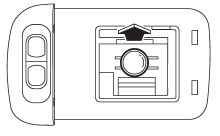
1. Remove the lens by prying the edge of the lens with a flat-head screwdriver.
2. Turn the bulb until the flat surfaces at its ends are aligned vertically.
3. Pull the bulb straight downward to remove it.
4. Install a new bulb.
5. Reinstall the lens.
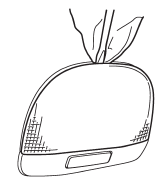
Map light
1. Remove the lens by prying the edge of the lens with a flat-head screwdriver.
2. Turn the bulb until the flat surfaces at its ends are aligned vertically. Pull the bulb straight downward to remove it.
3. Install a new bulb.
4. Reinstall the lens.
Vanity mirror light
1. Remove the lens by prying the edge of the lens with a flat-head screwdriver.
2. Pull the bulb out of the socket.
3. Install a new bulb.
4. Reinstall the lens.
Door step light
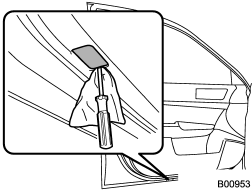
1. Remove the lens by prying the edge of the lens with a flat-head screwdriver.
2. Pull the bulb out of the socket.
3. Install a new bulb.
4. Reinstall the lens.
Cargo area light (Outback)
1. Remove the lens by prying the edge of the lens with a flat-head screwdriver.
2. Pull the bulb out of the socket.
3. Install a new bulb.
4. Reinstall the lens.
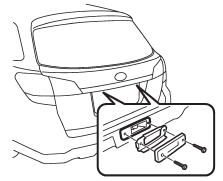
Trunk light (Legacy)
1. Push both sides of the light cover, and then remove the cover by pulling it out.
2. Pull the bulb out of the socket.
3. Install a new bulb.
4. Reinstall the cover.
Other bulbs
Other bulbs may be difficult to replace. We recommend that you have the bulbs replaced by your SUBARU dealer if necessary.


