BMW 5 Series: Replacing components
 BMW 5 Series: Replacing components
Vehicle equipment
All standard, country-specific and optional equipment that is offered in the model series is described in this chapter. Therefore, equipment is also described that is not available in a vehicle, e. g., because of the selected optional equipment or country variant. This also applies for safety-related functions and systems.
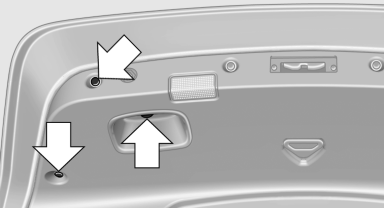
Onboard vehicle tool kit
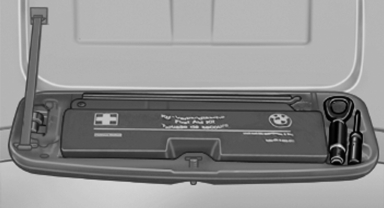
The onboard vehicle tool kit is located in a folddown cover in the trunk lid.
Unscrew the wing nut to open.
Wiper blade replacement
General information
 Do not fold down the wipers without wiper
blades
Do not fold down the wipers without wiper
blades
Do not fold down the wipers if wiper blades have
not been installed; this may damage the windshield.◀
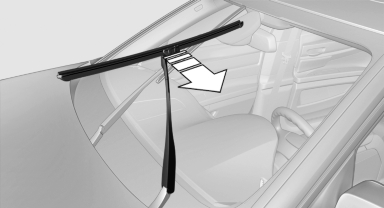
Replacing the wiper blades
1. To change the wiper blades, fold up, the wiper arms.
2. Fold up the wipers.
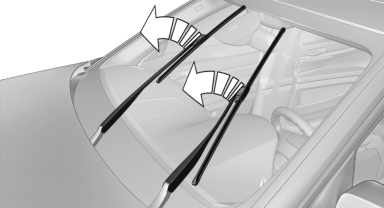
3. Position the wiper blade in a horizontal position.
4. Remove the wiper blade toward one side.
Lamp and bulb replacement
General information
Lamps and bulbs make an essential contribution to vehicle safety.
The manufacturer of the vehicle recommends that you entrust corresponding procedures to the service center if you are unfamiliar with them or they are not described here.
You can obtain a selection of replacement bulbs at the service center.
Danger of burns
Only change bulbs when they are cool;
otherwise, there is the danger of getting
burned.◀
Working on the lighting system
When working on the lighting system, you
should always switch off the lights affected to
prevent short circuits.
To avoid possible injury or equipment damage when replacing bulbs, observe any instructions provided by the bulb manufacturer.◀
Do not perform work/bulb replacement on
xenon headlamps
Have any work on the xenon lighting system, including
bulb replacement, performed only by a
service center. Due to the high voltage present
in the system, there is the danger of fatal injuries
if work is carried out improperly.◀
Do not touch the bulbs
Do not touch the glass of new bulbs with
your bare hands, as even minute amounts of
contamination will burn into the bulb's surface
and reduce its service life.
Use a clean tissue, cloth or something similar, or hold the bulb by its base.◀
Light-emitting diodes (LEDs)
Light-emitting diodes installed behind a cover serve as the light source for controls, display elements and other equipment.
These light-emitting diodes, which are related to conventional lasers, are officially designated as Class 1 light-emitting diodes.
Do not remove the covers
Do not remove the covers, and never stare
into the unfiltered light for several hours; otherwise,
irritation of the retina could result.◀
Headlamp glass
Condensation can form on the inside of the external lamps in cool or humid weather. When driving with the light switched on, the condensation evaporates after a short time. The headlamp glasses do not need to be changed.
If the headlamps do not dim despite driving with the light switched on, increasing humidity forms, e. g. water droplets in the light, have the service center check this.
Front lamps, bulb replacement
Halogen headlamps
At a glance
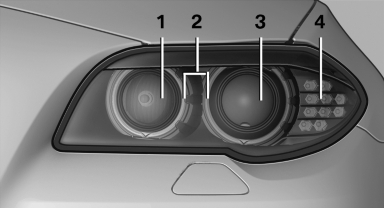
1. High beams
2. Parking lamps
3. Low beams
4. Turn signal
Parking lamps and roadside parking lamps, lateral turn signal lamp
Follow the general instructions on lamps and bulbs
These lights are made using LED technology.
Contact your service center in the event of a malfunction
Accessing the bulbs
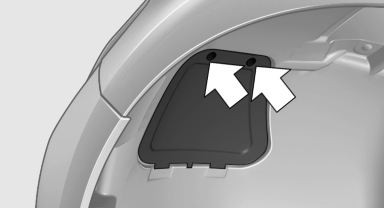
Remove the screws and fold down the cap.
Low beams
Follow the general instructions on lamps and bulbs
The illustration shows the left side of the engine compartment.
55-watt bulb, H7
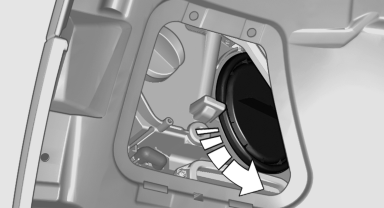
Unscrew the cap, remove it, and change the bulb.
Turn signal
Follow the general instructions on lamps and bulbs
The illustration shows the left side of the engine compartment.
24-watt bulb, PY
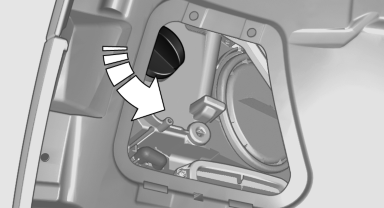
Unscrew the cap, remove it, and change the bulb.
High beams
Follow the general instructions on lamps and bulbs
The illustration shows the left side of the engine compartment.
55-watt bulb, H7
1. Fold open the cover in the engine compartment.

2. Unscrew the cap and remove it.

3. Unscrew the bulb holder counterclockwise
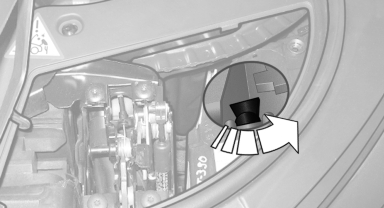
4. Remove the bulb and replace it.
5. Insert the new bulb and attach the cover in
the reverse order.
Xenon headlamps
Because of the long life of these bulbs, the likelihood of failure is very low. Switching the lamps on and off frequently shortens their life.
If a xenon bulb fails, switch on the front fog lamps and continue the trip with great care. Comply with local regulations.
Do not perform work/bulb replacement on
xenon headlamps
Have any work on the xenon lighting system, including
bulb replacement, performed only by a
service center. Due to the high voltage present
in the system, there is the danger of fatal injuries
if work is carried out improperly.◀
For checking and adjusting headlamp aim, please contact your BMW center.
At a glance

1. Corner-illuminating lamps
2. Parking lamp, daytime running lights
3. Low beams/high beams
4. Turn signal
Parking lamps and roadside parking lamps, turn signal lamp
Follow the general instructions on lamps and bulbs
These lights are made using LED technology.
Contact your service center in the event of a malfunction.
Corner-illuminating lamps
Follow the general instructions on lamps and bulbs
The illustration shows the left side of the engine compartment
55-watt bulb, H7
1. Fold open the cover in the engine compartment.
2. Unscrew the cap and remove it.

3. Unscrew the bulb holder counterclockwise
4. Remove the bulb and replace it.
5. Insert the new bulb and attach the cover in
the reverse order.
Front fog lamps
Follow the general instructions on lamps and bulbs
35-watt bulb, H8
1. Carefully pull out the grill toward the front.
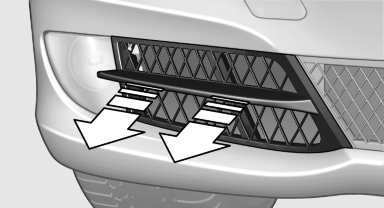
2. Remove the screws.
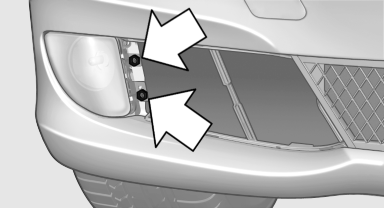
3. Pull the lamp out toward the front.
4. Remove the bulb and replace it.
5. Insert the new bulb and attach the cover in
the reverse order.
Tail lamps, bulb replacement
At a glance

1. Turn signal
2. Reversing lamp
3. Inside brake lamp
4. Tail lamp
5. Outside brake lamp
6. Rear reflector
Turn signal, outer brake, tail, and license plate lamps
Follow the general instructions on lamps and bulbs
These lights are made using LED technology.
Contact your service center in the event of a malfunction
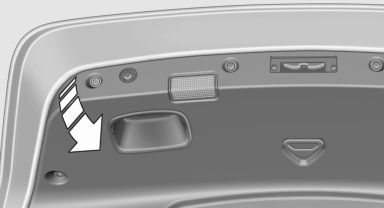
Lamps in the trunk lid
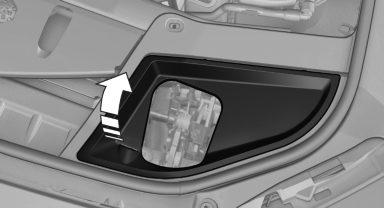
Access to the lamps
1. Remove the three screws using the screw driver from the onboard vehicle tool kit.
2. Fold away the cover.
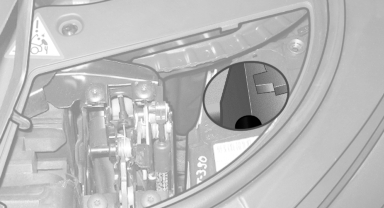
Inside brake lamp
Follow the general instructions on lamps and bulbs
21-watt bulb, H21W
The illustration shows the position of the bulb in the installed bulb holder

Squeeze the clips together and remove the bulb holder.
Press the bulb into the bulb holder, turn counterclockwise and remove.
Reversing lamp
Follow the general instructions on lamps and bulbs
16-watt bulb, W16W

The illustration shows the position of the bulb in the installed bulb holder.

Squeeze the clips together and remove the bulb holder.
Pull out the bulb and replace it.
Changing wheels
Notes
The vehicle equipment does not include a spare tire.
When using run-flat tires or tire sealants, a tire does not need to be changed immediately in the event of pressure loss due to a flat tire.
The tools for changing wheels are available as accessories from your service center.
Jacking points for the vehicle jack
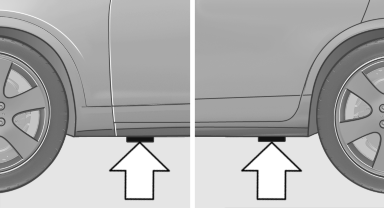
The jacking points for the vehicle jack are located in the positions shown.
Vehicle battery
Maintenance
The battery is maintenance-free, i.e., the electrolyte will last for the life of the battery.
Your service center will be glad to advise you on questions regarding the battery.
Battery replacement
Use approved vehicle batteries only.
Only use vehicle batteries that have been
approved for your vehicle by the manufacturer;
otherwise, the vehicle could be damaged and
systems or functions may not be fully available.◀
After a battery replacement, have the battery registered on the vehicle by your service center to ensure that all comfort functions are fully available and that any Check Control messages are no longer displayed.
Charging the battery
In the vehicle, only charge the battery via the terminals, in the engine compartment with the engine off.
Power failure
needs to be reinitialized.
Individual settings need to be reprogrammed:
▷ Seat, mirror, and steering wheel memory:
store the positions again.
▷ Time: update.
▷ Date: update.
▷ Radio station: save again.
▷ Navigation system: wait for the operability of the navigation.
Disposing of old batteries
 Have old batteries disposed of
by your
service center or bring them to a recycling
center.
Have old batteries disposed of
by your
service center or bring them to a recycling
center.
Maintain the battery in an upright position for transport and storage. Secure the battery so that it does not tip over during transport
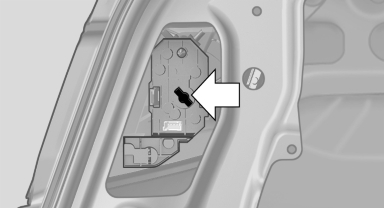
Fuses
Notes
Replacing fuses
Never attempt to repair a blown fuse and
do not replace a defective fuse with a substitute
of another color or amperage rating; this could
lead to a circuit overload, ultimately resulting in
a fire in the vehicle.◀
Plastic tweezers and information on the fuse types and locations are stored in the fuse box in the cargo area.
In the glove compartment
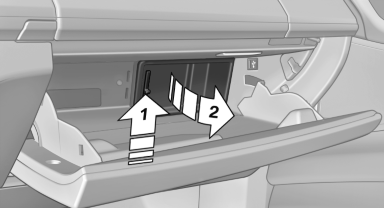
Push the handle up, arrow 1, and open the lid, arrow 2.
In the cargo area

Push the handle up, arrow 1, and open the lid, arrow 2.
In the cargo area
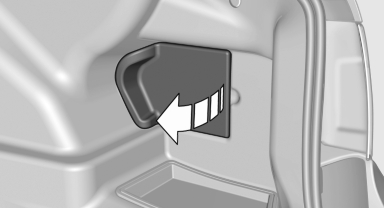
Open the cover on the right side trim.
Information on the fuse types and locations is found on a separate sheet.


