Honda Accord: Seats
 Honda Accord: Seats
- Driver’s Seat Power Adjustments
- Front Seat Manual Adjustments
- Driver’s Seat Manual Height Adjustment
- Armrest
- Rear Seat Access
- Head Restraints
- Folding Rear Seat
Driver’s Seat Power Adjustments
Except LX and EX
See for important safety information and warnings about how to properly position the seats and seatbacks.
The controls for the power adjustable driver’s seat are on the outside edge of the seat bottom. You can adjust the seat with the ignition switch in any position. Make all seat adjustments before you start driving.
The front passenger’s seat adjusts manually.
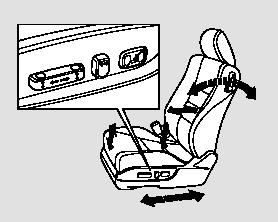
 Moves the seat forward
and backward.
Moves the seat forward
and backward.
 Moves the front of the
seat up or down.
Moves the front of the
seat up or down.
 Raises or lowers the seat.
 Moves the whole seat up
and forward, or down
and backward. The front
of the seat also tilts up or
down at the same time.
Moves the whole seat up
and forward, or down
and backward. The front
of the seat also tilts up or
down at the same time.
 Adjusts the seat-back
angle forward or
backward.
Adjusts the seat-back
angle forward or
backward.
 Increases or decreases
the lumbar support.
Increases or decreases
the lumbar support.
U.S. V6 models, and Canadian EX-L and V6 models with navigation system
The driver’s seat includes a memory feature. Two seat positions can be stored in separate memories. You can then select amemorized position by pushing the appropriate memory button. Refer to page for how to memorize and select the seat positions.
Front Seat Manual Adjustments
See pages for important safety information and warnings about how to properly position the seats and seatbacks.
Make all seat adjustments before you start driving.
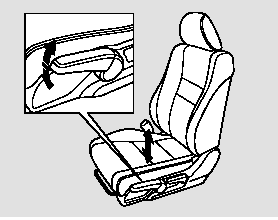
To adjust the seat forward or backward, pull up on the bar under the seat cushion’s front edge. Move the seat to the desired position, and release the bar. Try tomove the seat to make sure it is locked in position.
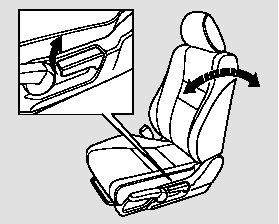
To change the seat-back angle, pull up on the lever on the outside of the seat bottom.
Once a seat is adjusted correctly, rock it back and forth to make sure it is locked in position.
Driver’s Seat Manual Height Adjustment
LX and EX models
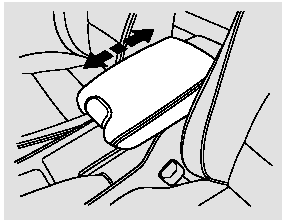
The height of your driver’s seat is adjustable. To raise the seat, repeatedly pull up the lever on the outside of the seat cushion. To lower the seat, push the lever down repeatedly.
Make all seat adjustments before you start driving.
Armrest
To use the console lid as an armrest, slide it to one of its three positions.
Rear Seat Access
Driver’s Side

On all V6 models and 4-cylinder EX-L model
To get into the rear seat on the driver’s side, open the door and pull the release lever up on the side of the seat-back. The seat-back will tilt forward to allow easier entry to the rear seat.

To avoid damaging the seat-back angle adjustment motor, do not operate the seat-back angle switch when the seatback is tilted f orward.
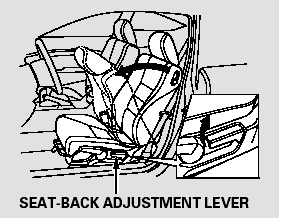
LX and EX models
To get into the rear seat on the driver’s side, open the door and pull up on the seat-back adjustment lever.
The seat-back will tilt forward to allow easier entry to the rear seat.
Passenger’s Side
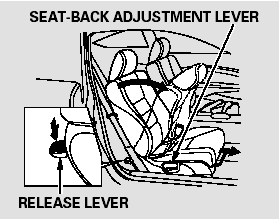
To get into the rear seat on the passenger’s side, push downward on the release lever at the base of the seat-back, or pull up on the seat-back adjustment lever. The seat-back will tilt forward and the entire seat will move forward to allow easier entry to the rear seat.
After a passenger gets into the rear seat, push the seat-back to the upright position and push the whole seat backwards until it latches. Make sure the seat is fully latched before sitting in it.
Head Restraints
Your vehicle is equipped with head restraints in all seating positions to help protect you and your passengers from the likelihood of whiplash and other injuries.
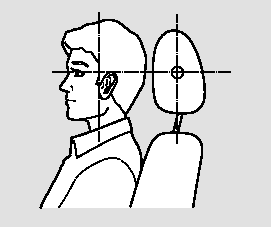
They are most effective when you adjust them so the center of the back of the occupant’s head rests against the center of the restraint.
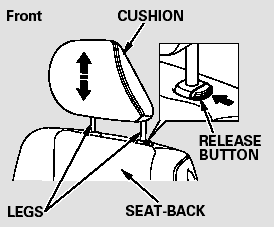
Adjusting the Head Restraint
The head restraints adjust for height.
You need both hands to adjust a restraint.Do not attempt to adjust it while driving. To raise it, pull upward.
To lower the restraint, push the release button sideways, and push the restraint down.
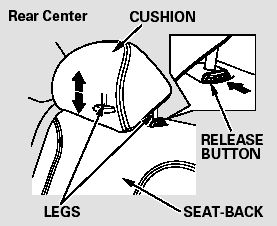
Removing the Head Restraint
To remove a head restraint for cleaning or repair, pull it up as far as it will go. Push the release button, then pull the restraint out of the seatback.

Failure to reinstall the head restraints can result in severe injury during a crash.
Always replace the head restraints before driving.
When reinstalling a head restraint, put the legs back in place. Then adjust it to the appropriate height while pressing the release button.
Make sure the head restraint locks in position when you reinstall it.
Active Head Restraints
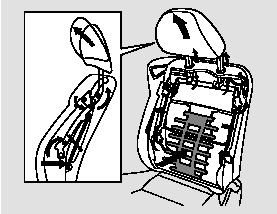
The driver’s and front passenger’s seats have active head restraints. If the vehicle is struck severely from the rear, the occupant properly secured with the seat belt will be pushed against the seat-back and the head restraint will automatically move forward.
This reduces the distance between the restraint and the occupant’s head.
It also helps protect the occupants against the likelihood of whiplash and injuries to the neck and upper spine.
After a collision, the activated restraint should return to its normal position.
If the restraints do not return to their normal position, or in the event of a severe collision, have the vehicle inspected by a Honda dealer.
For a head restraint system to work properly:
Do not hang any items on the head restraints, or from the restraint legs.
Do not place any object between an occupant and the seat-back.
Install each restraint in its proper location.
Only use genuine Honda replacement head restraints.
Folding Rear Seat
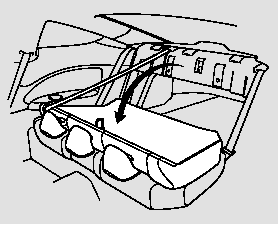
The back of the rear seat folds down, giving you direct access to the trunk.
The seat-back is released from inside the trunk.
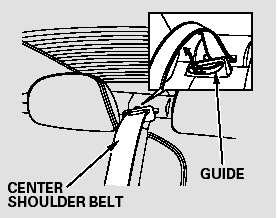
When storing cargo, you can move the rear center shoulder belt out of the way by removing the belt from the guide.
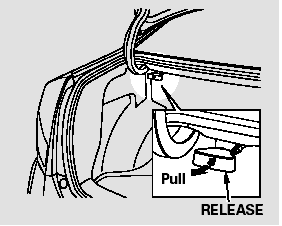
To release the seat-back from inside the trunk, pull the release under the trunk panel. Push the seat-back down from inside the trunk, or pull the seat-back down from inside the vehicle.
Remove any items from the seat before you fold down the seat-back.
Make sure that the folded seat-back does not press against the front passenger’s seat, as this could cause the weight sensors to work improperly.
To lock the seat-back upright, push it firmly against the trunk panel. Make sure it is latched in place by pulling on the top of the seat.
If the rear head restraints get caught on the front seat backs and you cannot fold down the rear seat-back fully, you can remove the head restraints.
Make sure the removed head restraints are securely stored.
Make sure all rear shoulder belts are positioned in front of the rear seatback, and the center shoulder belt is re-positioned in the guide whenever the seat-back is in its upright position.
Be sure there are no twists in any shoulder belt.
Do not put any heavy items on the seat-back when it is folded down.
Make sure all items in the trunk, or items extending through the opening into the back seat, are secured.
Loose items can fly forward and cause injury if you have to brake hard. See Carrying Cargo.
Never drive with the seat-back folded down and the trunk lid open.
See Carbon Monoxide Hazard.


