BMW 5 Series: Displays
 BMW 5 Series: Displays
- Vehicle equipment
- Instrument cluster
- Electronic displays
- Check Control
- Fuel gauge
- Tachometer
- Engine oil temperature
- Coolant temperature
- Odometer and trip odometer
- External temperature
- Time
- Date
- Range
- Current fuel consumption
- Energy recovery
- Service requirements
- Gear shift indicator
- Selection lists in the instrument cluster
- Computer
- Speed limit
- Settings on the Control Display
Vehicle equipment
All standard, country-specific and optional equipment that is offered in the model series is described in this chapter. Therefore, equipment is also described that is not available in a vehicle, e. g., because of the selected optional equipment or country variant. This also applies for safety-related functions and systems.
Instrument cluster
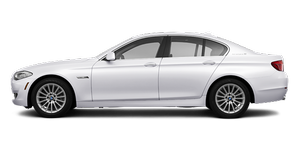
Overview, instrument cluster
1 Fuel gauge
2 Speedometer
3 Indicator/warning lamps
4 Tachometer
5 Engine oil temperature
6 Electronic displays
7 Display/reset miles
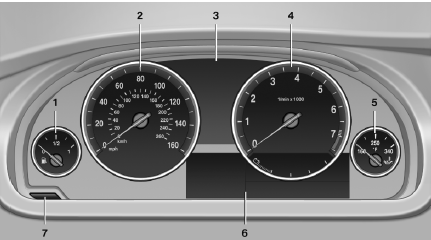
Overview, Instrument cluster with enhanced features
1 Fuel gauge
2 Speedometer
3 Indicator/warning lamps
4 Tachometer
5 Engine oil temperature
6 Electronic displays
7 Display/reset miles
Electronic displays
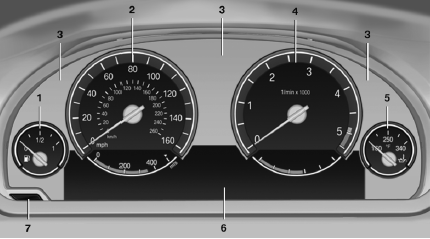
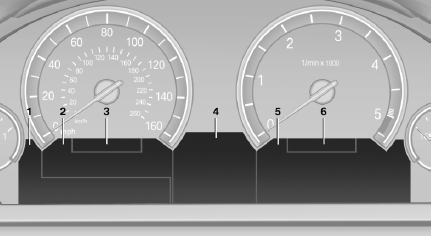
Overview, instrument cluster
1. Miles/trip miles
External temperature
Time
Date
Range
Selection list, e.g., radio
Navigation display
Computer
2. Transmission display
Current fuel consumption
Energy recovery
3. Service requirements
Messages, e.g. Check Contro
Navigation display
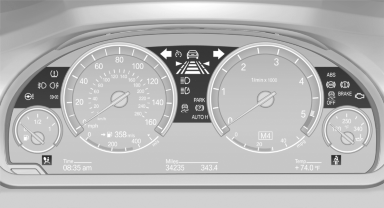
Overview, instrument cluster with enhanced features
1. Messages, e.g. Check Control
Time
Date
2. Range
3. Computer
4. Navigation display
Service requirements
Miles/trip miles
5. Selection list, for instance radio
Current fuel consumption
Energy recovery
External temperature
6. Transmission display
Check Control
The concept
The Check Control system monitors functions in the vehicle and notifies you of malfunctions in the monitored systems.
A Check Control message is displayed as a combination of indicator or warning lamps and text messages in the instrument cluster and in the Head-up Display.
In addition, an acoustic signal may be output and a text message may appear on the Control Display.
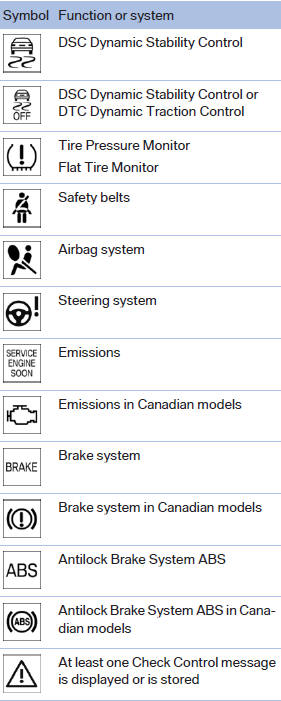
Indicator/warning lamps
The indicator and warning lamps can light up in a variety of combinations and colors.
Several of the lamps are checked for proper functioning and light up temporarily when the engine is started or the ignition is switched on.
Overview: indicator/warning lamps
Text messages
Text messages in combination with a symbol in the instrument cluster explain a Check Control message and the meaning of the indicator and warning lamps.
Supplementary text messages
Addition information, such as on the cause of a fault or the required action, can be called up via Check Control.
The supplementary text of urgent messages is displayed on the Control Display automatically.
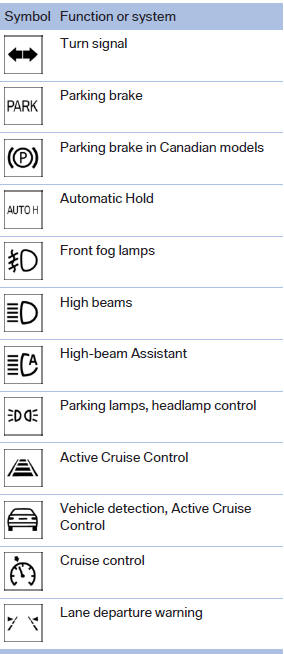
Symbols
Depending on the Check Control message, the following functions can be selected.
▷  "Owner's Manual"
Display additional information about the
Check Control message in the integrated
owner's manual.
▷  "Service
request"
"Service
request"
Contact the service partner.
▷  "Roadside
Assistance"
"Roadside
Assistance"
Contact Roadside Assistance.
Hiding Check Control messages
Hiding Check Control messages
Press the computer button on the turn signal lever.
▷ Some Check Control messages are displayed continuously and are not cleared until the malfunction is eliminated. If several malfunctions occur at once, the messages are displayed consecutively.
These messages can be hidden for approx.
8 seconds. After this time, they are displayed
again automatically.
▷ Other Check Control messages are hidden
automatically after approx. 20 seconds.
They are stored and can be displayed again later.
Displaying stored Check Control messages
1. "Vehicle Info"
2. "Vehicle status"
3.  "Check Control"
4. Select the text message.
Messages after trip completion
Special messages that are displayed during driving are displayed again after the ignition is switched off.
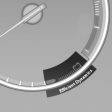
Fuel gauge
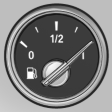 The vehicle inclination may
cause the display to vary.
The vehicle inclination may
cause the display to vary.
Notes on refueling
Tachometer
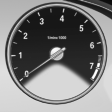 Always avoid engine speeds in
the red warning field. In this
range, the fuel supply is interrupted
to protect the engine.
Always avoid engine speeds in
the red warning field. In this
range, the fuel supply is interrupted
to protect the engine.
Engine oil temperature
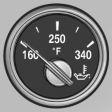 ▷ Cold engine: the pointer is at
the low temperature end.
▷ Cold engine: the pointer is at
the low temperature end.
Drive at moderate engine and vehicle speeds.
▷ Normal operating temperature:
the pointer is in the middle or in the left half of the temperature display.
▷ Hot engine: the pointer is at the high temperature end. A Check Control message is displayed in addition.
Coolant temperature
Should the coolant, and with it the engine, become too hot, a Check Control message is displayed.
Check the coolant level
Odometer and trip odometer
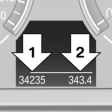 ▷ Odometer, arrow 1.
▷ Trip odometer, arrow 2.
Display/reset miles
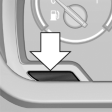 Press the knob.
▷ When the ignition is switched off, the time, external temperature and odometer are displayed.
▷ When the ignition is switched on, the trip odometer is reset.
External temperature
External temperature warning
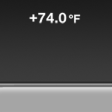 If the display drops to +37 ℉/
+3 ℃, a signal sounds.
If the display drops to +37 ℉/
+3 ℃, a signal sounds.
A Check Control message is displayed.
There is the increased danger of ice.
 Ice on roads
Even at temperatures above +37 ℉/+3 ℃,
there can be a risk of ice on roads.
Therefore, drive carefully on bridges and shady roads, for example, to avoid the increased danger of an accident.◀
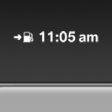
Time
 The time is displayed at the
bottom
of the instrument cluster.
The time is displayed at the
bottom
of the instrument cluster.
Setting the time and time format
Date
 The date is displayed in the
instrument
cluster.
The date is displayed in the
instrument
cluster.
Setting the date and date format
Range
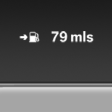 After the reserve range is
reached:
After the reserve range is
reached:
▷ A Check Control message is
displayed briefly.
▷ The remaining range is
shown on the computer.
▷ When a dynamic driving style is used, such
as when corners are taken rapidly, engine
functions are not ensured.
The Check Control message appears continuously below a range of approx. 30 miles/50 km.
Refuel promptly
Refuel no later than at a range 30 miles/
50 km, or engine functions are not ensured and
damage may occur.◀
Displaying the cruising range
1. "Settings"
2. "Info display"
3. "Additional indicators"
The range is displayed in the instrument cluster.
Current fuel consumption
 Displays the current fuel
consumption.
Displays the current fuel
consumption.
You can check whether you are currently driving in an efficient and environmentally- friendly manner.
Displaying the current fuel consumption
1. "Settings"
2. "Info display"
3. "Additional indicators"
The bar display for the current fuel consumption is displayed in the instrument cluster.
Energy recovery
 The energy of motion of the
vehicle
is converted to electrical energy
while coasting. The vehicle
battery is partially charged and
fuel consumption can be lowered.
The energy of motion of the
vehicle
is converted to electrical energy
while coasting. The vehicle
battery is partially charged and
fuel consumption can be lowered.
Service requirements
Display
 The driving distance or the time
to the next service is displayed
briefly after the ignition is
switched on.
The driving distance or the time
to the next service is displayed
briefly after the ignition is
switched on.
The current service requirements can be read out from the remote control by the service specialist.
Data regarding the maintenance status or legally mandated inspections of the vehicle are automatically transmitted to your service center before a service due date, Automatic Service Request
Detailed information on service requirements
More information on the scope of service required can be displayed on the Control Display.
1. "Vehicle Info"
2. "Vehicle status"
3.  "Service required"
Required maintenance procedures and legally
mandated inspections are displayed.
4. Select an entry to call up detailed information.
Symbols
Entering appointment dates
Enter the dates for the required inspections.
Ensure that the vehicle date and time are set correctly.
1. "Vehicle Info"
2. "Vehicle status"
3.  "Service required"
4. "§ Vehicle inspection<>"
5. "Date:"
6. Create the settings.
7. Confirm.
The entered date is stored
Automatic Service Request
Data regarding the maintenance status or legally mandated inspections of the vehicle are automatically transmitted to your service center before a service due date.
You can check when your service center was notified.
1. "Vehicle Info"
2. "Vehicle status"
3. Open "Options".
4. "Last Service Request"
Gear shift indicator
The concept
The system recommends the most fuel efficient gear in the current driving situation.
Displays
Indicators to shift up or down are displayed in the instrument cluster.
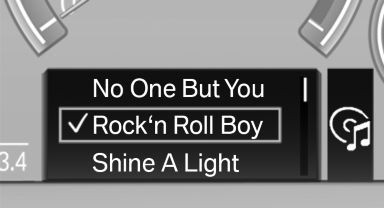
Selection lists in the instrument cluster
The concept
The concept
The following can be operated using the buttons and the thumbwheel on the steering wheel:
▷ Current audio source.
▷ Redial on telephone.
▷ Activation of the voice activation system.
Activating a list and creating the setting
Activating a list and creating the
setting
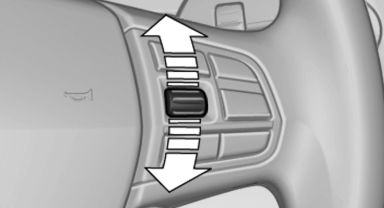
On the right side of the steering wheel, turn the thumbwheel to activate the corresponding list.
Using the thumbwheel, select the desired setting and confirm it by pressing the thumbwheel.
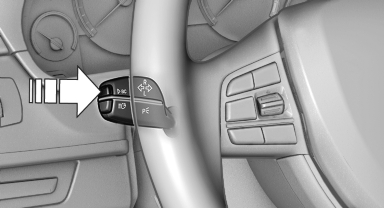
Computer
Indication in the info display
 The information from the
computer
is shown in the Info display
in the instrument cluster.
The information from the
computer
is shown in the Info display
in the instrument cluster.
Calling up information on the info display

Calling up information on the info
display
Press the computer button on the turn signal lever.
Information is displayed on the info display of the instrument cluster.
Information at a glance
Repeatedly pressing the button on the turn signal lever calls up the following information on the info display:
▷ Range.
▷ Average fuel consumption.
▷ Average speed.
▷ Date.
▷ Time of arrival
When destination guidance is activated in
the navigation system.
▷ Distance to destination
When destination guidance is activated in
the navigation system.
▷ Arrow view of navigation system
When destination guidance is activated in
the navigation system.
Adjusting the info display
You can select what information from the computer is to be displayed on the info display of the instrument cluster.
1. "Settings"
2. "Info display"
3. Select the desired displays.
Information in detail
Range
Displays the estimated cruising range available with the remaining fuel.
It is calculated based on your driving style over the last 20 miles/30 km.
If there is only enough fuel left for less than 45 miles/80 km, the color of the display changes.
Average fuel consumption
This is calculated for the period during which the engine is running.
The average fuel consumption is calculated on the basis of various distances.
Average speed
Periods in which the vehicle is parked with the engine manually stopped do not enter into the calculation of the average speed.
Resetting average values
Press and hold the computer button on the turn signal lever.
Distance to destination
The distance remaining to the destination is displayed if a destination is entered in the navigation system before the trip is started.
The distance to the destination is adopted automatically.
Time of arrival
 The estimated time of arrival is
displayed if a destination is entered
in the navigation system
before the trip is started.
The estimated time of arrival is
displayed if a destination is entered
in the navigation system
before the trip is started.
The time must be correctly set.
Speed limit
Display of a speed limit which, when reached, should cause a warning to be issued.
Renewed warning if the vehicle speed drops below the set speed limit once by at least 3 mph/ 5 km/h.
Displaying, setting or changing the limit
1. "Settings"
2. "Speed"
3. "Warning at:"
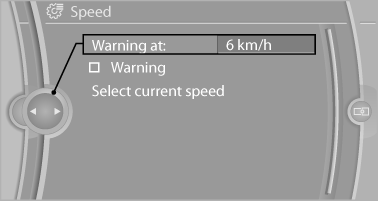
Displaying, setting or changing the
limit
4. Turn the controller until the desired limit is
displayed.
5. Press the controller.
The speed limit is stored.
Activating/deactivating the limit
1. "Settings"
2. "Speed"
3. "Warning"
4. Press the controller
Applying your current speed as the limit
1. "Settings"
2. "Speed"
3. "Select current speed"
4. Press the controller.
The current vehicle speed is stored as the limit.
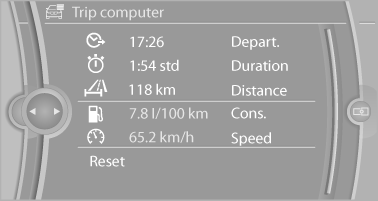
Trip computer
There are two types of computer.
▷ "Onboard info": the values can be reset as
often as necessary.
▷ "Trip computer": the values provide an overview
of the current trip.
Resetting the trip computer
1. "Vehicle Info"
2. "Trip computer"
3. "Reset": all values are reset.
"Automatically reset": all values are reset approx. 4 hours after the vehicle comes to a standstill.
Display on the Control Display
Display the computer or trip computer on the Control Display.
1. "Vehicle Info"
2. "Onboard info" or "Trip computer"
Resetting the fuel consumption or speed
1. "Vehicle Info"
2. "Onboard info"
3. "Cons." or "Speed"
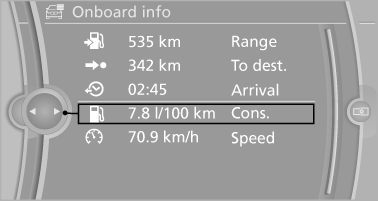
4. "Yes"
Settings on the Control Display
Time
Setting the time zone
1. "Settings"
2. "Time/Date"
3. "Time zone"
4. Select the desired time zone.
The time zone is stored.
Setting the time
1. "Settings"
2. "Time/Date"
3. "Time:"
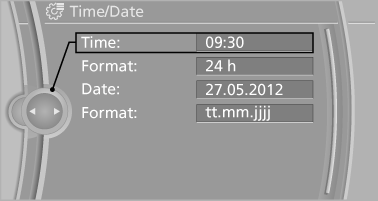
4. Turn the controller until the desired hours
are displayed.
5. Press the controller.
6. Turn the controller until the desired minutes
are displayed.
7. Press the controller.
The time is stored.
Setting the time format
1. "Settings"
2. "Time/Date"
3. "Format:"
4. Select the desired format.
The time format is stored.
Date
Setting the date
1. "Settings"
2. "Time/Date"
3. "Date:"
4. Turn the controller until the desired day is
displayed.
5. Press the controller.
6. Make the necessary settings for the month
and year.
The date is stored.
Setting the date format
1. "Settings"
2. "Time/Date"
3. "Format:"
4. Select the desired format.
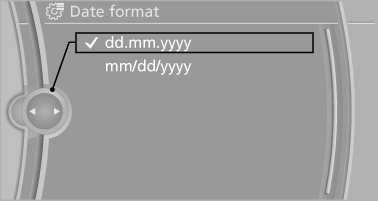
The date format is stored.
Language
Setting the language
To set the language on the Control Display:
1. "Settings"
2. "Language/Units"
3. "Language:"
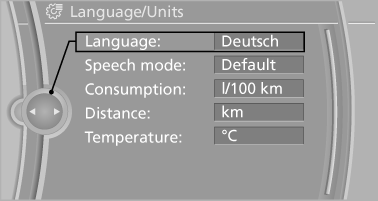
4. Select the desired language.
The setting is stored for the remote control currently in use.
Setting the voice dialog
Voice dialog for the voice activation system
Units of measure
Setting the units of measure
To set the units for fuel consumption, route/distance and temperature:
1. "Settings"
2. "Language/Units"
3. Select the desired menu item.
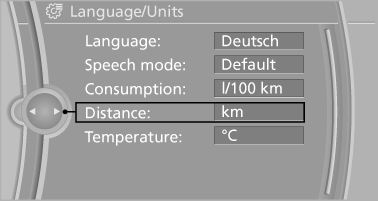
4. Select the desired unit.
The setting is stored for the remote control currently in use.
Brightness
Setting the brightness
To set the brightness of the Control Display:
1. "Settings"
2. "Control display"
3. "Brightness"
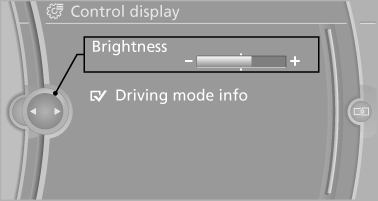
4. Turn the controller until the desired brightness
is set.
5. Press the controller.
The setting is stored for the remote control currently in use.
Depending on the light conditions, the brightness control may not be clearly visible.


