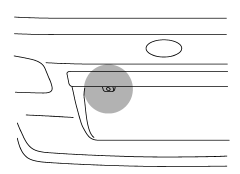
Subaru Legacy: Rear view camera (if equipped)
 Subaru Legacy: Rear view camera (if equipped)
Legacy
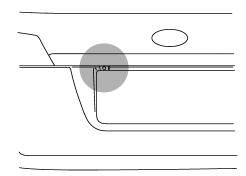
Outback
A rear view camera is attached to the trunk lid (Legacy) or rear gate (Outback). When the ignition switch is “ON” and the shift lever (MT models) or select lever (AT or CVT models) is set to “R”, the rear view camera automatically displays the rear view image behind the vehicle on the navigation monitor or on the inside mirror depending on the model.
WARNING
● Since the rear view camera uses a wide-angle lens, the image on the monitor
is different from the actual view in terms of distance.
● Since the range of the image on the monitor is limited, you should always check
the rear view and the surrounding area with your eyes and mirrors, and move backward
at a slow speed. Moving backward only by checking the rear view image from the camera
could cause an accident.
● Do not disassemble or modify the camera, switch or wiring. If smoke comes out
or you smell a strange odor, stop using the rear view camera immediately. Contact
your SUBARU dealer for an inspection. Continued use may result in accident, fire
or electric shock.
CAUTION
● If your vehicle is washed with a high-pressure washer, do not allow water to
contact the camera directly. Entry of water in the camera lens may result in condensation,
malfunction, fire or electric shock.
● Since the camera is a precision device, do not subject it to strong impacts. Otherwise,
malfunction, fire or electric shock may occur.
● If mud or snow sticks to or is frozen on the camera, you must be very careful
removing it. Otherwise, damage done to the camera may cause a fire or electric shock.
Pour water or lukewarm water over the camera to remove mud and ice, and wipe it
with a soft, dry cloth.
● Do not put a flame close to the camera or wiring. Otherwise, damage or fire may
occur.
● When replacing the fuse, be sure to use a fuse with the specified rating. Use
of a fuse with a different rating may result in a malfunction.
● If the rear view camera is used for a long time while the engine is not operated,
the battery may become completely discharged.
NOTE
● Do not wipe the camera with alcohol, benzine or paint thinner. Otherwise, discoloration may occur. To remove contamination, wipe the camera with a cloth moistened with a diluted neutral detergent and then wipe it with a soft, dry cloth.
● When waxing the vehicle, be careful not to apply the wax to the camera. If it comes in contact with the camera, moisten a clean cloth with a diluted neutral detergent to remove the wax.
● The camera lens has hard coating to help prevent scratches. However, when washing the vehicle or cleaning the camera lens, be careful not to scratch the camera lens. Do not use a washing brush directly on the camera lens. The monitor screen may be adversely affected.
● Strong light shined on the camera lens may develop white light stripes around the light source. This is not a malfunction.
● Under fluorescent lighting, the display may flicker. However, this is not a malfunction.
● The image of the rear view camera may be slightly different from the actual color of the objects.
How to use the rear view camera
When the shift lever or select lever is set to “R”, the rear view camera automatically displays the rear view image from the vehicle. When the lever is set to other positions, the image before setting to “R” is displayed.
1. Set the ignition switch to “ON”.
2. Set the shift lever or select lever to “R”.
NOTE
● For models with the genuine SUBARU navigation system, the image of the rear view camera has priority over other screen displays. To operate other screens, set the shift lever (MT models) or select lever (AT and CVT models) to a position other than “R”.
● The image of the rear view camera is horizontally reversed as is the case with the vehicle rearview mirror or the side view mirror.
● It may be difficult to see the image of the rearview camera in the following cases. This is not a malfunction of the camera.
– The vehicle is in a dark place (at night, in a tunnel, etc.).
– The vehicle is in an extremely hot or cold place.
– An object (such as raindrops, snow, dirt, etc.) that disturbs the view of the
rear view camera sticks to the lens of the camera.
– Strong light shined directly on the camera lens (occasionally, there are vertical
lines on the screen).
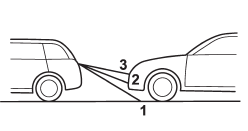
Viewing range on the screen
Range of view
Range of view
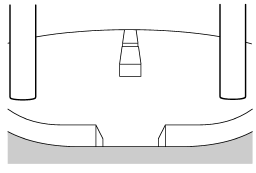
Image from camera
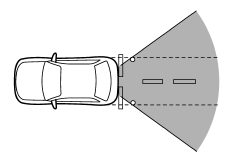
The area from the rear end of the bumper can be viewed. Areas at both ends of the bumper and areas just under the bumper cannot be viewed.
Also, the image from the rear view camera looks shorter than the actual distance.
CAUTION
The range that can be viewed with the rear view camera is limited. Always be sure to check with your eyes when moving backward and proceed slowly.
Range of view
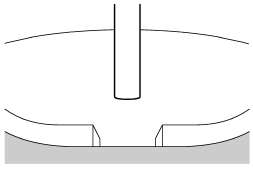
Image from camera
The area from the rear end of the bumper can be viewed. Areas at both ends of the bumper and areas just under the bumper cannot be viewed.
Also, the image from the rear view camera looks shorter than the actual distance.
CAUTION
The range that can be viewed with the rear view camera is limited. Always be sure to check with your eyes when moving backward and proceed slowly.
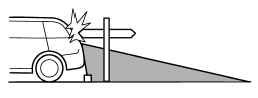
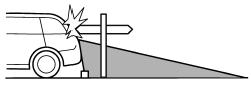
Range of view
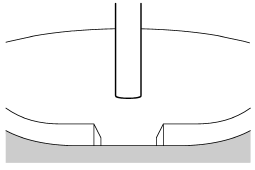
Image from camera
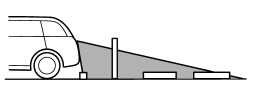
The area above the camera cannot be viewed. If there is an object that has a wide projection on its upper part such as a sign pole behind the vehicle, the projection cannot be seen on the screen.
CAUTION
The range that can be viewed with the rear view camera is limited. Always be sure to check with your eyes when moving backward and proceed slowly.
Help line
The help line (distance marker and vehicle width line) is a guide to help you realize the actual distance from the screen.
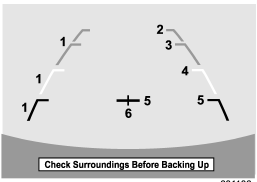
Help lines displayed on the navigation monitor
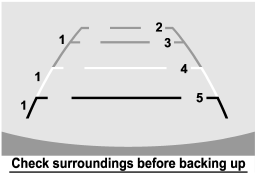
Help lines displayed on the inside mirror
1) Vehicle width line (oblique vertical line)
2) Approx. 10 feet (3 m) from the bumper (green horizontal line)
3) Approx. 6.5 feet (2 m) from the bumper (green horizontal line)
4) Approx. 3 feet (1 m) from the bumper (yellow horizontal line)
5) Approx. 1.5 feet (0.5 m) from the bumper (red horizontal line)
6) Vehicle centerline
When the shift lever or select lever is set to position “R”, the monitor screen displays the help lines together with the rear view image.
CAUTION
● When moving backward, always check the back with your eyes without relying
on the help lines.
● The actual position may be different from the indication of the help lines.
● Differences may occur due to number of passengers or loaded cargo.
● When the vehicle is on a slope or when the vehicle is inclined against the road,
the indication is different from the actual position.
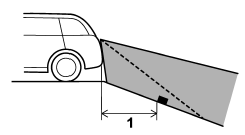
Difference between screen and actual road
The distance markers show the distance for a level road when the vehicle is not loaded. It may be different from the actual distance depending on the loading conditions or road conditions.
When there is an upward slope at the back

1) 3 feet (1 m)
The distance on the screen looks farther than the actual distance.
When there is a downward slope at the back
1) 3 feet (1 m)
The distance on the screen looks nearer than the actual distance.
NOTE
When cargo is loaded, the rear view distance on the screen looks farther than the actual distance as in an upward slope.
Feature of distance marker
1) 3 feet (1 m) line
2) 6.5 feet (2 m) line
3) 10 feet (3 m) line
The distance marker shows the distance on the road. If there is a car or other object close behind, distance cannot be correctly displayed.


