Subaru Legacy: Meters and gauges
 Subaru Legacy: Meters and gauges
NOTE
Liquid crystal displays are used in some of the meters and gauges in the combination meter. You will find their indications hard to see if you wear polarized glasses.
- Combination meter illumination
- Canceling the function for meter/gauge needle movement upon turning on the ignition switch
- Speedometer
- Odometer
- Double trip meter
- Tachometer
- Fuel gauge
- ECO gauge
Combination meter illumination
When the ignition switch is turned to the “ON” position, the various parts of the combination meter are illuminated in the following sequence.
1. Warning lights, indicator lights, meter needles, gauge needles, odometer and
trip meter back light illuminate.
2. Meter needles and gauge needles each show MAX position.
3. Meter needles and gauge needles each show MIN position.
4. Dials and indicators in meters and gauges light up.
5. Regular illumination (for driving) begins.
NOTE
The above sequence of operations may not take place if you quickly turn the ignition switch to start the engine. This is not a malfunction.
Canceling the function for meter/gauge needle movement upon turning on the ignition switch
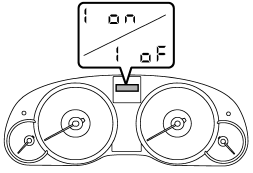
It is possible to activate or deactivate the movement of the meter needles and gauge needles that takes place when the ignition switch is turned to the “ON” position.
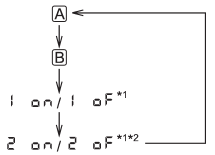
1. Turn the ignition switch to the “LOCK” or “Acc” position.
2. Press the trip knob to show “ ” or “ ” on the trip meter display
The display can be switched as shown in the following illustration by pressing the trip knob.
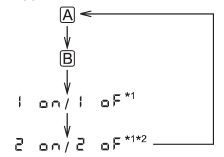
3. To change the current setting, press the trip knob for at least 2 seconds.
 : Activated
 : Deactivated
NOTE
● Your vehicle’s initial movement setting of the meter/gauge needles has been
set for activation “ ” at the time of shipment from the factory.
● It is not possible to change the initial movement setting of the meter/gauge needles
when the ignition switch is in the “ON” position. Change the setting when the ignition
switch is in the “LOCK” or “Acc” position.
Speedometer
The speedometer shows the vehicle speed.
Odometer
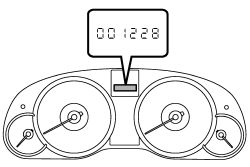
This meter displays the odometer when the ignition switch is in the “ON” position. The odometer shows the total distance that the vehicle has been driven.
If you press the trip knob when the ignition switch is in the “LOCK” or “Acc” position, the odometer/trip meter will light up. If you do not press the trip knob within 10 seconds of illumination of the odometer/ trip meter, the odometer/trip meter will turn off.
Also, if you open and close the driver’s door within 10 seconds of illumination of the odometer/trip meter, the odometer/trip meter will turn off.
Double trip meter
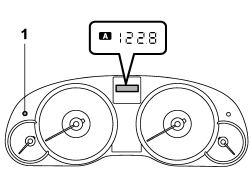
1) Trip knob
This meter displays the two trip meters when the ignition switch is in the “ON” position.
The trip meter shows the distance that the vehicle has been driven since you last set it to zero.
If you press the trip knob when the ignition switch is in the “LOCK” or “Acc” position, the odometer/trip meter will light up. It is possible to switch between the A trip meter and B trip meter indications while the odometer/trip meter is lit up. If you do not press the trip knob within 10 seconds of illumination of the odometer/trip meter, the odometer/trip meter will turn off. Also, if you open and close the driver’s door within 10 seconds of illumination of the odometer/trip meter, the odometer/trip meter will turn off.
The display can be switched as shown in the following illustration by pressing the trip knob.
To set the trip meter to zero, select the A trip or B trip meter by pressing the knob and keep the knob pressed for more than 2 seconds.
CAUTION
To ensure safety, do not attempt to change the function of the indicator during driving, as an accident could result.
NOTE
If the connection between the combination meter and battery is broken for any reason such as vehicle maintenance or fuse replacement, the data recorded on the trip meter will be lost.
Tachometer
The tachometer shows the engine speed in thousands of revolutions per minute.
CAUTION
Do not operate the engine with the pointer of the tachometer in the red zone. In this range, fuel injection will be cut by the engine control module to protect the engine from overrevving. The engine will resume running normally after the engine speed is reduced below the red zone.
NOTE
To protect the engine while the select lever is in the “P” or “N” position (for AT and CVT models) or the shift lever is in the neutral position (for MT models), the engine is controlled so that the engine speed may not become too high even if the accelerator pedal is pressed hard.
Fuel gauge
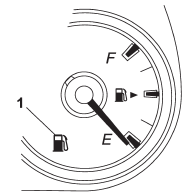
1) Low fuel warning light
The fuel gauge shows the approximate amount of fuel remaining in the tank. When the ignition switch is in the “LOCK” or “Acc” position, the fuel gauge shows “E” even if the fuel tank contains fuel.
The gauge may move slightly during braking, turning or acceleration due to fuel level movement in the tank.
If you press the trip knob while the ignition switch is in the “LOCK” or “Acc” position, the fuel gauge’s dial will light up and the needle will indicate the amount of fuel remaining in the tank.
If, while the fuel gauge needle is indicating the amount of fuel remaining in the tank, you (a) do not press the trip knob for 10 seconds or (b) open and close the driver’s door, the fuel gauge needle will drop to the “E” position and the dial and needle will turn off.
NOTE
You will see the “ ” sign in the fuel
gauge.
” sign in the fuel
gauge.
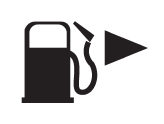
This indicates that the fuel filler door (lid) is located on the right side of the vehicle.
Low fuel warning light
The low fuel warning light illuminates when the fuel tank is nearly empty. It only operates when the ignition switch is in the “ON” position. When this light illuminates, fill the fuel tank immediately.
CAUTION
Promptly put fuel in the tank whenever the low fuel warning light illuminates. Engine misfires as a result of an empty tank could cause damage to the engine.
NOTE
● The low fuel warning light illuminates when the remaining amount of fuel in the tank has reached approximately 2.6 US gal (10 liters, 2.2 Imp gal).
● The low fuel warning light does not turn off unless the tank is replenished up to a fuel quantity of approximately 4.0 US gal (15 liters, 3.3 Imp gal).
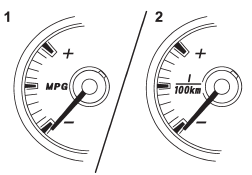
ECO gauge
1) U.S.-spec. models
2) Except U.S.-spec. models
The ECO gauge shows the difference between the average rate of fuel consumption and the current rate of fuel consumption. Using the average rate of fuel consumption since the trip meter was last reset, the indicator needle behaves as described in the following items.
U.S.-spec. models:
If the current rate of fuel consumption is lower than the average rate of fuel consumption, the indicator needle points to the “+” side. If the current rate of fuel consumption is higher than the average rate of fuel consumption, the indicator needle points to the “−” side. When the indicator needle is pointing to the “+” side, it indicates fuel-efficient driving.
Except U.S.-spec. models:
If the current rate of fuel consumption is lower than the average rate of fuel consumption, the indicator needle points to the “−” side. If the current rate of fuel consumption is higher than the average rate of fuel consumption, the indicator needle points to the “+” side. When the indicator needle is pointing to the “−” side, it indicates fuel-efficient driving.
NOTE
● The ECO gauge shows only an approximate indication.
● After resetting the trip meter, the average rate of fuel consumption is not shown
until driving 0.6 mile (1 km). Until that time, the ECO gauge does not operate.


