BMW 5 Series: iDrive
 BMW 5 Series: iDrive
- Vehicle equipment
- The concept
- Controls at a glance
- Operating concept
- Example: setting the clock
- Status information
- Split scre
- Programmable memory buttons
- Entering letters and numbers
Vehicle equipment
All standard, country-specific and optional equipment that is offered in the model series is described in this chapter. Therefore, equipment is also described that is not available in a vehicle, e. g., because of the selected optional equipment or country variant. This also applies for safety-related functions and systems.
The concept
The iDrive combines the functions of a multitude of switches. Thus, these functions can be operated from a central location.
 Using the iDrive during a trip
To avoid becoming distracted and posing
an unnecessary hazard to your vehicle's occupants
and to other road users, never attempt to
use the controls or enter information unless traffic
and road conditions allow this.◀
Controls at a glance
Controls

Controls at a glance
1. Control Display
2. Controller with buttons
The buttons can be used to open the menus
directly. The controller can be used to select
menu items and create the settings.
Control Display
Notes
▷ To clean the Control Display, follow the care
instructions.
▷ Do not place objects close to the Control
Display; otherwise, the Control Display can
be damaged.
Switching off
1.  Press the button.
2. "Switch off control display"
Switch off control display
Switching on
Press the controller again to switch the screen back on.
Controller
Select menu items and create settings.
1. Turn.
2. Press.
3. Move in four directions.

Buttons on controller

Operating concept
Opening the main menu
 Press the button.
The main menu is displayed.
All iDrive functions can be called up via the main menu.
Selecting menu items
Menu items shown in white can be selected.
1. Turn the controller until the desired menu item is highlighted.
2. Press the controller.
Menu items in the Owner's Manual
In the Owner's Manual, menu items that can be selected are set in quotation marks, e.g., "Settings".
Changing between panels
After a menu item is selected, e.g., "Radio", a new panel is displayed. Panels can overlap.
▷ Move the controller to the left.
The current panel is closed and the previous panel is displayed.
The previous panel is opened again by pressing the BACK button. In this case, the current panel is not closed.
▷ Move the controller to the right.
A new panel is opened on top of the previous display.
White arrows pointing to the left or right indicate that additional panels can be opened.
View of an opened
When a menu is opened, it generally opens with the panel that was last selected in that menu. To display the first panel of a menu:
▷ Move the controller to the left repeatedly
until the first panel is displayed.
▷ Press the menu button on the controller
twice.
Opening the Options menu
 Press the button.
The "Options" menu is displayed.
Additional options: move the controller to the right repeatedly until the "Options" menu is displayed.
Options menu
The "Options" menu consists of various areas:
▷ Screen settings, e.g., "Split screen".
This area remains unchanged.
▷ Control options for the selected main menu,
e.g., for "Radio".
▷ If applicable, further operating options for
the selected menu, e.g., "Store station".
Changing settings
1. Select a field.
2. Turn the controller until the desired setting is displayed.
Changing settings
3. Press the controller.
Activating/deactivating the functions
Several menu items are preceded by a checkbox.
It indicates whether the function is activated or deactivated. Selecting the menu item activates or deactivates the function.
 The function is activated.
 The function is deactivated.
Example: setting the clock
Setting the clock
1.  Press the button. The main
menu is
displayed.
Press the button. The main
menu is
displayed.
2. Turn the controller until "Settings" is highlighted, and then press the controller.
3. If necessary, move the controller to the left to display "Time/Date".
4. Turn the controller until "Time/Date" is highlighted, and then press the controller.
5. Turn the controller until "Time:" is highlighted, and then press the controller.
6. Turn the controller to set the hours and press the controller.
7. Turn the controller to set the minutes and press the controller.
Status information
Status field
The following information is displayed in the status field at the top right:
▷ Time.
▷ Current entertainment source.
▷ Sound output, on/off.
▷ Wireless network reception strength.
▷ Telephone status.
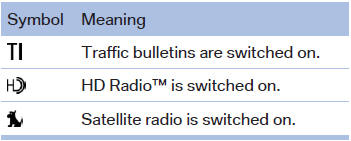
▷ Traffic bulletin reception.
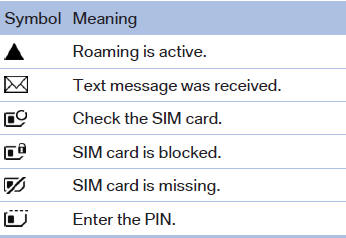
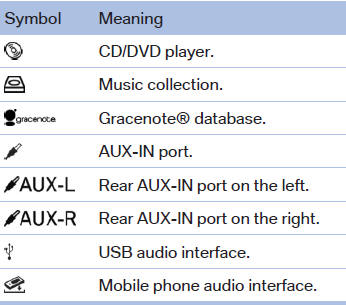
Status field symbols
The symbols are grouped as follows.
Radio symbols
Telephone symbols
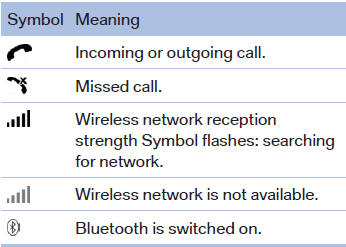
Entertainment symbols
Additional symbols

Split scre
General information
Additional information can be displayed on the right side of the split screen, e.g., information from the computer.
In the divided screen view, the so-called split screen, this information remains visible even when you change to another menu.
Switching the split screen on and off
1.  Press the button.
2. "Split screen"
3. Move the controller until the split screen is
selected.
4. Press the controller or select "Split screen
content".
5. Select the desired menu item.
Selecting the display
Programmable memory buttons
General information
The iDrive functions can be stored on the programmable memory buttons and called up directly, e.g., radio stations, navigation destinations, phone numbers and entry points into the menu.
The settings are stored for the remote control currently in use.
Saving a function
1. Highlight the function via the iDrive.
2.  Press
the desired button for more
than 2 seconds.
Press
the desired button for more
than 2 seconds.
Running a function
 Press the
button.
Press the
button.
The function will run immediately. This means, for example, that the number is dialed when a phone number is selected.
Displaying the button assignment
Use a finger to touch the buttons. Do not wear gloves or use objects.
The key assignment is displayed at the top edge of the screen.
Displaying the button assignment
▷ To display short information: touch the button.
▷ To display detailed information: touch the
button for an extended period.
Deleting the button assignments
1. Press buttons 1 and 8 simultaneously for approx. five seconds.
2. "OK"
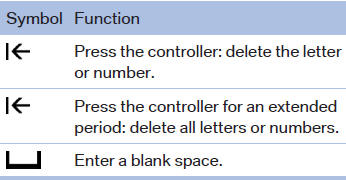
Entering letters and numbers
General information
1. Turn the controller: select letters or numbers.
2. Select additional letters or numbers if
needed.
3. "OK": confirm the entry.
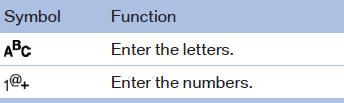
Switching between letters and numbers
Depending on the menu, you can switch between entering letters and numbers:
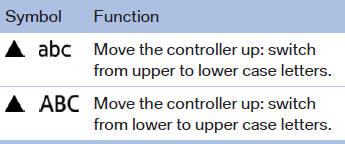
Switching between upper and lower case letters
Depending on the menu, you can switch between entering upper and lower case letters:
Entry comparison
Entry of names and addresses: the selection is narrowed down every time a letter is entered and letters may be added automatically.
The entries are continuously compared to the data stored in the vehicle.
▷ Only those letters are offered during the entry
for which data is available.
▷ Destination search: town/city names can be
entered using the spelling of language available
on the Control Display.


