Buick LaCrosse: Introduction
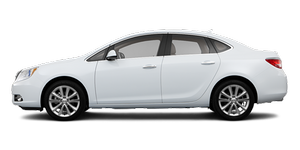 Buick LaCrosse: Introduction
- Infotainment
- Theft-Deterrent Feature
- Overview (Radio with CD)
- Overview (Radio with CD/DVD and MEM)
- Overview (Radio with CD and Touchscreen)
- Operation
Infotainment
Read the following pages to become familiar with the audio system's features.
WARNING!
Taking your eyes off the road for
extended periods could cause a
crash resulting in injury or death
to you or others. Do not give
extended attention to
entertainment tasks while driving.
This system provides access to many audio and non-audio listings.
To minimize taking your eyes off the road while driving, do the following while the vehicle is parked:
• Become familiar with the operation and controls of the audio system.
• Set up the tone, speaker adjustments, and preset radio stations.
For more information, see Defensive Driving.
Notice:
Contact your dealer
before adding any equipment.
Adding audio or communication
equipment could interfere with
the operation of the engine, radio,
or other systems, and could
damage them. Follow federal
rules covering mobile radio and
telephone equipment.
The vehicle has Retained Accessory Power (RAP). With RAP, the audio system can be played even after the ignition is turned off.
See Retained Accessory Power (RAP) for more information.
Navigation System
For vehicles with a navigation system, see the separate navigation manual.
Theft-Deterrent Feature
The theft-deterrent feature works by learning a portion of the Vehicle Identification Number (VIN) to the infotainment system. The infotainment system does not operate if it is stolen or moved to a different vehicle.
Overview (Radio with CD)
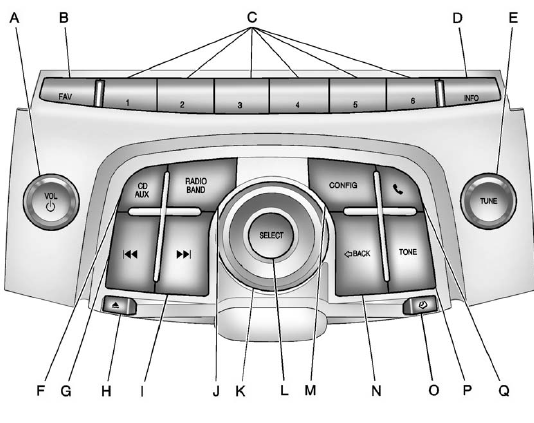
A. VOL/ 
• Turns the system on or off
and adjusts the volume.
B. FAV
• Opens the favorites list.
C. Buttons 1 to 6
• Saves and selects favorite
stations.
D. INFO
• Radio: Shows available
information about the
current station.
• CD: Shows available information about the current track.
E. TUNE
• Radio: Manually selects
radio stations.
• CD: Selects tracks.
F. CD/AUX
• Selects the CD player or
an external audio source.
G. 
• Radio: Seeks the previous
station.
• CD: Select the previous track or rewinds within a track.
H. 
• Removes a disc from the
CD slot.
I. 
• Radio: Seeks the next
station.
• CD: Select the next track or fast forwards within a track.
J. RADIO/BAND
• Changes the band while
listening to the radio.
• Selects the radio when listening to a different audio source.
K. Menu Knob
• Opens menus, highlights
menu items, or sets
numeric values while in
a menu.
L. SELECT
• Selects menu items.
M. CONFIG
• Opens the Settings menu.
N.  BACK
BACK
• Menu: Moves one
level back.
• Character Input: Deletes the last character.
O. 
• Opens the Clock menu.
P. TONE
• Opens the Tone menu.
Q. 
• Opens the Phone
main menu.
• Mutes the audio system.
Overview (Radio with CD/DVD and MEM)
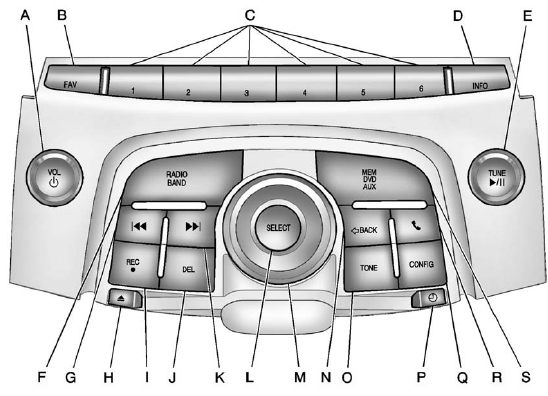
A. VOL/ 
• Turns the system on or off
and adjusts the volume.
B. FAV
• Radio: Opens the
favorites list.
• MEM: Opens the favorites list.
C. Buttons 1 to 6
• Radio: Saves and selects
favorite stations.
• MEM: Saves and selects favorite tracks and playlists.
D. INFO
• Radio: Shows available
information about the
current station.
• CD: Shows available information about the current track.
E. TUNE/
• Manually selects radio
stations and pauses time
shifted content.
• CD/DVD: Select tracks, pauses playback, and stops playback.
• MEM: Select tracks and pauses playback.
F. RADIO/BAND
• Changes the band while
listening to the radio.
• Selects the radio when listening to a different audio source.
G. 
• Radio: Seeks the previous
station.
• CD: Selects the previous track or rewinds within a track.
• MEM: Selects the previous track or rewinds within a track.
H. 
• Removes a disc from the
CD/DVD slot.
I. REC 
• AUX: Records content
from audio CDs, MP3/WMA CDs, and USB mass
storage devices.
J. DEL
• MEM: Deletes the current
track from MEM.
K. 
• Radio: Seeks the next
station.
• CD: Selects the next track or fast forwards within a track.
• MEM: Selects the next track or fast forwards within a track.
L. SELECT
• Selects menu items.
M. Menu Knob
• Opens menus, highlights
menu items, or sets
numeric values while in
a menu.
N.  BACK
BACK
• Menu: Moves one
level back.
• Character Input: Deletes the last character.
O. TONE
• Opens the Tone menu.
P. 
• Opens the Clock menu.
Q. CONFIG
• Opens the Settings menu.
R. 
• Opens the Phone
main menu.
• Mutes the audio system.
S. MEM/DVD/AUX
• Selects MEM (Memory),
CD/DVD, USB, or a
connected front or rear
auxiliary audio source.
Overview (Radio with CD and Touchscreen)
For vehicles equipped with the MyLink® or IntelliLink® infotainment system, see the separate MyLink/IntelliLink Features and Functions Guide for more information.
Keeping your eyes on the road and your mind on the drive is important for safe driving. The infotainment system has built-in features intended to help with this by disabling some features when driving. A grayed-out function is not available when the vehicle is moving.
All functions are available when the vehicle is parked. Do the following before driving:
• Become familiar with the infotainment system operation, buttons on the faceplate, and touch-sensitive screen buttons.
• Set up the audio by presetting favorite stations, setting the tone, and adjusting the speakers.
• Set up phone numbers in advance so they can be called easily by pressing a single button or a single voice command for vehicles equipped with phone capability.
WARNING!
Taking your eyes off the road too
long or too often while using the
navigation system could cause a
crash and you or others could be
injured or killed. Focus your
attention on driving and limit
glances at the moving map on the
navigation screen. Use voice
guidance whenever possible.
Infotainment System Overview
The infotainment system is controlled by using the buttons on the faceplate and the touch screen.
See “Infotainment Control Buttons” in this section for more information.
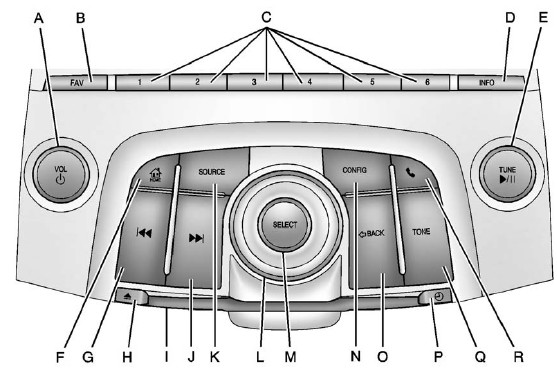
A. VOL/  (Volume/Power)
B. FAV (Favorites)
C. Buttons 1 to 6
D. INFO (Information)
E. TUNE /  (Tune/Play/Pause)
F.  /HOME (Home Page)
G.  (Seek Down)
H.  (Eject)
I. CD Slot
J.  (Seek Up)
K. SOURCE
L. Menu Knob
M. SELECT
N. CONFIG (Configuration Menu)
O.  BACK
BACK
P.  (Clock Menu)
Q. TONE
R.  (Phone menu)
Infotainment Control Buttons
The buttons on the faceplate are used to start primary functions while using the infotainment system.
VOL/  (Volume/Power):
1. Press to turn the system on and off.
2. Turn to adjust the volume.
TUNE / (Tune/Play/Pause):
Press TUNE /  to start, pause,
and resume playback. Turn to
manually change radios stations.
to start, pause,
and resume playback. Turn to
manually change radios stations.
See CD Player and MP3 for more information.
SOURCE: Press to change the audio sources such as AM-FM Radio, XM™ (if equipped), CD, and AUX.
TONE: Press to access the sound menu screen to adjust bass, midrange, and treble. See AM-FM Radio (Radio with CD/DVD/MEM) or AM-FM Radio (Radio with CD and Touchscreen) for more information.
INFO (Information): Press to toggle through an audio information screen.
CONFIG (Configure): Press to adjust features for radio, display, phone, vehicle, and time.
 /HOME (Home): See “Home
Page” following in this section.
/HOME (Home): See “Home
Page” following in this section.
MENU/SEL: Turn to highlight a feature. Press to activate the highlighted feature.
 (Phone): See Bluetooth
(Overview) or
Bluetooth (Infotainment Controls) or Bluetooth (Voice
Recognition) or
Bluetooth (UHP Mexico Only) for more information.
(Phone): See Bluetooth
(Overview) or
Bluetooth (Infotainment Controls) or Bluetooth (Voice
Recognition) or
Bluetooth (UHP Mexico Only) for more information.
 BACK: Press to return to the
previous screen in a menu.
BACK: Press to return to the
previous screen in a menu.
If on a page accessed directly by a faceplate button or Home Page screen button, pressing / BACK will go to the previous menu.
FAV (Favorite Pages 1-6): Press to display the current page number above the preset buttons. The stored stations for each list display on the touch-sensitive preset buttons at the bottom of the screen.
The number of preset FAV lists can be changed in the Configuration Menu.
 (Seek Down):
1. Press to seek to the beginning of the current or previous track.
If the track has been playing for less than five seconds, it seeks the previous track. If longer than five seconds, the current track starts from the beginning.
2. Press and hold to fast forward through a track.
3. Press and hold to quickly reverse through a track. Release the button to return to playing speed. See CD Player and MP3 for more information.
4. For AM, FM, or XM (if equipped), press to seek to the next strong station.
Preset Buttons (1-6): The preset buttons numbered one through six can be used to select stored AM, FM, and XM (if equipped) stations.
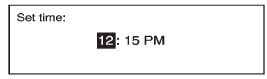
 (Clock Menu): Press to set
the time.
(Clock Menu): Press to set
the time.
 (Eject): Press to eject a disc
from the CD player. See CD Player.
(Eject): Press to eject a disc
from the CD player. See CD Player.
Touch Screen Buttons
Touch screen buttons are on the screen and highlighted when a feature is available. Some toggle screen buttons highlight when active and gray out when inactive.
Home Page
The infotainment system displays a home page that makes accessing many of the features an easy process.
Back: If on page two of the Home Page, press Back to return to page one of the Home Page. If on page one, Back serves no function.
Home: While navigating through other menus, press to go back to the Home Page to start a different feature.
FAV: Press to display a page of stored (favorite) AM, FM, or XM (if equipped) stations. Keep pressing FAV to scroll through the favorite pages.
The Home Page Menu lists the options Customize Home Page and Restore Home Page Defaults.
Out of all available Home Page icons, up to eight icons can be selected and sorted for the first Home Page screen.
Home Page Features
Various functions are disabled when the vehicle is moving.
Press the Now Playing screen button to display the active source page. The sources available are AM, FM, XM (if equipped), CD, USB/iPod, and AUX.
See AM-FM Radio (Radio with CD/DVD/MEM) or AM-FM Radio (Radio with CD and Touchscreen), Satellite Radio, and CD Player.
Press the Phone screen button to display the Phone main page. See Bluetooth (Overview) or Bluetooth (Infotainment Controls) or Bluetooth (Voice Recognition) or Bluetooth (UHP Mexico Only).
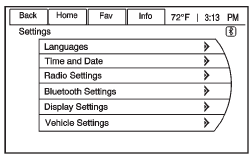
Press the Config screen button to display the Config main page. From this display, you can adjust features such as time and date, radio, phone, vehicle, and display.
Press the Tone screen button to display the Tone main page. Adjust the tone and speakers by pressing the screen buttons to change the levels of sound for treble, midrange, bass, fade, and balance. See AM-FM Radio (Radio with CD/DVD/MEM) or AM-FM Radio (Radio with CD and Touchscreen).
Press the FM screen button to display the FM main page and play the current or last tuned FM station.
See AM-FM Radio (Radio with CD/DVD/MEM) or AM-FM Radio (Radio with CD and Touchscreen).
Press the AM screen button to display the AM main page and play the current or last tuned AM station.
See AM-FM Radio (Radio with CD/DVD/MEM) or AM-FM Radio (Radio with CD and Touchscreen).
Press the XM screen button (if equipped) to display the XM main page and play the current or last tuned XM channel. See AM-FM Radio (Radio with CD/DVD/MEM) or AM-FM Radio (Radio with CD and Touchscreen) and Satellite Radio.
Press the CD screen button to display the CD main page and play the current or last CD track selected. See CD Player.
Press the USB screen button to display the USB main page and play the current or last track selected.
See Auxiliary Devices (Radio with CD and Touchscreen).
Press the AUX screen button to access any connected auxiliary device. See Auxiliary Devices (Radio with CD and Touchscreen).
Time and Date Settings
From the Time & Date Settings screen button, press to display the Time & Date Settings menu.
Set Time: Press the up or down arrows to increase or decrease the Hours and Minutes displayed on the clock.
Set Date: Press the up or down arrows to increase or decrease the day.
Set Time Format: Press the 12 Hours screen button for standard time; press the 24 Hours screen button for military time.
Set Date Format: Depending on the region, the following date formats may be available: MM/DD/YYYY, DD.MM.YYYY, or YYYY/MM/DD.
Display Digital Clock: Press Display to turn the display of the clock on the screen On or Off.
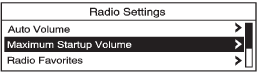
Radio Settings
Press the Config button on the Home Page or the CONFIG button on the faceplate to enter the menu options. Turn the MENU knob or touch-tap the scroll bar to scroll through the available options. Press the MENU knob or press Radio Settings to display the radio settings menu. Press this feature to make changes for radio information displayed, preset pages, Auto Volume Control, and XM Categories Restore. See Satellite Radio (if equipped), for more information about XM Categories.
The Radio Settings are:
Speed Dependent Volume: Select OFF, Low, Medium, or High sensitivity to automatically adjust the volume to minimize the effects of unwanted background noise that can result from changing road surfaces, driving speeds, or open windows. This feature works best at lower volume settings where background noise is typically louder than the sound system volume.
Startup Volume: Press to set the maximum volume level for startup that will be used even if a higher volume had been set when the radio was turned off.
Radio Favorites: Press to select the number of FAV pages to be used in the system.
Add/Remove XM Categories:
Press to customize which available XM Categories are used and displayed in the system.
See AM-FM Radio (Radio with CD/DVD/MEM) or AM-FM Radio (Radio with CD and Touchscreen) for more information.
Phone Settings
See Bluetooth (Overview) or Bluetooth (Infotainment Controls) or Bluetooth (Voice Recognition) or Bluetooth (UHP Mexico Only) in the “Phone” section for more information on phone settings.
Vehicle Settings
See Vehicle Personalization for more information.
Display Settings
Press the Config button on the Home Page or the CONFIG button on the faceplate, then select Display Settings from the list.
The following options may display:
Dimming Mode: Press to change the screen background. The Automatic setting adjusts the screen background automatically depending on the exterior lighting conditions.
To change the overall brightness setting for the display, use the vehicle interior lighting instrument panel illumination control.
Languages
The vehicle supports English, French (Canadian), and Spanish.
The default language is English.
To change the display language, see Vehicle Personalization for more information.
English and Metric Unit Conversion
To change the display units between English and metric units, see Driver Information Center (DIC) for more information.
Cleaning the Display
Notice:
Using abrasive cleaners
when cleaning glass surfaces
could scratch the glass. Use only
a soft cloth and do not spray
cleaner directly on the system as
it could affect the mechanical
parts.
Do not wipe the panel with a hard cloth or use a volatile liquid such as paint thinner; it could scratch the surface or erase the characters on the buttons.
Operation
Controls
The infotainment system is operated by using the pushbuttons, multifunction knobs, menus shown on the display, and steering wheel controls, if equipped.
Turning the System On or Off
VOL/  (Volume/Power): Press to
turn the system on and off.
(Volume/Power): Press to
turn the system on and off.
Automatic Switch-Off
If the infotainment system has been turned on after the ignition is turned off, the system will turn off automatically after 10 minutes.
Volume Control
VOL/  (Volume/Power): Turn to
adjust the volume.
(Volume/Power): Turn to
adjust the volume.
 (Phone/Mute): For vehicles with
OnStar®, press and hold to mute
the infotainment system. Press and
hold again, or turn the VOL/
knob to cancel mute.
(Phone/Mute): For vehicles with
OnStar®, press and hold to mute
the infotainment system. Press and
hold again, or turn the VOL/
knob to cancel mute.
For vehicles without OnStar®, press
to mute the infotainment system.
Press again, or turn the VOL/
knob to cancel mute.
Menu System
Controls
The Menu knob, SELECT button,
and  BACK button are used to
navigate the menu system.
BACK button are used to
navigate the menu system.
Menu Knob:
Turn to:
• Enter the menu system.
• Highlight a menu option.
• Select a value.
SELECT:
Press to:
• Select or activate the highlighted menu option.
• Confirm a set value.
• Turn a system setting on or off.
 BACK:
BACK:
Press to:
• Exit a menu.
• Return from a submenu screen to the previous menu screen.
• Delete the last character in a sequence.
Selecting a Menu Option
1. Turn the Menu knob to move the highlighted bar.
2. Press SELECT to select the highlighted option.
Submenus
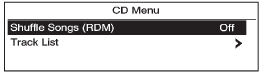
An arrow on the right-hand edge of the menu indicates that it has a submenu with other options.
Activating a Setting
1. Turn the Menu knob to highlight the setting.
2. Press SELECT to activate the setting.
Setting a Value
1. Turn the Menu knob to change the current value of the setting.
2. Press SELECT to confirm the setting.
Turning a Function On or Off
1. Turn the Menu knob to highlight the function.
2. Press SELECT to turn the function on or off.
Entering a Character Sequence
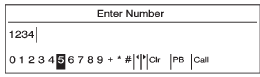
1. Turn the Menu knob to highlight the character.
2. Press SELECT to select the character.
Press the BACK button to
delete
the last character in the sequence
or press and hold to delete the
entire character sequence.
Audio Settings
The audio settings can be set for each radio band and each audio player source.
To quickly reset an audio setting value to 0:
1. Press the TONE button.
2. Select the audio setting.
3. Press and hold the SELECT button until the value changes to 0.
Press the BACK button to go
back to the Tone Settings menu.
Adjusting the Treble, Midrange, and Bass
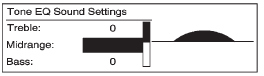
1. Press the TONE button.
2. Select Treble, Midrange, or Bass.
3. Select the value.
Press the BACK button to go
back to the Tone Settings menu.
Adjusting the Fader and Balance

1. Press the TONE button.
2. Select Fader or Balance.
3. Select the value.
Press the BACK button to go
back to the Tone Settings menu.
Adjusting the EQ (Equalizer)
For vehicles with an equalizer:
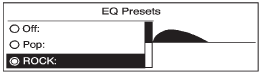
1. Press the TONE button.
2. Select EQ.
3. Select the setting.
Press the BACK button to go
back to the Tone Settings menu.
DSP (Digital Signal Processing) Settings
For vehicles with DSP, it is used to provide a choice of different listening experiences.
The DSP settings for the radio with CD are:
• normal - Select this setting to adjust the audio for stereo mode. This provides the best sound quality for the driver seat first, with the front passenger second.
• hk surround - Select to enable hk surround. This produces a true 6.1 matrix surround from any two channel digital source.
This feature is not available in AM/FM radio mode.
The DSP settings for the radio with CD/DVD and MEM are:
• 2.0 normal - Select this setting to adjust the audio for stereo mode. This provides the best sound quality for the driver seat first, with the front passenger second.
• hk surround - Select to enable hk surround. This produces a true 6.1 matrix surround from any two channel digital source.
This feature is not available in AM/FM radio mode.
To adjust the DSP settings:
1. Press the TONE button.
2. Select DSP.
3. Select the setting.
Press the BACK button to go
back to the Tone Settings menu.
System Settings
Configuring the Number of Favorite Pages
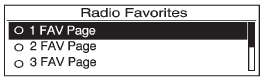
To configure the number of available favorite pages:
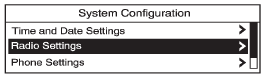
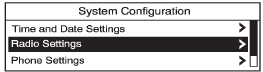
1. Press the CONFIG button.
2. Select Radio Settings.
3. Select Radio Favorites.
4. Select the number of available favorite pages.
5. Press the BACK button to
go
back to the System
Configuration menu.
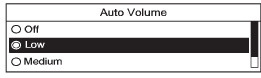
Auto Volume
The auto volume feature automatically adjusts the radio volume to compensate for road and wind noise as the vehicle speeds up or slows down, so that the volume level is consistent.
The level of volume compensation can be selected, or the auto volume feature can be turned off.
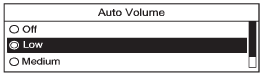
1. Press the CONFIG button.
2. Select Radio Settings.
3. Select Auto Volume.
4. Select the setting.
5. Press the BACK button to
go
back to the System
Configuration menu.
Maximum Startup Volume
The maximum volume played when the radio with CD is first turned on can be set.
1. Press the CONFIG button.
2. Select Radio Settings.
3. Select Maximum Startup Volume.
4. Select the setting.
5. Press the BACK button to
go
back to the System
Configuration menu.


