BMW 5 Series: Adjusting
 BMW 5 Series: Adjusting
- Vehicle equipment
- Sitting safely
- Seats
- Safety belts
- Front head restraints
- Rear head restraints
- Seat, mirror, and steering wheel memory
- Mirrors
- Steering wheel
Vehicle equipment
All standard, country-specific and optional equipment that is offered in the model series is described in this chapter. Therefore, equipment is also described that is not available in a vehicle, e. g., because of the selected optional equipment or country variant. This also applies for safety-related functions and systems.
Sitting safely
The ideal seating position can make a vital contribution to relaxed, fatigue-free driving.
The seating position plays an important role in an accident in combination with:
▷ Safety belts.
▷ Head restraints.
▷ Airbags.
Seats
General information
 Do not adjust the seat while driving
Do not adjust the driver's seat while driving,
or the seat could respond with unexpected
movement and the ensuing loss of vehicle control
could lead to an accident.◀
Do not incline the backrest too far to the
rear
Also on the front passenger side, do not incline
the backrest on the front passenger side too far
to the rear during driving, or there is a risk of
slipping under the safety belt in the event of an
accident. This would eliminate the protection
normally provided by the belt.◀
Semi-electrically adjustable seats
At a glance
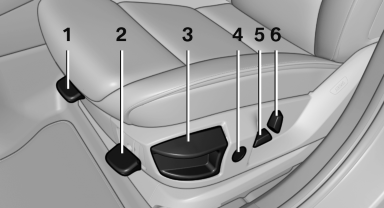
1. Thigh support
2. Tilt
3. Forward/backward
4. Lumbar support
5. Height
6. Backrest
Tilt
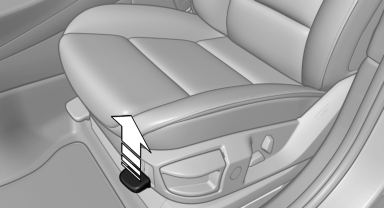
Pull the lever and move the seat to the desired tilt. After releasing the lever, apply your weight to the seat or lift it off to make sure the seat engages properly.
Forward/backward

Pull the lever and slide the seat in the desired direction.
After releasing the lever, move the seat forward or back slightly to make sure it engages properly.
Height

Move the button in the required direction.
Backrest
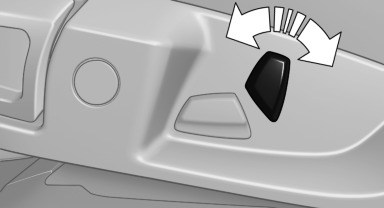
Move the button in the required direction.
Electrically adjustable seats
At a glance
1. Lumbar support
2. Backrest width
3. Shoulder support
4. Backrest
5. Forward/back, height, tilt
6. Thigh support
Note
The seat setting for the driver's seat is stored for the remote control currently in use. When the vehicle is unlocked via the remote control, the position is automatically retrieved if the Function, for this is activated.
Adjustments in detail
1. Forward/back.
2. Height.
3. Seat tilt.
4. Backrest tilt.
5. Thigh support.
Lumbar support
The curvature of the seat backrest can be adjusted in such a way that it supports the lumbar region of the spine. The lower back and the spine are supported for upright posture.
 ▷ Press the front/rear section
of
the switch.
▷ Press the front/rear section
of
the switch.
The curvature is increased/
decreased.
▷ Press the upper/lower section
of the switch.
The curvature is shifted up/
down.
Shoulder support
Also supports the back in the shoulder area:
▷ Results in a relaxed seating position.
▷ Reduces strain on the shoulder muscles.
Active seat
Active adjustment of the seat cushion's contours reduces muscular tension and fatigue to help prevent lower back pain.
 Press the button. The LED lights
up.
Press the button. The LED lights
up.
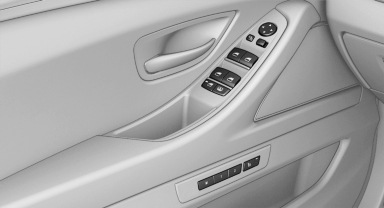
Front seat heating
Switching on
 Press the button once for each
temperature
level.
Press the button once for each
temperature
level.
The maximum temperature is reached when three LEDs are lit.
If the drive is continued within approx. 15 minutes, the seat heating is activated automatically with the temperature selected last.
Switching off
Press the button longer.
The LEDs go out.
The temperature may be reduced or seat heating may be switched off entirely to save battery power.
Temperature distribution
The heating action in the seat cushion and backrest can be distributed in different ways.
1. "Climate"
2. "Seat heating distribution"
3. Select the required seat.
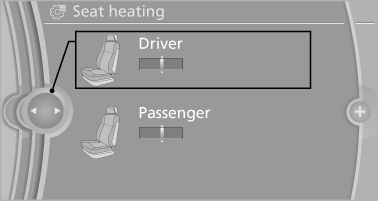
4. Turn the controller to set the temperature distribution.
Rear seat heating

Rear seat heating
Switching on
 Press the button
once for each temperature
level.
Press the button
once for each temperature
level.
The maximum temperature is reached when three LEDs are lit.
If the drive is continued within approx. 15 minutes, the seat heating is activated automatically with the temperature selected last.
Switching off
Press the button longer.
The LEDs go out.
Active seat ventilation, front
The seat cushion and backrest surfaces are cooled by means of integrated fans.
The ventilation rapidly cools the seat, e. g., if the vehicle interior is overheated or for continuous cooling at high temperatures.

Switching on
 Press the button
once for each ventilation
level.
Press the button
once for each ventilation
level.
The highest level is active when three LEDs are lit.
If when the seat ventilation is turned on the Maximum Cooling function is activated, the seat ventilation automatically switches to the highest level. When the Maximum Cooling function is switched off, the unit switches to the previously set level.
After a short time, the system automatically moves down one level in order to prevent excessive cooling.
Switching off
Press the button longer.
The LEDs go out.
Safety belts
Seats with safety belt
The vehicle has five seats, each of which is equipped with a safety belt.
Notes
Always make sure that safety belts are being worn by all occupants before driving away.
Although airbags enhance safety by providing added protection, they are not a substitute for safety belts.
▷ The shoulder strap's anchorage point will be
correct for adult seat occupants of every
build if the seat is correctly adjusted.
▷ The two outer safety belt buckles,
integrated into the rear seat, are for passengers
sitting on the left and right.
▷ The center rear seat belt buckle marked with
the letters CENTER is solely intended for
the center passenger.
One person per safety belt
Never allow more than one person to wear
a single safety belt. Never allow infants or small
children to ride on a passenger's lap.◀
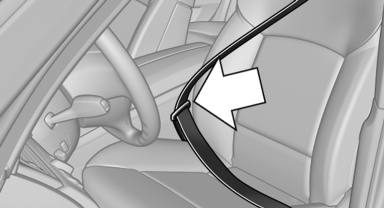
Putting on the belt
Lay the belt, without twisting, snugly
across the lap and shoulders, as close to the
body as possible. Make sure that the belt lies low
around the hips in the lap area and does not
press on the abdomen. Otherwise, the belt can
slip over the hips in the lap area in a frontal impact
and injure the abdomen.
The safety belt must not lie across the neck, rub on sharp edges, be routed over solid or breakable objects, or be pinched.◀
Reduction of restraining effect
Avoid wearing clothing that prevents the
belt from fitting properly, and pull the shoulder
belt periodically to readjust the tension across
your lap; otherwise, the retention effect of the
safety belt may be reduced.◀
Buckling the belt
Make sure you hear the latch plate engage in the belt buckle.
Unbuckling the belt
1. Hold the belt firmly.
2. Press the red button in the belt buckle.
3. Guide the belt back into its reel.
Safety belt reminder for the driver's and front passenger seat
 The indicator lamp flashes or
lights up
and a signal sounds. Make sure that the
safety belts are positioned correctly.
The indicator lamp flashes or
lights up
and a signal sounds. Make sure that the
safety belts are positioned correctly.
The safety belt reminder is active at speeds above approx. 5 mph/8 km/h. It can also be activated if objects are placed on the front passenger seat.
Damage to safety belts
In the case of strain caused by accidents or damage:
Have the safety belts, including the safety belt tensioners, replaced and have the belt anchors checked.
Checking and replacing safety belts
Have the work performed only by your
service center; otherwise, it cannot be ensured
that this safety feature will function properly.◀
Front head restraints
Correctly adjusted head restraint
A correctly adjusted head restraint reduces the risk of injury to cervical vertebrae in the event of an accident.
Adjusting the head restraint
Correctly adjust the head restraints of all
occupied seats; otherwise, there is an increased
risk of injury in an accident.◀
Height
Adjust the head restraint so that its center is approximately at ear level.
Distance
Adjust the distance so that the head restraint is as close as possible to the back of the head.
Active head restraint
In the event of a rear-end collision with a certain severity, the active head restraint automatically reduces the distance from the head.
Reduced protective function
▷ Do not use seat or head restraint covers.
▷ Do not hang objects, e.g., clothes hangers,
on the head restraints.
▷ Only attach accessories approved by BMW
to the seat or head restraint.
Otherwise, the protective function of the active head restraint will be impaired and the personal safety of the occupants will be endangered.◀
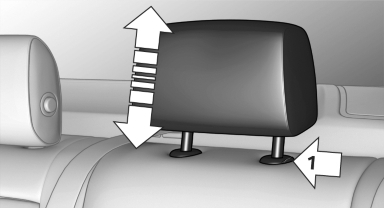
Adjusting the height: manual head restraints
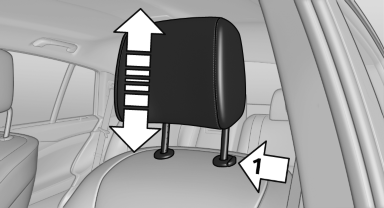
Adjusting the height: manual head
restraints
▷ To raise: pull.
▷ To lower: press the button, arrow 1, and push the head restraint down.
Adjusting the height: electrical head restraints
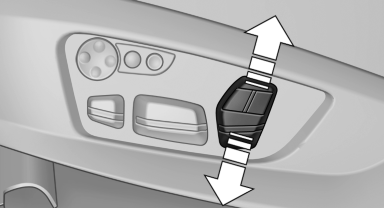
Adjusting the height: electrical head
restraints
Adjusting electrically.
Distance to back of head: manual head restraints
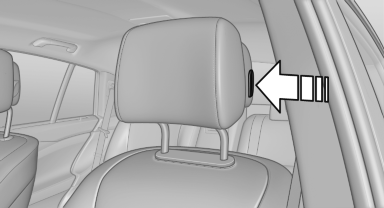
Distance to back of head: manual head
restraints
▷ Forward: by pulling
▷ Back: press the button and push the head
restraint toward the rear.
Distance to back of head: electrical head restraints
The head restraint is automatically repositioned when the shoulder support is adjusted.
Adjusting the side extensions
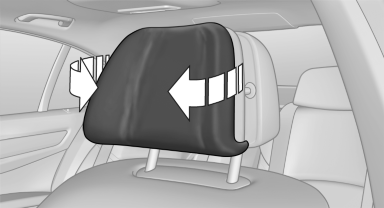
Adjusting the side extensions
Fold forward for increased lateral support in the resting position.
Removing
The head restraints cannot be removed.
Rear head restraints
Correctly adjusted head restraint
A correctly adjusted head restraint reduces the risk of injury to cervical vertebrae in the event of an accident.
Adjusting the head restraint
Correctly adjust the head restraints of all
occupied seats; otherwise, there is an increased
risk of injury in an accident.◀
Height
Adjust the head restraint so that its center is approximately at ear level.
Distance
Adjust the distance so that the head restraint is as close as possible to the back of the head.
Adjusting the height
▷ To raise: pull.
▷ To lower: press the button, arrow 1, and
push the head restraint down.
Folding forward
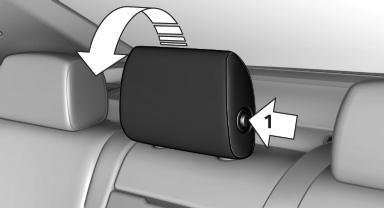
Press the button, arrow 1, and fold the head restraint forward.
Removing
Only remove the head restraint if no one will be sitting in the seat in question.

1. Pull the head restraint upward as far as possible.
2. Press the button, arrow 1, and pull the head
restraint out completely.
Before transporting passengers
Reinstall the head restraint before transporting
anyone in the seat; otherwise, the protective
function of the head restraint is unavailable.◀
Seat, mirror, and steering wheel memory
General information
Front
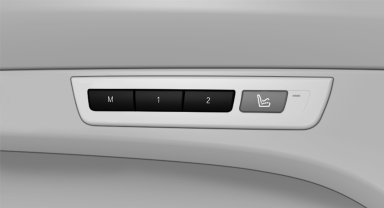
Two different driver's seat, exterior mirror, and steering wheel positions can be stored and retrieved for each remote control. The adjustment of the lumbar support is not stored.
Storing
1. Switch on the ignition.
2. Set the desired position.
3.  Press the button. The LED in the
button lights up.
Press the button. The LED in the
button lights up.
4. Press the desired button 1 or 2. The LED
goes out.
If the M button is pressed accidentally:
 Press the button again.
The LED goes out.
Calling up settings
Do not retrieve the memory while driving
Do not retrieve the memory setting while
driving, as an unexpected movement of the seat
or steering wheel could result in an accident.◀
Comfort function
1. Open the driver's door.
2. Switch off the ignition.
3. Briefly press the desired button 1 or 2.
The corresponding seat position is performed automatically.
The procedure stops when a switch for adjusting the seat or one of the buttons is pressed.
Safety mode
1. Close the driver's door or switch on the ignition.
2. Press and hold the desired button 1 or 2 until
the adjustment procedure is completed.
Calling up of a seat position deactivated
After a brief period, the calling up of stored seat positions is deactivated to save battery power.
To reactivate calling up of a seat position:
▷ Open or close the door or trunk lid.
▷ Press a button on the remote control.
▷ Press the Start/Stop button.
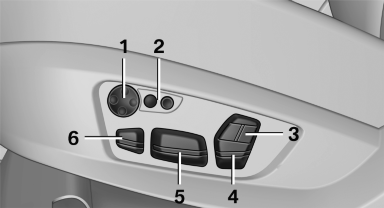
Mirrors
Exterior mirrors
At a glance
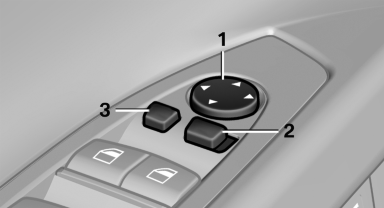
1 Adjusting
2 Left/right, Automatic Curb Monitor
3 Fold in and out
General information
The mirror on the passenger side is more curved than the driver's side mirror
Estimating distances correctly
Objects reflected in the mirror are closer
than they appear. Do not estimate the distance
to the traffic behind you based on what you see
in the mirror, as this will increase your risk of an
accident.◀
Depending on how the vehicle is equipped, the mirror setting is stored for the remote control in use. When the vehicle is unlocked via the remote control, the position is automatically retrieved if the setting for this function is active.
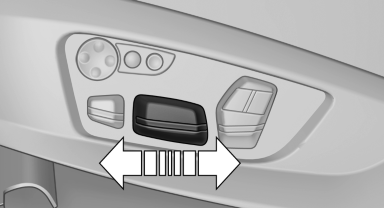
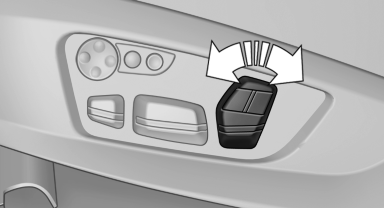
Selecting a mirror
 To change over to the other
mirror:
To change over to the other
mirror:
Slide the mirror changeover switch.
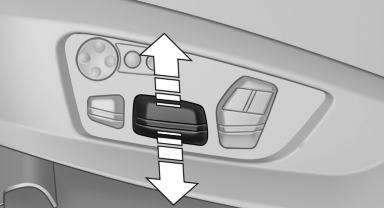
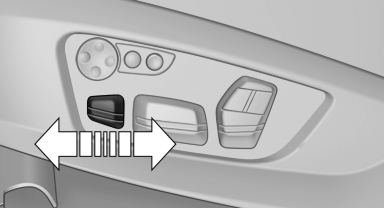
Adjusting electrically
 The setting corresponds to the
direction
in which the button is pressed.
The setting corresponds to the
direction
in which the button is pressed.
Storing positions
Seat, mirror, and steering wheel memory
Adjusting manually
If an electrical malfunction occurs, for example, press the edges of the mirror glass
Automatic Curb Monitor
When the reverse gear is engaged, the mirror glass tilts downward slightly on the front passenger side. This improves your view of the curb and other low-lying obstacles when parking, for example.
Activating
1.  Slide the mirror changeover
switch
to the driver's side mirror position.
Slide the mirror changeover
switch
to the driver's side mirror position.
2. Engage transmission position R.
Deactivating
Slide the mirror changeover switch to the passenger's side mirror position.
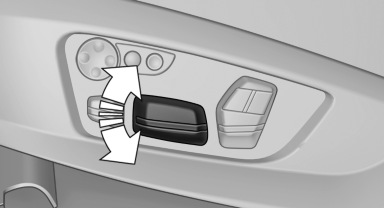
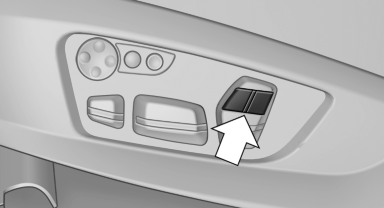
Fold in and out
 Press the button.
Possible up to approx. 15 mph/20 km/h.
For example, this is advantageous
▷ In car washes.
▷ In narrow streets.
▷ For folding back mirrors that were folded
away manually.
Mirrors that were folded in are folded out automatically at a speed of approx. 25 mph/40 km/h.
Fold in the mirror in a car wash
Before entering an automatic car wash,
fold in the exterior mirrors by hand or with the
button; otherwise, they could be damaged, depending
on the width of the vehicle.◀
Automatic heating
Both exterior mirrors are automatically heated whenever the engine is running.
Automatic dimming feature
Both exterior mirrors are automatically dimmed.
Photocells are used for control in the Interior rear view mirror
Interior rearview mirror
Reducing the blinding effect
Reducing the blinding effect
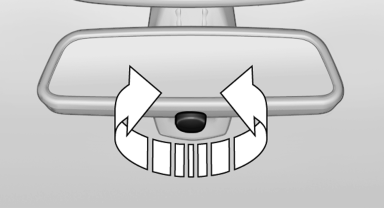
From behind when driving at night: turn the knob.
Interior rearview mirror, automatic dimming feature
The concept
Interior rearview mirror, automatic
dimming feature
Photocells are used for control:
▷ In the mirror glass.
▷ On the back of the mirror.
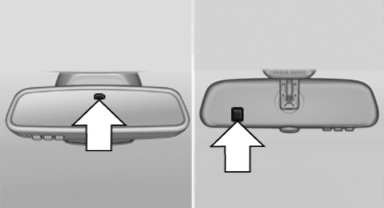
Functional requirement
For proper operation:
▷ Keep the photocells clean.
▷ Do not cover the area between the inside
rearview mirror and the windshield.
Steering wheel
General information
Do not adjust while driving
Do not adjust the steering wheel while
driving; otherwise, an unexpected movement
could result in an accident.◀
Manual steering wheel adjustment
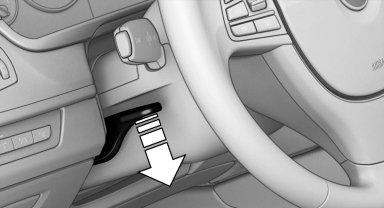
1. Fold the lever down.
2. Move the steering wheel to the preferred
height and angle to suit your seating position.
3. Fold the lever back.
Power steering wheel adjustment
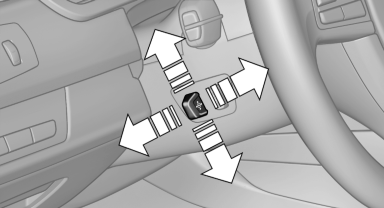
The steering wheel can be adjusted in four directions.
Storing the position
Seat, mirror, and steering wheel memory
Steering wheel heating
Switching on/off
 Press the button.
▷ On: the LED lights up.
▷ Off: the LED goes out.


