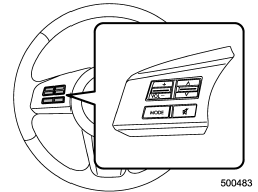
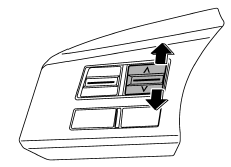
Subaru Legacy: Audio control buttons (if equipped)
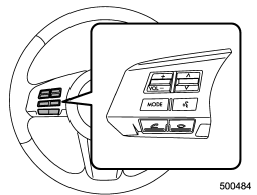
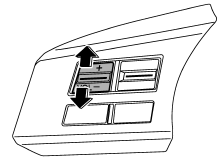
 Subaru Legacy: Audio control buttons (if equipped)
Type A audio
Type B audio
These buttons are located on the spokes of the steering wheel. They allow the driver to control audio functions without taking his/her hands off the steering wheel.
MODE button
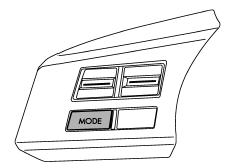
This button is used to select the desired audio mode. Each time it is pressed, the mode changes to the next one in the following sequence.
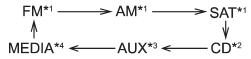
*1: The frequency last received in the selected waveband will be displayed.
*2: Only when a CD is in the player.
*3: Only when an auxiliary audio product is connected.
*4: Only when an iPod is connected using the iPod adapter that is available as a dealer option.
“up” and “down” switch
With radio mode selected
Press the switch to the “ ” or “
 ”
side briefly to skip to a preset channel. Press the switch to the “”
or “” side for more than 0.5 second
to seek the next receivable station and stop at it.
”
side briefly to skip to a preset channel. Press the switch to the “”
or “” side for more than 0.5 second
to seek the next receivable station and stop at it.
That station’s frequency will be indicated on the audio display.
With CD mode selected
Press the switch to the “” side
to skip forward in the track/file (track) order. Press the switch to the “”
side to skip back ward in the track/file (track) order. The track/file (track) number
will be shown on the audio display.
With SAT mode selected
Press the switch to the “” side
to skip forward in the channel order. Press the switch to the “”
side to skip backward in the channel order. When the switch is briefly pressed,
the channel will skip every 1 channel. When the switch is pressed for more than
0.5 second, the channel will skip every 10 channels. The channel will be shown on
the audio display.
Volume control switch
Press the switch to the “+” side to increase the volume. Press the switch to the “−” side to reduce the volume. A number indicating the volume will be shown on the audio display.
MUTE button (if equipped)
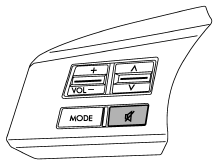
Press this button if you wish to immediately cut the volume to zero.
The audio display will show “MUTE”. If you press the button again, the original sound volume will return and “MUTE” turns off.


