Honda Accord: Audio System
 Honda Accord: Audio System
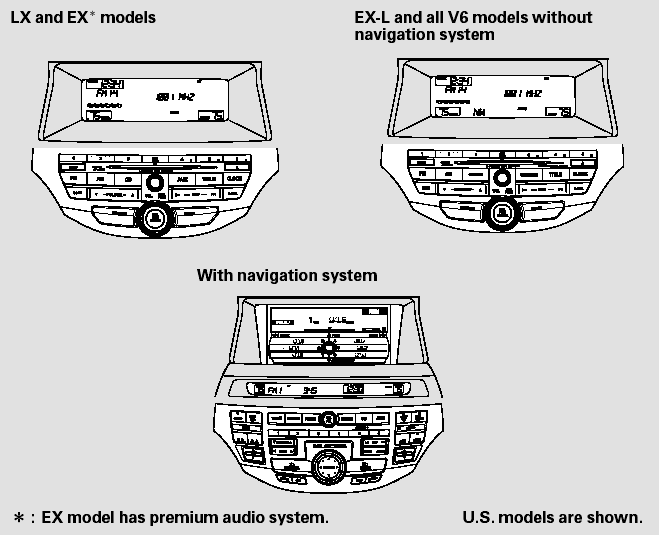
Audio System
An audio system is standard on all models. Read the appropriate pages (as shown below) to use your vehicle’s audio system.
- Selector Knob
- Menu Display
- Playing the FM/AM Radio (Models without navigation system)
- To Play the Radio
- To Select a Station
- Radio Data System (RDS)
- Adjusting the Sound
- Audio System Lighting
Selector Knob
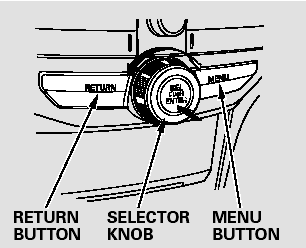
Most audio system functions can be controlled by standard buttons, bars, and knobs. In addition, you can access some functions by using the selector knob on the audio system.
The knob turns left and right. Use it to scroll through lists, or to make selections or adjustments to a list or menu item on the display. When you make a selection, push the center of the selector (ENTER) to go to that selection.
When the audio system is in XM Radio mode or playing discs, pushing the selector (ENTER) knob switches the display between the normal display and the extended display.
The extended display has three segments to display the detailed information.
Menu Display
To select any setting such as the clock, sound adjusting, or the compass (if equipped), press the MENU button. To use any audio system function, the ignition switch must be in the ACCESSORY (I) or ON (II) position. You can select the item by turning the selector knob.
To go back to the previous display, press the RETURN button.
Pressing the MENU button again will also cancel the menu display mode.
Playing the FM/AM Radio (Models without navigation system)
Playing the FM/AM Radio (Models without navigation system)
To Play the Radio
The band and frequency that the radio was last tuned to are displayed.
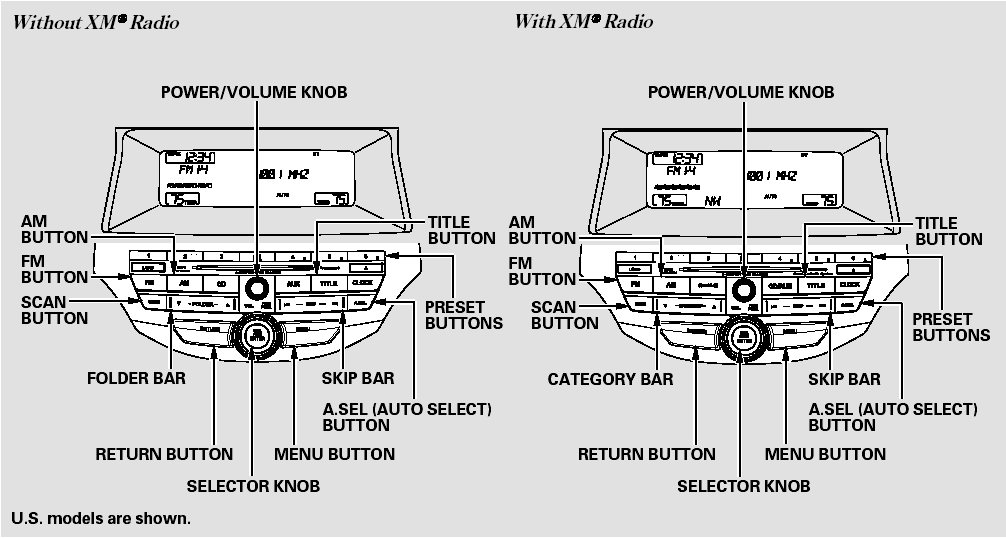
To change bands, press the AM or FM button. On the FM band, ST will be displayed if the station is broadcasting in stereo. Stereo reproduction in AM is not available.
On the AM band, AM noise reduction turns on automatically.
The ignition switch must be in the ACCESSORY (I) or ON (II) position.
Turn the system on by pushing the power/volume knob or the AM or FM button. Adjust the volume by turning the power/volume knob.
To Select a Station
You can use any of five methods to find radio stations on the selected band: tune, skip, scan, the preset buttons, and auto select.
On the FM band, you can also use the features provided by the radio data system (RDS). For more information on the RDS.
TUNE - Use the selector knob to tune the radio to a desired frequency.
Turn the knob right to tune to a higher frequency, or left to tune to a lower frequency.
SKIP - The skip function searches
up and down from the current
frequency to find a station with a
strong signal. To activate it, press
and hold the  or
or
 side of the
SKIP bar until you hear a beep, then
release it.
side of the
SKIP bar until you hear a beep, then
release it.
SCAN - The scan function samples all stations with strong signals on the selected band. To activate it, press the SCAN button, then release it.
You will see SCAN in the display.
When the system finds a strong signal, it will stop and play that station for about 10 seconds.
If you do nothing, the system will scan for the next strong station and play it for 10 seconds. When it plays a station that you want to listen to, press the SCAN button again.
Preset - Each preset button can store one frequency on AM and two frequencies on FM.
1. Select the desired band, AM or FM. FM1 and FM2 let you store six stations each.
2. Use the tune, skip, scan, or RDS function to tune the radio to a desired station.
3. Pick a preset button, and hold it until you hear a beep.
4. Repeat steps 1 through 3 to store a total of six stations on AM and twelve stations on FM.
AUTO SELECT - If you are traveling and can no longer receive your preset stations, you can use the auto select feature to find stations in the local area.
You will see a ‘‘0’’ displayed after pressing a preset button if auto select cannot find a strong station for that preset button.
If you do not like the stations auto select has stored, you can store other frequencies on the preset buttons as previously described.
Press the A. SEL button. ‘‘A-SEL’’ flashes in the display, and the system goes into scan mode for several seconds. It stores the frequencies of six AM and twelve FM stations in the preset buttons.
To turn off auto select, press the A. SEL (auto select) button. This restores the presets you originally set.
For information on FM/AM radio frequencies and reception.
Radio Data System (RDS)
On the FM band, you can select a favorite station and display the program service name provided by the radio data system (RDS).
RDS INFO Display
The RDS information display function shows the name of the RDS station you are listening to. With the audio system on and the FM band selected, you can turn this function on or off.
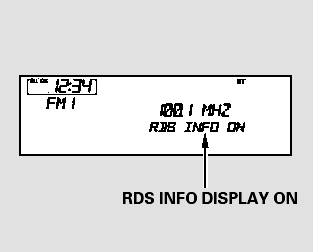
To switch the function between on and off, press and release the TITLE button. With the system on, you will see the ‘‘RDS INFO ON’’ message on the display. If the station you are listening to is an RDS station, the display shows the station name.
If the station you are listening to is not an RDS station, the display continues to show the frequency with the RDS information display function on.
When you turn off this function by pressing the TITLE button, the display shows ‘‘RDS INFO OFF.’’
Radio Data System (RDS) Category
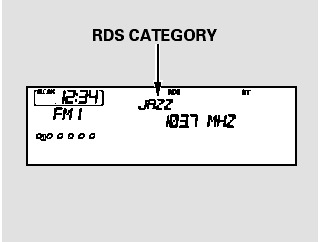
On the FM band selected, you can
select the program category
provided by the RDS. Press either
side ( or
or
 ) of the CATEGORY
bar (FOLDER bar on models without
XM Radio) to display and select an
RDS category. The principal RDS
categories are shown as follows:
) of the CATEGORY
bar (FOLDER bar on models without
XM Radio) to display and select an
RDS category. The principal RDS
categories are shown as follows:
ALL: All RDS category stations ROCK: Rock, classic rock and soft rock music COUNTRY: Country music SOFT: Adult hits and soft music TOP 40: Top 40 hits OLDIES: Nostalgia music and oldies R & B: Rhythm and blues, and soft rhythm and blues RELIGION: Programs concerned with religion CLASSIC: Classical music JAZZ: Jazz INFO: News, information, sports, talk shows, foreign language, personality, public, college, and weather TRAFFIC: Traffic information
Press either side of the CATEGORY bar (FOLDER bar on models without XM Radio) to select a RDS category.
The display shows the selected RDS category name for about 10 seconds.
You can use the search or scan function to find radio stations in the selected RDS category. If you do nothing while the RDS category name is displayed, the selected category is canceled.
RDS Program Search
This function searches up and down a frequency for the strongest signal from the frequencies that carry the selected RDS category information.
This can help you to find a station in
your favorite category. To activate it,
press and release either side
( or
) of the SKIP bar. You
will see the selected RDS category
name blinking while searching it.
When the system finds a station, the selected RDS category name will be displayed again for about 5 seconds.
If the system does not find a station, ‘‘NOTHING’’ will be blinking for about 5 seconds, then the system goes back to the last selected station.
RDS Program SCAN
The scan function samples all stations with strong signals on the selected RDS category. To activate it, press and release the SCAN button.
You will see SCAN in the display.
The system will scan for a station with a strong signal in the selected RDS category. You will also see the selected RDS category name blinking while searching it. When it finds a strong signal, it will stop and play that station for about 10 seconds.
If you do nothing, the system will scan for the next strong station and play it for 10 seconds. When it plays a station that you want to listen to, press the SCAN button again.
If the system does not find a station, ‘‘NOTHING’’ will be blinking for about 5 seconds, then the system goes back to the last selected station.
You can use the RDS program search or scan function even if the RDS information display function is off.
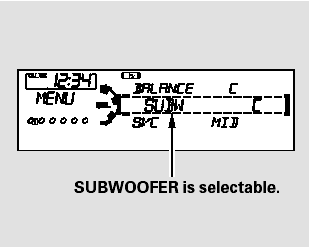
Adjusting the Sound
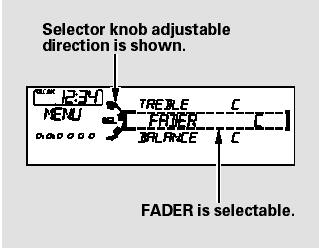
Press the MENU button to display the sound settings. Turn the selector knob to select an appropriate setting:
bass, treble, fader, balance, SUBW* (subwoofer) and SVC (speedsensitive volume compensation).
Press the selector knob (ENTER) to enter the setting, then turn the selector knob to adjust the setting.
*: If equipped
BASS - Adjusts the bass.
TREBLE - Adjusts the treble.
FADER - Adjusts the front-to-back strength of the sound.
BALANCE - Adjusts the side-toside strength of the sound.
If equipped
SUBW - Adjusts the strength of sound from the subwoofer speaker.
If the fader adjustment is set to F9 (maximum front level), the subwoofer is turned off.
SVC - Adjusts the volume level based on the vehicle speed.
Eachmode is shown in the display as it changes. Turn the selector knob to adjust the setting to your liking.
Except SVC adjustment
When the level reaches the center, you will see ‘‘C’’ in the display.
To return to the normal play, push the RETURN or MENU button after you stop adjusting a mode.
Speed-sensitive Volume Compensation (SVC)
The SVC has four modes: SVC OFF, SVC LOW, SVC MID, and SVC HIGH. Turn the selector knob to adjust the setting to your liking. If you feel the sound is too loud, choose low. If you feel the sound is too quiet, choose high.
The SVC mode controls the volume based on vehicle speed. The faster you go, the louder the audio volume becomes. As you slow down, the audio volume decreases.
Audio System Lighting
You can use the instrument panel brightness control knob to adjust the illumination of the audio system. The audio system illuminates when the parking lights are on, even if the radio is turned off.


