Honda Accord: Playing Discs (Models with navigation system)
 Honda Accord: Playing Discs (Models with navigation system)
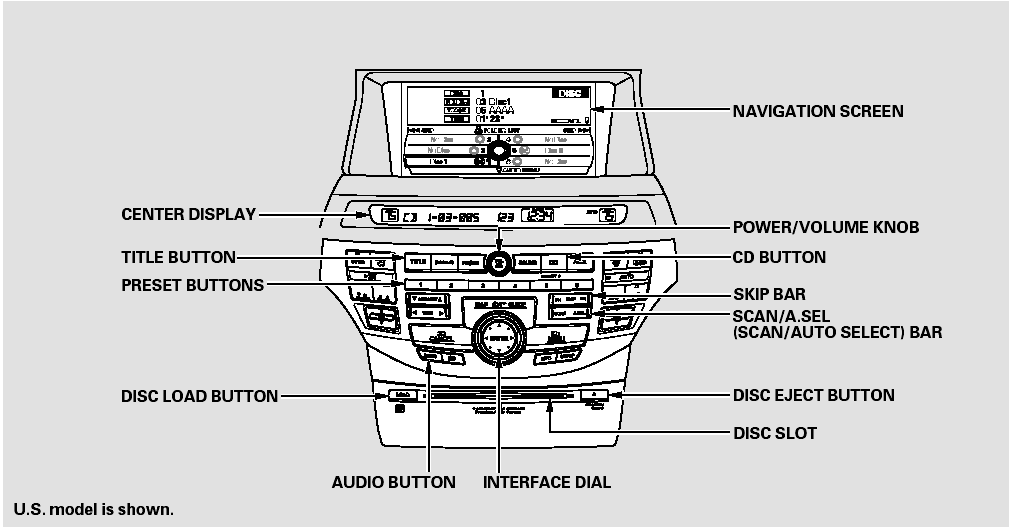
Playing Discs (Models with navigation system)
Your vehicle’s audio system has an in-dash disc changer with the same controls used for the radio. To operate the disc changer, the ignition switch must be in the ACCESSORY (I) or the ON (II) position.
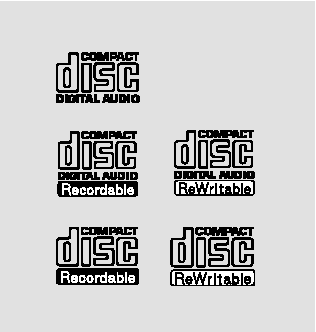
The disc changer can play these disc formats:
CD (CD-DA) MP3/WMA
The disc packages or jackets should have one of these marks.
The changer can also play MP3 or WMA format.
When playing a disc in MP3, you will see ‘‘MP3’’ in the display. In WMA format, ‘‘WMA’’ will appear in the display.
NOTE:
If a file on a WMA disc is protected by digital rights management (DRM), the audio unit displays UNSUPPORTED, and then skips to the next file.
Video CDs and DVDs will not work in this unit.
Some CD-DA and CD-ROM mixed discs are not playable.
You cannot load and play 3-inch (8-cm) discs in this system.

Do not use discs with adhesive labels.
The label can curl up and cause the disc to jam in the unit.
- Loading Discs in the Changer
- To Play a Disc
- To Change Tracks
- To Choose a Track
- Track Scan
- Disc Scan
- Track Repeat
- Disc Repeat
- Random Play
- To Stop Playing a Disc
- Playing an MP3/WMA Disc
- Changing the Folders
- Folder Scan
- Folder Repeat
- Folder Random
- Removing Discs from the Changer
Loading Discs in the Changer
To load multiple discs in one operation:
1. With the ignition in the ACCESSORY (I) or the ON (II) position, press and hold the LOAD button until you hear a beep and see ‘‘LOAD’’ in the center display, then release the button.
2. Insert a disc into the slot. Insert it only about halfway; the drive will pull it in the rest of the way. You will see ‘‘BUSY’’ in the center display. When you insert the first disc, the changer will start to play the disc.
3. Do not try to insert a disc until ‘‘LOAD’’ appears. You could damage the audio unit.
When ‘‘LOAD’’ appears in the center display again, insert the next disc into the slot.
4. Repeat this until all six positions are loaded. If you are not loading all six positions, the system will then begin playing the last disc loaded.
If you stop loading discs before all six positions are filled, the system will wait for 10 seconds, stop the load operation, and begin playing the last disc loaded.
To load a single disc:
1. Press and release the LOAD button.
2. ‘‘NO DISC’’ is shown on the screen for an empty position in the changer. When the green load indicator comes on and you see ‘‘LOAD’’ in the center display, insert the disc into the slot. Insert it only about halfway; the drive will pull it in the rest of the way.
Do not try to insert a disc until ‘‘LOAD’’ appears. You could damage the audio unit.
You can select the position to load a disc. Turn the interface knob or press a preset button to select the position, then press ENTER on the selector. This starts the loading sequence. If you do not select the position, the system loads the disc to the first empty position in numerical order.
If you press the LOAD button while a disc is playing, the system will stop playing that disc and start the loading sequence. It will then play the disc just loaded.
To Play a Disc
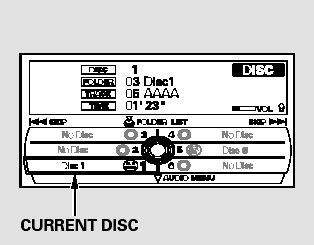
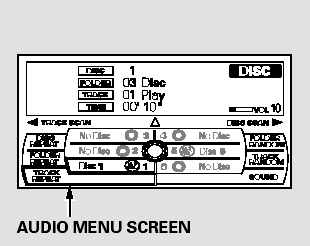
Select the changer by pressing the CD button. The system will begin playing the last selected disc in the disc changer. You will see the current disc position highlighted.
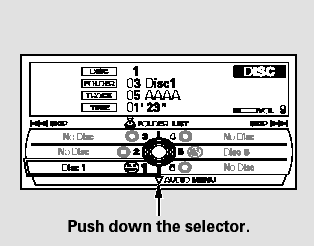
To select a different disc, press the corresponding number on the preset buttons, or turn the interface knob to highlight the desired disc number, then press ENTER on the interface selector.
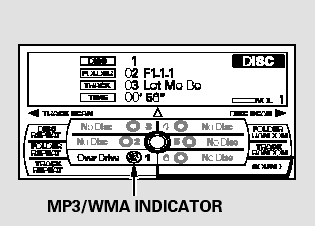
The player can play CD-TEXT, MP3, andWMA formats.
When you play CD-TEXT, you will see the track name, artist name, and album name on the screen. When you play MP3/WMA discs, you will see the track name and folder name on the screen. If the disc was not recorded with this information, it will not be displayed.
To Change Tracks
Each time you press and release the
 side of the skip bar or push the
interface selector to the right, the
player skips forward to the
beginning of the next track. Press
and release the
side of the skip bar or push the
interface selector to the right, the
player skips forward to the
beginning of the next track. Press
and release the  side of the skip
bar or push the interface selector to
the left to skip backward to the
beginning of the current track. Press
the side or push the interface
selector to the left again to skip to
the previous track. To move rapidly
within a track, press and hold either
side of the skip bar.
side of the skip
bar or push the interface selector to
the left to skip backward to the
beginning of the current track. Press
the side or push the interface
selector to the left again to skip to
the previous track. To move rapidly
within a track, press and hold either
side of the skip bar.
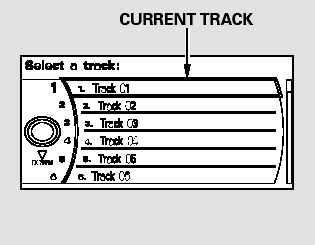
To Choose a Track

You can also choose a track directly from a track list. Press ENTER on the interface selector, and the track list screen will be shown. If there are no track names, track numbers are displayed. You will see the current track is highlighted. Turn the interface knob to select the desired track, then press ENTER on the interface selector.
To exit the track list display, press the AUDIO button, or push the interface selector to the left.
Track Scan
When you press the SCAN side of the SCAN/A. SEL bar or scroll down and push the interface selector to the left, the next track of the current track plays for about 10 seconds.
You will see SCAN next to TRACK on the screen and center display. To listen to the rest of the track, press and hold the SCANside of the bar until you hear a beep or push the interface selector to the left again within 10 seconds.
If you don’t, the system advances to the next track, plays about 10 seconds of it, and continues through the rest of the tracks the same way.
Disc Scan
When you press the SCAN side of the SCAN/A. SEL bar repeatedly until you see D-SCAN in the center display, or push the interface selector to the right, the first track of the current disc plays for about 10 seconds. You will see SCAN next to DISC on the screen. The disc number is blinking and SCAN is also shown in the center display. To listen to the rest of the disc, press and hold the SCAN side of the bar until you hear a beep, or push the interface selector to the right again within 10 seconds.
If you don’t, the system advances to the next disc, plays about 10 seconds of its first track, and continues through the rest of the discs the same way. When the system reaches the last disc, DISC SCAN is canceled, and that disc continues to play.
To Select Repeat or Random Mode:
You can select any type of repeat and random modes by using the interface dial.
Push the AUDIO button to display the audio information on the screen, then scroll down by pushing down the selector to select the audio menu.
Turn the interface knob to select a desired repeat or random mode, then press ENTER to set your selection.
To cancel the selected repeat or random mode, have the selected mode highlighted, then press ENTER on the interface selector.
Track Repeat
To replay the current track continuously, select TRACK REPEAT, and press ENTER on the interface selector. As a reminder, you will see REPEAT next to TRACK on the screen. To turn this feature off, highlight TRACK REPEAT (if not already highlighted), and press ENTER on the interface selector again.
Disc Repeat
To replay the current disc continuously, select DISC REPEAT, and press ENTER on the interface selector. As a reminder, you will see REPEAT next to DISC on the screen.
To turn this feature off, highlight DISC REPEAT (if not already highlighted), and press ENTER on the interface selector again.
Random Play
To play the tracks on the current disc in random order, select TRACK RANDOM, and press ENTER on the interface selector. As a reminder, you will see RANDOM next to TRACK on the screen. To turn this feature off, highlight TRACK RANDOM (if not already highlighted), and press ENTER on the interface selector again.
To Stop Playing a Disc
To take the system out of disc mode,
press the FM/AM button, the
 button, or the AUX button (if
an appropriate unit is connected). To
return to disc mode, press the CD
button.
button, or the AUX button (if
an appropriate unit is connected). To
return to disc mode, press the CD
button.
You can also press the MODE button on the steering wheel to change modes.
If you turn the system off while a disc is playing, either with the power/volume knob or the ignition switch, play will continue at the same point when you turn it back on.
Playing an MP3/WMA Disc
The changer plays MP3/WMA files in recorded order. Each disc can hold up to 400 playable files within 8 folder layers. When playing MP3 discs, a disc can support a maximum number of 100 folders, and each folder can hold 255 playable files.
Depending on the software the files were made with, it may not be possible to play some files, or display some text data.
To play anMP3/WMA disc, use the disc controls previously described, along with the following information.
Changing the Folders
While playing an MP3/WMA disc, you can select a folder within the disc by pressing either side of the category bar. Each time you press either side of the bar, the folder title and its first file’s information appear in the center display in recorded order.
Changing and Selecting the Folders/ Files
Using the interface selector, you can see the list of all the files and folders within a disc. While playing a MP3/ WMA disc, press the AUDIO button.
The currently playing folder and file information comes on the screen.
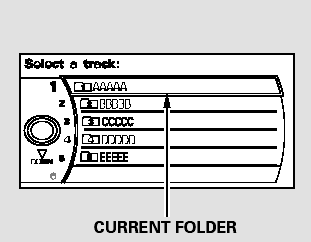
Push ENTER on the selector to show the folder list. Turn the selector knob, highlight the folder you want to see the information within, and press ENTER.
You can see the list of all the files in the selected folder. Turn the selector knob, then press ENTER to set your selection.
If the root folder has some additional folders in the lower layer, they will be listed on the screen.
Folder Scan
This feature, when activated, samples the first file in each folder for 10 seconds. To scan a folder, press the SCAN side of the SCAN/ A. SEL bar repeatedly. You will see SCAN next to FOLDER and the folder number blinking.
To listen to the rest of the folder, press and hold the SCAN side of the bar until you hear a beep. If you do nothing, the system advances to the next folder, plays 10 seconds of it, and continues with the remaining folders in the same way. When the system has finished sampling the first file in all folders, folder scan is canceled, and the last file played continues to play.
Folder Repeat
This feature, when activated, replays all files in the selected folder. To activate folder repeat mode, select FOLDER REPEAT by using the interface knob, and press ENTER on the interface selector. You will see REPEAT next to FOLDER on the screen. To turn this feature off, highlight FOLDER REPEAT (if not already highlighted), and press ENTER on the interface selector again.
To select any type of the repeat modes, use the interface dial. For more information.
Folder Random
This feature, when activated, plays all files in the current folder in random order. To activate folder random play, select FOLDER RANDOM by using the interface knob, and press ENTER on the interface selector. You will see RANDOM next to FOLDER on the screen. To turn this feature off, highlight FOLDER RANDOM (if not already highlighted), and press ENTER on the interface selector again.
To select any type of the random modes, use the interface dial. For more information.
Removing Discs from the Changer
To remove the disc that is currently playing, press the eject button. You will see ‘‘EJECT’’ in the center display. When you remove the disc from the slot, the system automatically enters the previous mode AM, FM1, FM2, or XMRadio.
The system also begins the load sequence so you can load another disc. If you do not load another disc, the load sequence is canceled, and the system continues playing in the previous mode.
If you do not remove the disc from the slot, the system will reload the disc after 10 seconds. To begin playing the disc, press the CD button.
To remove a different disc from the changer, first select it by pressing the corresponding number on the preset button or turning the interface knob, and pressing ENTER on the interface selector. When that disc begins playing, press the eject button.
When you press the eject button while listening to the radio, or with the audio system turned off, the disc that was last selected is ejected.
After that disc is ejected, pressing the eject button again will eject the next disc in numerical order. By doing this six times, you can remove all the discs from the changer.
You can also eject discs when the ignition switch is off:
To eject one disc, press and release the eject button.
To eject all discs, press and hold the eject button until the first disc begins to eject.


