Mercedes-Benz E-Class: Menus and submenus
 Mercedes-Benz E-Class: Menus and submenus
- Menu overview
- Trip menu
- Navigation system menu
- Audio menu
- Telephone menu
- Assistance menu
- Service menu
- Settings menu
- AMG menu in AMG vehicles
Menu overview
The number of menus shown depends on the optional equipment in the vehicle.
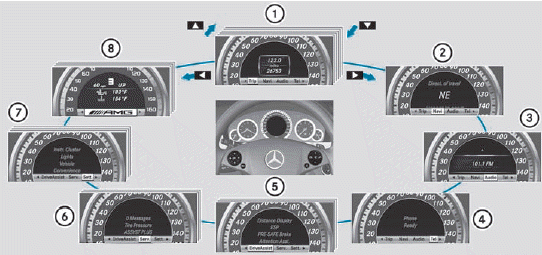
1. Trip menu
2. Navi menu (navigation instructions)
3. Audio menu
4. Tel menu (telephone)
5. DriveAssist. menu (assistance)
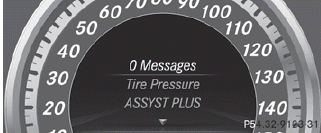
6. Serv. menu
- calls up display messages
- tire pressure loss warning system (Canada only)
- tire pressure monitor
- ASSYST PLUS service interval display
7. Sett. menu
8. AMG menu in AMG vehicles
Trip menu
Standard display
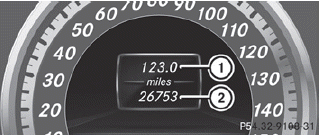
•► Press and hold the  button on
the
steering wheel until the Trip menu with
odometer 1 and trip odometer 2 is
shown.
button on
the
steering wheel until the Trip menu with
odometer 1 and trip odometer 2 is
shown.
Trip computer "From start" or "From reset"
The values in the From Start submenu are calculated from the start of a journey, while the values in the From Reset submenu are calculated from the last time the submenu was reset
•► Press the  or
or
 button on the
steering wheel to select the Trip menu.
button on the
steering wheel to select the Trip menu.
•► Press the  or
or
 button to select
From Start or From Reset.
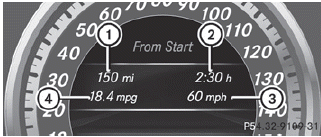
Trip computer "From start" (example)
1. Distance
2. Time
3. Average speed
4. Average fuel consumption
The From Start trip computer is reset automatically if:
- the ignition has been switched off for more
than four hours.
- 999 hours have been exceeded.
- 9,999 miles have been exceeded.
When 9,999 hours or 99,999 miles have been exceeded, the trip computer is automatically reset From Reset.
Displaying the range and current fuel consumption
•► Press the  button on the
steering wheel to select the Trip menu.
button on the
steering wheel to select the Trip menu.
•► Press the  button to select
current fuel consumption21 and
approximate range.
button to select
current fuel consumption21 and
approximate range.
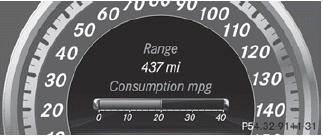
The approximate range that can be covered
depends on the fuel level and your current
driving style. If there is only a small amount
of fuel left in the fuel tank, the display shows
a vehicle being refueled  instead of
the
range.
instead of
the
range.
Digital speedometer
•► Press the button on the
steering wheel to select the Trip menu.
•► Press to select the digital
speedometer.
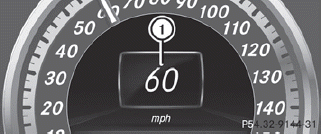
1 Digital speedometer
Resetting values
You can reset the values of the following functions:
- Trip odometer
- Trip computer "From start"
- Trip computer "From reset"
•► Press the button on the
steering wheel to select the Trip menu.
•► Press the button to select the
function that you wish to reset.
•► Press  .
.
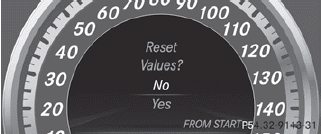
Resetting the trip computer "From start" (example)
•► Press  to select Yes and press
 to confirm.
Navigation system menu
Displaying navigation instructions
In the Navi menu, the multifunction display shows navigation instructions. For more information, see the separate operating instructions.
•► Switch on COMAND (see the separate operating instructions).
•► Press the button on the
steering wheel to select the Navi menu.
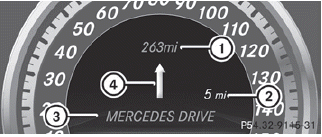
Route guidance inactive
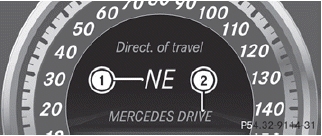
1. Direction of travel
2. Current road
Route guidance active
No change of direction announced
1. Distance to the destination
2. Distance to the next change of direction
3. Current road
4. Symbol for "follow the road's course"
Change of direction announced without a lane recommendation
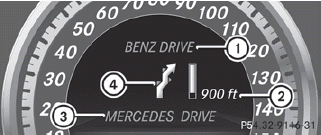
1. Road into which the change of direction
leads
2. Distance to change of direction and visual
distance display
3. Current road
4. Symbol for change of direction
When a change of direction has been announced, you will see visual distance display 2 next to the symbol for change of direction 4. This decreases in size as you approach the announced change of direction.
Change of direction announced with a lane recommendation
Lane recommendations are only displayed if the relevant data is available on the digital map.
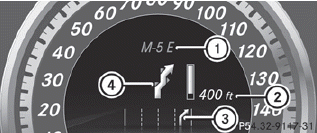
1. Road into which the change of direction
leads
2. Distance to change of direction and visual
distance display
3. Lane recommendation
4. Symbol for change of direction
On multi-lane roads, lane recommendation 3 may be shown for the next change of direction. Lanes may be added during a change of direction.
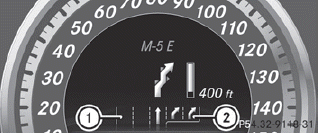
Lane recommendation display (example)
1 Uninterrupted lane
2 New lane during a change of direction
Other status indicators of the navigation system
-  : you have reached the
destination or
an intermediate destination.
: you have reached the
destination or
an intermediate destination.
- New Route... or Calculating Route: a
new route is being calculated.
- Off Map or Off Mapped Road: the vehicle
position is outside the area of the digital
map (off-map position).
- No Route: no route could be calculated to
the selected destination.
Audio menu
Selecting a radio station
SIRIUS XM satellite radio acts like a normal radio.
For more information on satellite radio operation, see the separate operating instructions.
You can only change the waveband and store new stations using COMAND.
•► Switch on COMAND and select Radio (see the separate operating instructions).
•► Press the button on the
steering wheel to select the Audio menu.
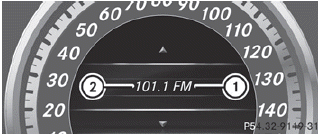
1. Waveband
2. Station
•► To select a stored station: briefly press
the button.
•► To select a station from the station
list: press and briefly hold the  or
or  button.
•► To select a station using station
search23: press and briefly hold the  or button.
Operating audio player or audio media
Audio data from various audio devices or media can be played, depending on the equipment installed in the vehicle.
•► Switch on COMAND and select the audio device or medium (see the separate operating instructions).
•► Press the button on the
steering wheel to select the Audio menu.

CD changer display (example)
1 Current track
•► To select the next/previous track:
briefly press the button.
•► To select a track from the track list
(rapid scrolling): press and hold the
button until the desired track
has been reached.
If you press and hold the
button, the rapid scrolling speed is increased.
Not all audio devices or media support this function.
If track information is stored on the audio device or medium, the multifunction display will show the number and name of the track.
The current track does not appear in audio AUX mode (Auxiliary audio mode: external audio source connected).
Operating video DVD
•► Switch on COMAND and select video DVD (see the separate operating instructions).
•► Press the button on the
steering wheel to select the Audio menu.
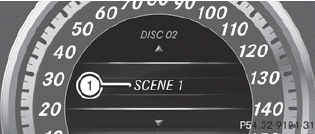
DVD changer display (example)
1. Current scene
•► To select the next or previous scene:
briefly press the button.
•► To select a scene from the scene list
(rapid scrolling): press and hold the
button until the desired
scene has been reached.
Telephone menu
introduction
You can establish a Bluetooth® connection to COMAND (see the separate operating instructions).
![]() WARNING
WARNING
A driver's attention to the road must always
be his/her primary focus when driving. For
your safety and the safety of others, we
recommend that you pull over to a safe
location and stop before placing or taking a
telephone call. If you choose to use the
telephone while driving, please use the handsfree
device and only use the telephone when
weather, road and traffic conditions permit.
Some jurisdictions prohibit the driver from using a mobile phone while driving a vehicle.
Bear in mind that at a speed of just 30 mph (approximately 50 km/h ), your vehicle is covering a distance of 44 feet (approximately 14 m) every second.
•► Switch on the mobile phone and COMAND (see the separate operating instructions).
•► Press the button on the
steering wheel to select the Tel menu.
You will see one of the following display messages in the multifunction display:
- Telephone Ready or the name of the
network provider: the mobile phone has
found a network and is ready to receive.
- Phone No Service: no network is
available, or the mobile phone is searching
for a network.
Accepting a call
If someone calls you when you are in the Tel menu, a display message appears in the multifunction display, for example:
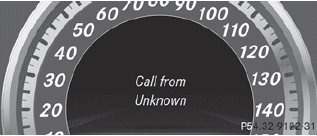
•► Press the  button on the
steering
wheel to accept an incoming call.
button on the
steering
wheel to accept an incoming call.
If you are not in the Tel menu, you can still accept a call.
Rejects or ends a call
•► Press the  button on the
steering
wheel.
button on the
steering
wheel.
If you are not in the Tel menu, you can still reject or end a call.
Dialing a number from the phone book
If your mobile phone is able to receive calls, you can search for and dial a number from the phone book in COMAND at any time.
•► Copy the telephone book of the mobile phone into the audio system or to COMAND (see the separate operating instructions).
Copy the telephone book of the mobile phone to COMAND (see the separate operating instructions).
•► Press the button on the
steering wheel to select the Tel menu.
•► Press the  button to call
up the phone book.
button to call
up the phone book.
•► Press the button to select the
desired name.
To start scrolling rapidly, press and hold the
button for longer than one
second. After a short time, the rapid scroll
speeds up.
Rapid scrolling stops when you release the button or reach the end of the list.
•► If only one telephone number is stored
for a name: press the  or
button
to start dialing.
or
button
to start dialing.
or
•► If there is more than one number for a
particular name: press the or
button to display the numbers.
•► Press the button to select the
number you want to dial.
•► Press the or
button to start
dialing.
or
•► If you do not want to make a call: press
the  or
or
 button.
Redialing
The on-board computer saves the last names or numbers dialed in the redial memory.
•► Press the button on the
steering wheel to select the Tel menu.
•► Press the button to switch to the
redial memory.
•► Press the button to select the
desired name or number.
•► Press the or
button to start
dialing.
or
•► If you do not want to make a call: press
the or
button.
Assistance menu
Introduction
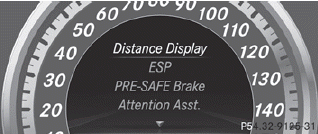
In the DriveAssist. menu you can:
- show the distance display
- activate/deactivate ESP®
- activate/deactivate PRE-SAFE® Brake
- activate/deactivate ATTENTION ASSIST
- activate/deactivate Blind Spot Assist or
Active Blind Spot Assist
- activate/deactivate Lane Keeping Assist or
Active Lane Keeping Assist
Showing the distance display
This function is only available with DISTRONIC PLUS.
•► Press the button on the
steering wheel to select the DriveAssist
menu.
•► Press the button to select
Distance Display.
•► Press .
The DISTRONIC PLUS distance display appears in the multifunction display.
Deactivating/activating ESP®
![]() WARNING
WARNING
Never switch off the ESP when you see the
ESP warning lamp  flashing in the
instrument cluster. In this case proceed as
follows:
flashing in the
instrument cluster. In this case proceed as
follows:
- When driving off, apply as little throttle as
possible.
- While driving, ease up on the accelerator
pedal.
- Adapt your speed and driving style to the
prevailing road conditions.
Failure to observe these guidelines could cause the vehicle to skid. The ESP cannot prevent accidents resulting from excessive speed.
Activating/deactivating ESP® on AMG vehicles.
For further information about ESP®, see.
•► Start the engine.
•► Press on the steering wheel
to select the DriveAssist menu.
•► Press the button to select
ESP.
•► Press the button.
•► To deactivate: press
again.
The  warning lamp in the instrument
cluster comes on.
warning lamp in the instrument
cluster comes on.
![]() WARNING
WARNING
When the ESP OFF warning
lamp lights
up, ESP is switched off.
When the ESP warning lamp and the
ESP OFF warning lamp are on
continuously, ESP is not operational due to a
malfunction.
When ESP is switched off or not operational, the vehicle's stability during standard driving maneuvers is reduced.
Adapt your driving style to suit the prevailing road conditions/weather conditions and to the non-operating status of ESP.
•► To activate: press again.
The warning lamp in the instrument
cluster goes out.
Activating/deactivating PRE-SAFE® Brake
PRE-SAFE® Brake is only available in vehicles with DISTRONIC PLUS.
•► Press the button on the
steering wheel to select the DriveAssist
menu.
•► Press to select PRE-SAFE
Brake.
•► Press .
The current selection is displayed.
•► To activate/deactivate: press
again.
When PRE-SAFE® Brake is
activated, the multifunction display shows
the  symbol as long as the HOLD
function is not activated.
symbol as long as the HOLD
function is not activated.
Vehicles with Parking Guidance: if
PARKTRONIC is activated and you are driving
at a speed under 22 mph (35 km/h) the
 symbol for Parking Guidance is displayed
instead of the
symbol for Parking Guidance is displayed
instead of the  symbol.
Activating/deactivating ATTENTION ASSIST
•► Press the button on the
steering wheel to select the DriveAssist
menu.
•► Press the button to select
Attention Asst..
•► Press .
The current selection is displayed.
•► To activate/deactivate: press
again.
When ATTENTION ASSIST is
activated, the  symbol appears in
the
multifunction display when the ignition is on.
symbol appears in
the
multifunction display when the ignition is on.
Activating/deactivating Blind Spot Assist
You can use the Blind Spot Asst. function to activate or deactivate Blind Spot Assist or Active Blind Spot Assist.
•► Press on the steering wheel
to select the DriveAssist menu.
•► Press to select Blind Spot
Asst..
•► Press .
If the function is activated, the monitored areas are shown in red in the multifunction display.
•► To activate/deactivate: press
again
Activating/deactivating Lane Keeping Assist
You can use the Lane Keep. Asst. function to activate/deactivate Lane Keeping Assist or Active Lane Keeping Assist.
•► Press the button on the
steering wheel to select the DriveAssist
menu.
•► Press the button to select
Lane Keep. Asst..
•► Press .
If the function is activated, the road markings are shown in red in the multifunction display.
•► To activate/deactivate: press
again.
If Lane Keeping Assist or Active Lane keeping
Assist is activated, the multifunction display
shows the  symbol when the ignition
is
switched on.
symbol when the ignition
is
switched on.
Service menu
In the Serv. menu you can:
- call up display messages
- restart the tire pressure loss warning
system (Canada only) Rcheck the tire pressure electronically
- call up the service due date
Settings menu
Introduction
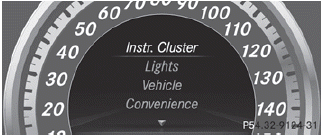
The Sett. menu can be used for:
- changing the instrument cluster settings
- changing the light settings
- changing the vehicle settings
- changing the convenience settings
- restoring the factory settings
Instrument cluster
Selecting the unit of measurement for distance
The Display Unit Speed-/Odometer:
function allows you to choose whether certain displays appear in kilometers or miles.
The selected unit of measurement for distance applies to:
- the digital speedometer in the Trip menu
- the odometer and the trip odometer
- the trip computer
- the current consumption and the range
- the navigation instruction in the Navi menu
- DISTRONIC PLUS
- ASSYST PLUS service interval display
•► Press the button on the
steering wheel to select the Settings
menu.
•► Press the button to select the
Instr. cluster submenu.
•► Press the a button to confirm.
•► Press the button to select the
Display Unit Speed-/Odometer function.
You will see the selected setting: km or miles.
•► Press the button to save the
setting.
Selecting the permanent display function
The Permanent Display: function allows you to choose whether the multifunction display always shows the outside temperature or the speed in km/h (USA) or mph (Canada).
•► Press the button on the
steering wheel to select the Settings
menu.
•► Press the button to select the
Instr. cluster submenu.
•► Press the button to confirm.
•► Press the button to select the
Permanent display function.
You will see the selected setting Outside Temperature or Speedometer [km/h]:.
•► Press the button to save the
setting.
Lights
Switching the daytime running lamps on/ off
This function is not available in Canada.
If you have activated the Day Lights
function and the light switch is in the
 or
or
 position, the daytime running lamps
are
switched on automatically during the day
when the engine is running.
position, the daytime running lamps
are
switched on automatically during the day
when the engine is running.
In the dark, the following also light up:
- the low-beam headlamps
- the parking lamps
- the tail lamps
- the license plate lamp
- the side marker lamps
•► Press the button on the
steering wheel to select the Sett. menu.
•► Press the button to select the
Lights submenu.
•► Press the button to confirm.
•► Press the button to select the
Day Lights function.
If the Daytime Running Lights: function
has been switched on, the cone of light and
the  symbol in the multifunction
display are shown in red.
symbol in the multifunction
display are shown in red.
•► Press the button to save the
setting.
Switching Adaptive Highbeam Assist on/ off
•► Press the button on the
steering wheel to select the Sett. menu.
•► Press the button to select the
Lights submenu.
•► Press the button to confirm.
•► Press to select the Adapt.
Highbeam function.
If the Adapt. Highbeam function has been
switched on, the cone of light and the
 symbol in the multifunction display
are shown in red.
symbol in the multifunction display
are shown in red.
•► Press the button to save the
setting.
Setting the brightness of the ambient lighting
•► Press the button on the
steering wheel to select the Settings
menu.
•► Press the button to select the
Lights submenu.
•► Press the button to confirm.
•► Press the button to select
Amb. light +/-.
•► Press the button to confirm.
•► Press the button to adjust the
brightness to any level from Off to Level
5 (bright).
•► Press the or
 button to save the
setting.
button to save the
setting.
Activating/deactivating surround lighting and exterior lighting delayed switch-off
If you have activated the Surround
Lighting function and the light switch is in
the or
position, the following
functions are active when it is dark:
RSurround lighting: the exterior lighting remains lit for 40 seconds after unlocking with the key. The exterior lighting switches off when you open the driver's door.
RExterior lighting delayed switch-off: the exterior lighting remains lit for 60 seconds after the engine has been switched off. If you close all the doors, the exterior lighting goes off after 15 seconds.
If you activate the Surround Lighting function, the following light up depending on the vehicle's equipment:
- the parking lamps
- the fog lamps
- the daytime running lamps
- the side marker lamps
- the surround lighting in the exterior mirrors
•► Press the button on the
steering wheel to select the Sett. menu.
•► Press the button to select the
Lights submenu.
•► Press the button to confirm.
•► Press the button to select the
Surround lighting function.
When the Surround Lighting function is activated, the light cone and the area around the vehicle are displayed in red in the multifunction display.
•► Press the button to save the
setting.
Deactivating delayed switch-off of the exterior lighting temporarily:
•► Before leaving the vehicle, turn the SmartKey to position 0 in the ignition lock.
•► Turn the SmartKey to position 2 in the ignition lock and back to position 0.
The exterior lighting delayed switch-off is deactivated.
Delayed switch-off of the exterior lighting is reactivated the next time you start the engine.
Activating/deactivating the interior lighting delayed switch-off
If you activate the Light. delay function, the interior lighting remains on for 20 seconds after you remove the SmartKey from the ignition lock.
•► Press the button on the
steering wheel to select the Settings
menu.
•► Press the button to select the
Lights submenu.
•► Press the button to confirm.
•► Press the button to select the
Light. Delay function.
When the Light. Delay function is activated, the vehicle interior is displayed in red in the multifunction display.
•► Press the button to save the
setting.
Vehicle
Activating/deactivating the automatic door locking feature
If you select the Auto. Door Locks function, the vehicle is centrally locked above a speed of around 9 mph.
For further information on the automatic locking feature, see.
•► Press the button on the
steering wheel to select the Settings
menu.
•► Press the button to select the
Vehicle submenu.
•► Press the button to confirm.
•► Press the button to select the
Auto. Door Locks function.
When the Auto. Door Locks function is activated, the vehicle doors are displayed in red in the multifunction display.
•► Press the button to save the
setting.
Activating/deactivating the acoustic locking verification signal
If you activate the Acoustic Lock function, an audible signal sounds depending on the vehicle's date of manufacture:
Rwhen locking
or
Ronce when unlocking and three times when
locking
•► Press the button on the
steering wheel to select the Settings
menu.
•► Press the button to select the
Vehicle submenu.
•► Press the button to confirm.
•► Press the button to select the
Acoustic Lock function.
If the Acoustic Lock function is activated,
the  symbol in the multifunction
display lights up red.
symbol in the multifunction
display lights up red.
•► Press the button to save the
setting.
Activating/deactivating the radar sensor system
The following systems are switched off when the radar sensor system is deactivated:
- DISTRONIC PLUS
- BAS PLUS
- PRE-SAFE® Brake
- Blind Spot Assist
- Active Blind Spot Assist
USA only: This device has been approved by the FCC as a "Vehicular Radar System".
The radar sensor is intended for use in an automotive radar system only. Removal, tampering, or altering of the device will void any warranties, and is not permitted by the FCC. Do not tamper with, alter, or use in any non-approved way.
Any unauthorized modification to this device could void the user's authority to operate the equipment.
Canada only:
This device complies with RSS-210 of Industry Canada. Operation is subject to the following two conditions:
1. This device may not cause harmful interference, and 2. this device must accept any interference received, including interference that may cause undesired operation.
Any unauthorized modification to this device could void the user's authority to operate the equipment.
•► Press the button on the
steering wheel to select the Settings
menu.
•► Press the button to select the
Vehicle submenu.
•► Press the button to confirm.
•► Press the button to select
Radar Sensor (See Oper. Manual):.
You will see the selected setting: Enabled or Disabled.
•► Press the button to save the
setting.
Convenience
Activating/deactivating the EASYENTRY/ EXIT feature
You can use the Easy Entry/Exit: function to activate or deactivate the EASY ENTRY/ EXIT feature
![]() WARNING
WARNING
You must make sure no one can become
trapped or injured by the moving steering
wheel when the easy-entry/exit feature is
activated.
To stop steering wheel movement, move steering wheel adjustment lever or press one of the memory position buttons.
Do not leave children unattended in the vehicle, or with access to an unlocked vehicle.
Children could open the driver's door and unintentionally activate the easy-entry/exit feature, which could result in an accident and/or serious personal injury.
•► Press the button on the
steering wheel to select the Sett. menu.
•► Press the button to select the
Convenience submenu.
•► Press the button to confirm.
•► Press the button to select the
Easy Entry/Exit function.
If the Easy Entry/Exit function is activated, the vehicle steering wheel is displayed in red in the multifunction display.
•► Press the button to save the
setting.
Switching the belt adjustment on/off
For further information on belt adjustment
•► Press the button on the
steering wheel to select the Settings
menu.
•► Press the button to select the
Convenience submenu.
•► Press the button to confirm.
•► Press the button to select the
Belt Adjustment function.
When the Belt Adjustment function is activated, the vehicle seat belt is displayed in red in the multifunction display.
•► Press the button to save the
setting.
Switching the Fold in mirrors when locking function on/off
This function is only available in Canada.
If you switch on the Auto. Mirror Folding function, the exterior mirrors fold in when you lock the vehicle. If you unlock the vehicle and then open the driver's or frontpassenger door, the exterior mirrors fold out again.
If you have switched the function on and you fold the exterior mirrors in using the button on the door (Y page 109), they will not fold out automatically. The exterior mirrors can then only be folded out using the button on the door.
•► Press the button on the
steering wheel to select the Sett. menu.
•► Press the button to select the
Convenience submenu.
•► Press the button to confirm.
•► Press the to select the
Auto. Mirror Folding function.
If the Auto. Mirror Folding function is activated, the vehicle's exterior mirror is displayed in red in the multifunction display.
•► Press the button to save the
setting.
Resetting to factory settings
For safety reasons, the Day Lights function in the Lights submenu is only reset when the vehicle is stationary.
•► Press the button on the
steering wheel to select the Settings
menu.
•► Press the button to select the
Factory Setting submenu.
•► Press the button to confirm.
The Reset All Settings? message appears.
•► Press the button to select No or Yes.
•► Press the button to confirm the
selection.
If you select Yes, the multifunction display shows a confirmation message.
AMG menu in AMG vehicles
AMG displays
•► Press on the steering wheel
to select the AMG menu.
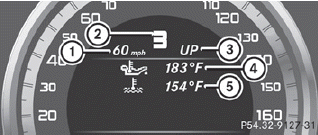
1. Digital speedometer
2. Gear indicator
3. Upshift indicator
4. Engine oil temperature
5. Coolant temperature
Upshift indicator UP 3 indicates that the engine has reached the overrevving range when in the manual gearshift program.
Upshift indicator UP 3 fades out other messages until you have shifted up.
When the engine oil temperature is below 80 °C, the oil temperature is shown in blue.
Avoid driving at full engine output during this time.
SETUP
SETUP shows the drive program, the ESP® (Electronic Stability Program) mode and the SPORT handling mode.
•► Press on the steering wheel
to select the AMG menu.
•► Press the  button repeatedly until
SETUP is displayed.
button repeatedly until
SETUP is displayed.
or
•► Briefly press the AMG button on the center
console.
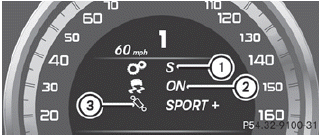
1. Drive program (C/S/S+/M)
2. ESP® mode (ON/OFF) or SPORT handling
mode (SPORT)
3. Suspension tuning (COMFORT/SPORT/
SPORT+)
RACETIMER
Displaying and starting RACETIMER
![]() WARNING
WARNING
The RACETIMER feature is only for use on
roads and in conditions where high speed
driving is permitted. Racing on public roads is
prohibited under all circumstances. The driver
is and must always remain responsible for
following posted speed limits.
You can use the RACETIMER to store lap times.
•► Press on the steering wheel
to select the AMG menu.
•► Press the  button repeatedly until
the
RACETIMER is shown.
button repeatedly until
the
RACETIMER is shown.
If RACETIMER is selected, the menu bar
cannot be called up with the  and
and  buttons.
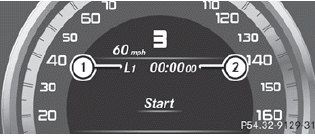
1. Lap
2. RACETIMER
You can start the RACETIMER when the engine is running or if the SmartKey is in position 2 in the ignition lock.
•► To start: press the button to
start the
RACETIMER.
Displaying the intermediate time
•► Press to select Interm.
Time.
•► Press the button to confirm.
The intermediate time is displayed for five seconds.
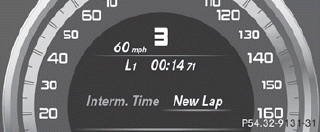
Starting a new lap
It is possible to store a maximum of sixteen laps.
•► Press to confirm New Lap.
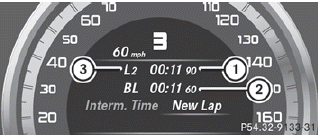
1. RACETIMER
2. Fastest lap time (best lap)
3. Lap
Stopping the RACETIMER
•► Press the button on the
steering
wheel.
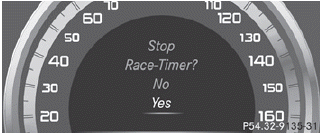
•► Press to confirm YES.
The RACETIMER interrupts timing when you
stop the vehicle and turn the SmartKey to
position 1 in the ignition lock. When you turn
the SmartKey to position 2 or 3 and then
press the to confirm Start, timing
is
continued.
Resetting the current lap
•► Stop the RACETIMER.
•► Press to select Reset Lap.
•► Press to reset the lap time to "0”.
Deleting all laps
If you switch off the engine, the RACETIMER is reset to "0" after 30 seconds. All laps are deleted.
You cannot delete individual stored laps. If you have stopped 16 laps, the current lap does not have to be reset.
•► Reset the current lap.
•► Press to confirm Reset.
Reset Race Timer? appears in the multifunction display.
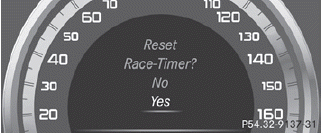
•► Press the button to select Yes
and
press the button to confirm.
All laps are deleted.
Overall evaluation
This function is shown if you have stored at least one lap and stopped the RACETIMER.
•► Press on the steering wheel
to select the AMG menu.
•► Press the button repeatedly until
the
overall evaluation is shown.
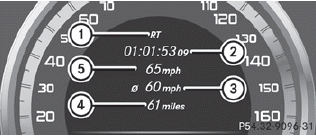
1. RACETIMER overall evaluation
2. Total time driven
3. Average speed
4. Distance covered
5. Top speed
Lap evaluation
This function is only available if you have stored at least two laps and have stopped the RACETIMER.
•► Press on the steering wheel
to select the AMG menu.
•► Press the button repeatedly until
the
lap evaluation is shown.
Each lap is shown in a separate submenu.
The fastest lap is indicated by flashing symbol 1.
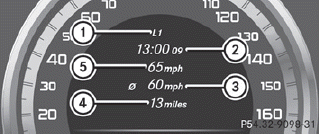
1. Lap
2. Lap time
3. Average lap speed
4. Lap length
5. Top speed during lap
•► Press the button to select a
different lap evaluation.


